
Sides
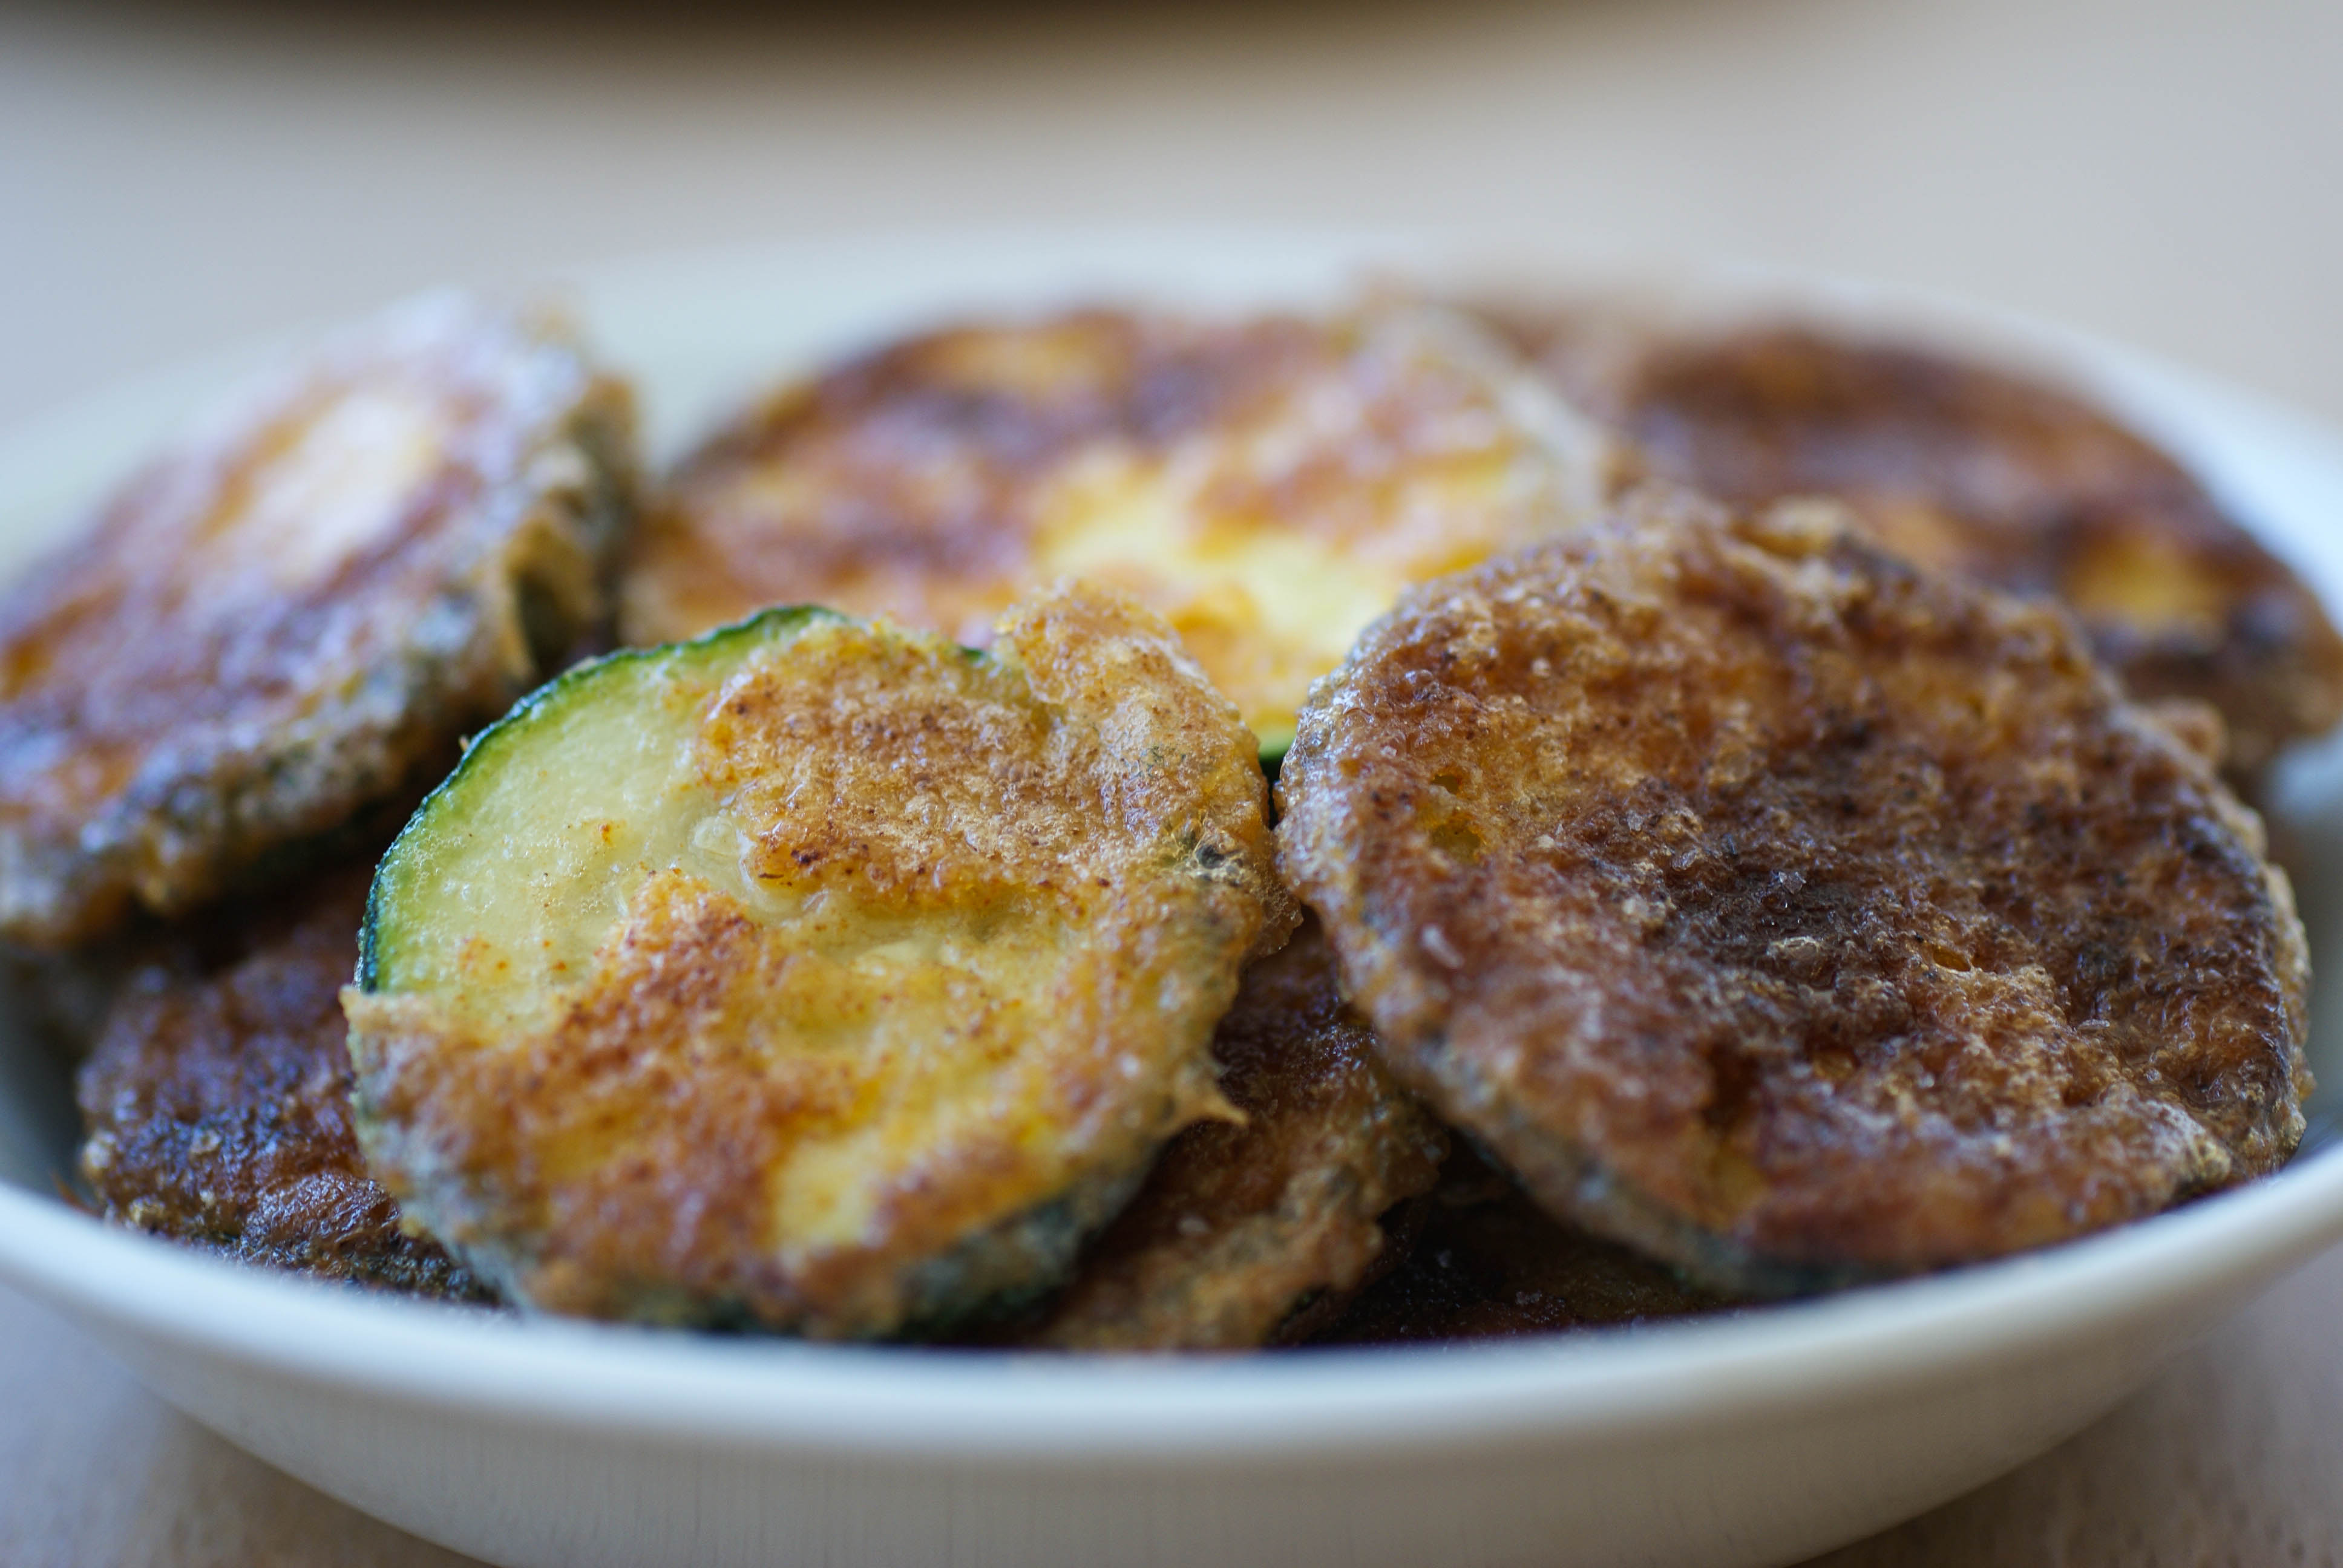
Paleo Fried Zucchini
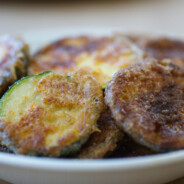
I seriously earned myself some “good wife points” when I cooked these up for my husband. I really don’t tolerate eggs, so these were off the menu for me. I did, however, sneak one or two to see how they turned out and I wanted to eat them all and suffer the egg consequences…but I didn’t. Fried zucchini is a total warm and fuzzy memory food for me. My grandma used to make them for me every time I visited.
You could eat these as is, or you could make a little dip to go with them. I whipped up a quick dip using about 1/4 cup homemade kefir, 1 Tablespoon pickle juice, salt, garlic and chopped dill. The dip was super delicious and I ate it on steak and broccoli while my husband had it on his zucchini 🙂
Paleo Fried Zucchini
Ingredients
- 1 medium large zucchini, diced into 1/4 inch rounds
- 2 Tablespoons coconut flour
- 1 Tablespoon arrowroot powder
- 1 Tablespoon paprika
- 1/2 teaspoon salt
- 1 egg
- 2 Tablespoons coconut milk
- 2 heaping tablespoons ghee for frying
Instructions
- Put the coconut flour, arrowroot powder, salt and paprika into a large ziplock bag and give it a good shake to combine.
- Now toss in the diced zucchini and shake the bag again to coat all the zucchini rounds.
- With a fork, whisk together the egg and the coconut milk in a shallow bowl.
- Heat the ghee (or coconut oil or other oil of your choice) in a large frying pan over medium high heat.
- Dip each flour coated zucchini round into the egg/milk mixture and place in the frying pan.
- Fry for 2 minutes or so before flipping. If the coating sticks to the pan instead of the zucchini, you flipped too soon.
- Remove from the pan to drain on paper towels.
Whole 30 and Paleo Mini Sweet Potato Gratin

I made a huge sweet potato gratin years ago for a paleo feast in a Swiss forest hut (read about the feast here), and it was delicious. Since I’m usually just cooking for two, I decided to scale it down and make mini portions in silicon muffin cups. Plus, like I said, this stuff is delicious and having it in “mini” form helps me with portion control 🙂

These are really easy and quick to make. I eat Whole 30 pretty much always, so these are definitely allowed. Share with your Whole 30 friends; they’ll thank you.
This recipe made six mini gratins which served two people (I had two and he had four). 
Ingredients
- 4 pieces of bacon, diced and browned
- 1 sweet potato, peeled and sliced thin with a mandolin
- 1 medium onion, sliced thin with a mandolin
- coconut milk, about 100ml/ 1/2 cup
- salt and pepper
- green onion for garnish
Instructions
- Dice and brown your bacon and set it aside to cool.
- Peel and slice the sweet potato thin with a mandolin. If you don't have a mandolin, you can do it with a knife but will probably end up with thicker slices (which is fine, but may alter cooking time a bit).
- Slice the onion thin with the mandolin as well.
- Get you muffin cups ready. I used silicon and did not grease them. If you are using a tin muffin pan, I would grease it first.
- Now lay 2 slices of sweet potato into each cup and then a slice of onion and give it a quick pinch of salt and pepper.
- Repeat the layers until your muffin cup is filled as full as you can get it. It will shrink to about half full in the oven. The top layer should be potato.
- Add a few bacon crumbles to the top. Be sure to save half your crumbles to garnish with after they come out of the oven.
- Now pour some coconut milk over the top. I used about 2 Tablespoons per cup. You want it to drizzle down into the cup and to be all over the top potato, but you don't want it to be swimming in coconut milk either.
- Place into a pre-heated 375 F/ 190C oven and bake for 30-40 minutes. It took 30 minutes in my oven.
- Remove and let sit for 5-10 minutes in the muffin cups. Invert onto a serving plate and grnish with the remaining bacon crumbles and green onion.
Beet Greens
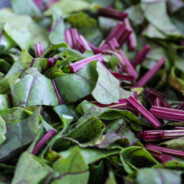
I picked up a bunch of beets from the Farmer’s Market the other day and was excited that all the greens were still attached. Whenever I get beets from the store, the greens have already been removed. I consider them a “bonus” that comes with the beets—kind of like the prize in the cereal box—two things for the price of one.

Farmer’s Market Beets
Beet greens are super nutritious. Here’s what I dug up on them:
“Besides supplying good amounts of protein, phosphorus, and zinc, beet greens are also a great source of fiber. Packed with antioxidants, they’re high in vitamin B6, magnesium, potassium, copper, and manganese, and low in fat and cholesterol. Based on a 2,000 calorie diet, daily values of beet greens contain: 220% of vitamin A, 60% of vitamin C, 16% of calcium, and 15% of iron.
As if that weren’t enough, studies have also shown that the vitamin K in beet greens contains blood clotting properties, helps ward off osteoporosis, works with calcium to boost bone strength, and may also play a role in fighting Alzheimer’s disease. Beet greens have a higher iron content than spinach, and a higher nutritional value than the beetroot itself.
The vitamin A content in beet greens helps strengthen the immune system and stimulates production of antibodies and white blood cells. The beta-carotene in vitamin A is a known antioxidant that can fight the effects of free radicals in the body along with cancer and heart disease. Doctors often recommend vitamin A to patients at risk of developing night blindness.”
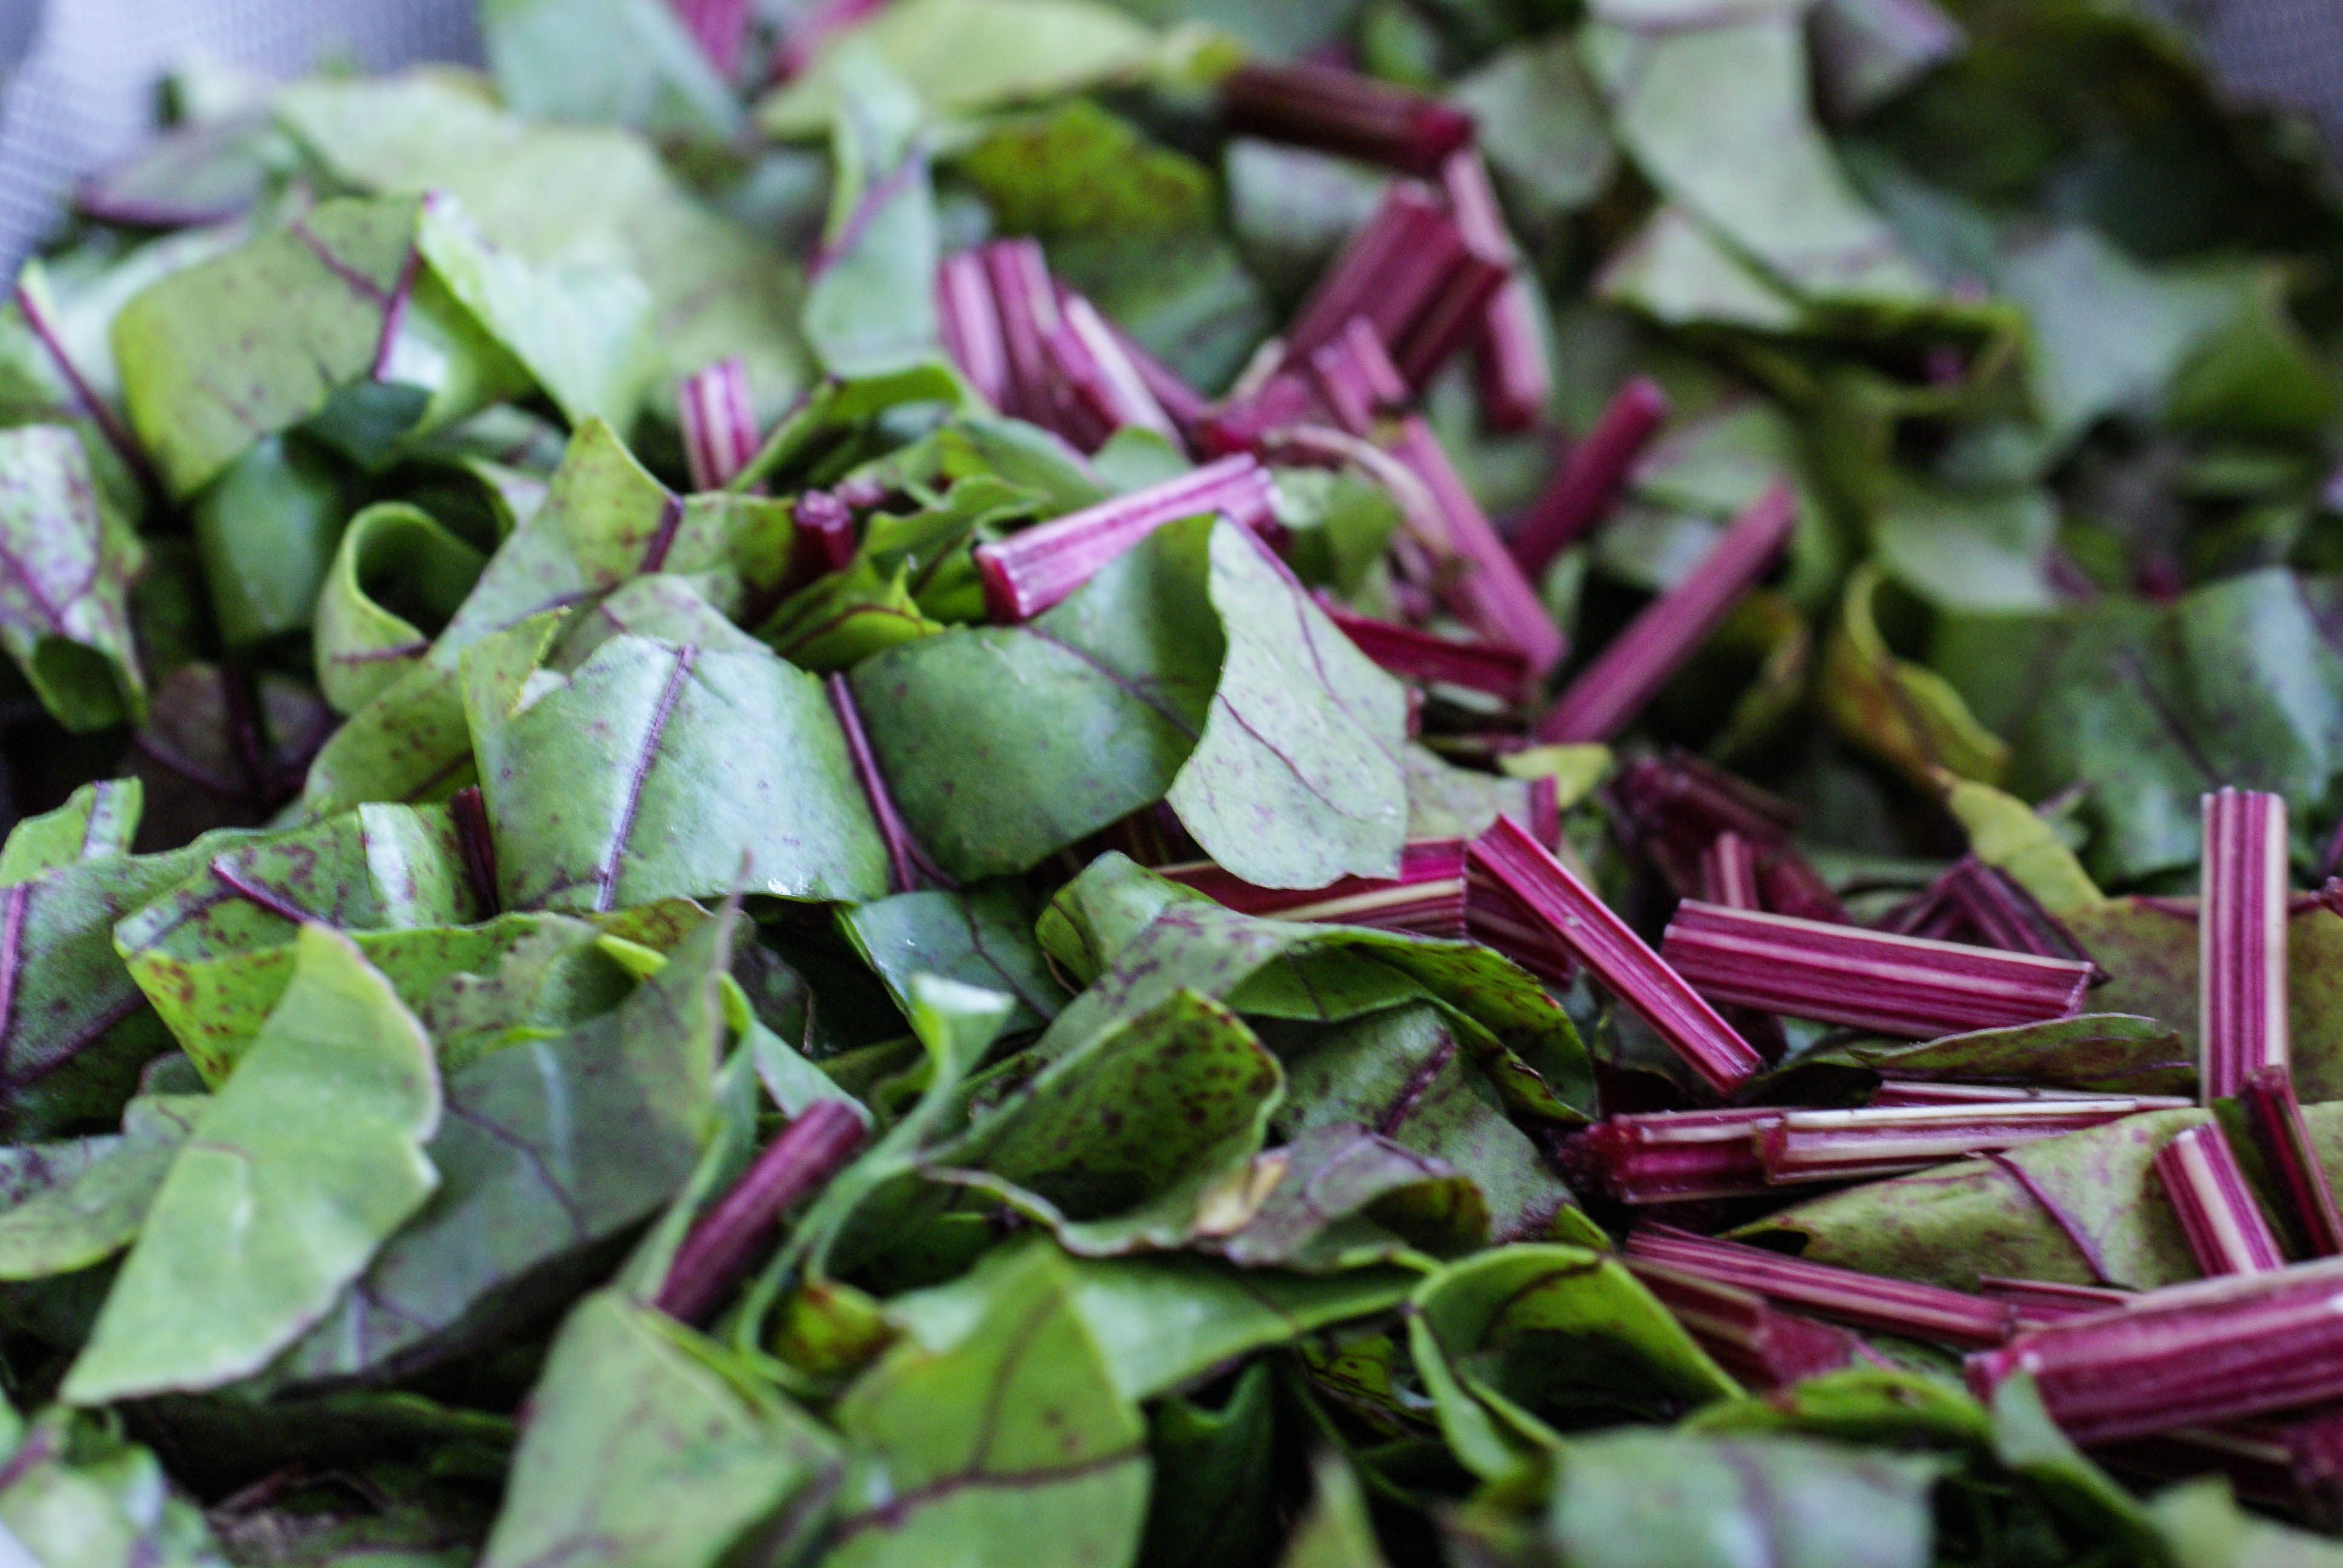
Cleaned, chopped and ready to cook
I love that they’re good for me, but I love how they taste even more.
Ingredients
- Greens and stems from 6 beets, washed and chopped
- 1 onion, diced
- 2 cloves garlic, minced
- 2 Tablespoons coconut oil
- Juice from half a lemon
- Salt and pepper to taste
Instructions
- Heat the coconut oil in a large frying pan over medium high heat.
- Add the onion and cook until translucent.
- Add in the garlic and cook until fragrant.
- Toss in the washed and shopped greens. Six beets seems like it makes a ton of greens, but it cooks down like spinach.
- Cook until wilted and until the stems are tender.
- Add the juice of one lemon and salt and pepper to taste.
- These are really good served cold the next day as well 🙂

Served with spare ribs, parsnip chips and fresh tomato
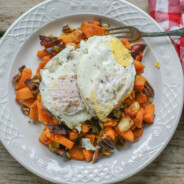
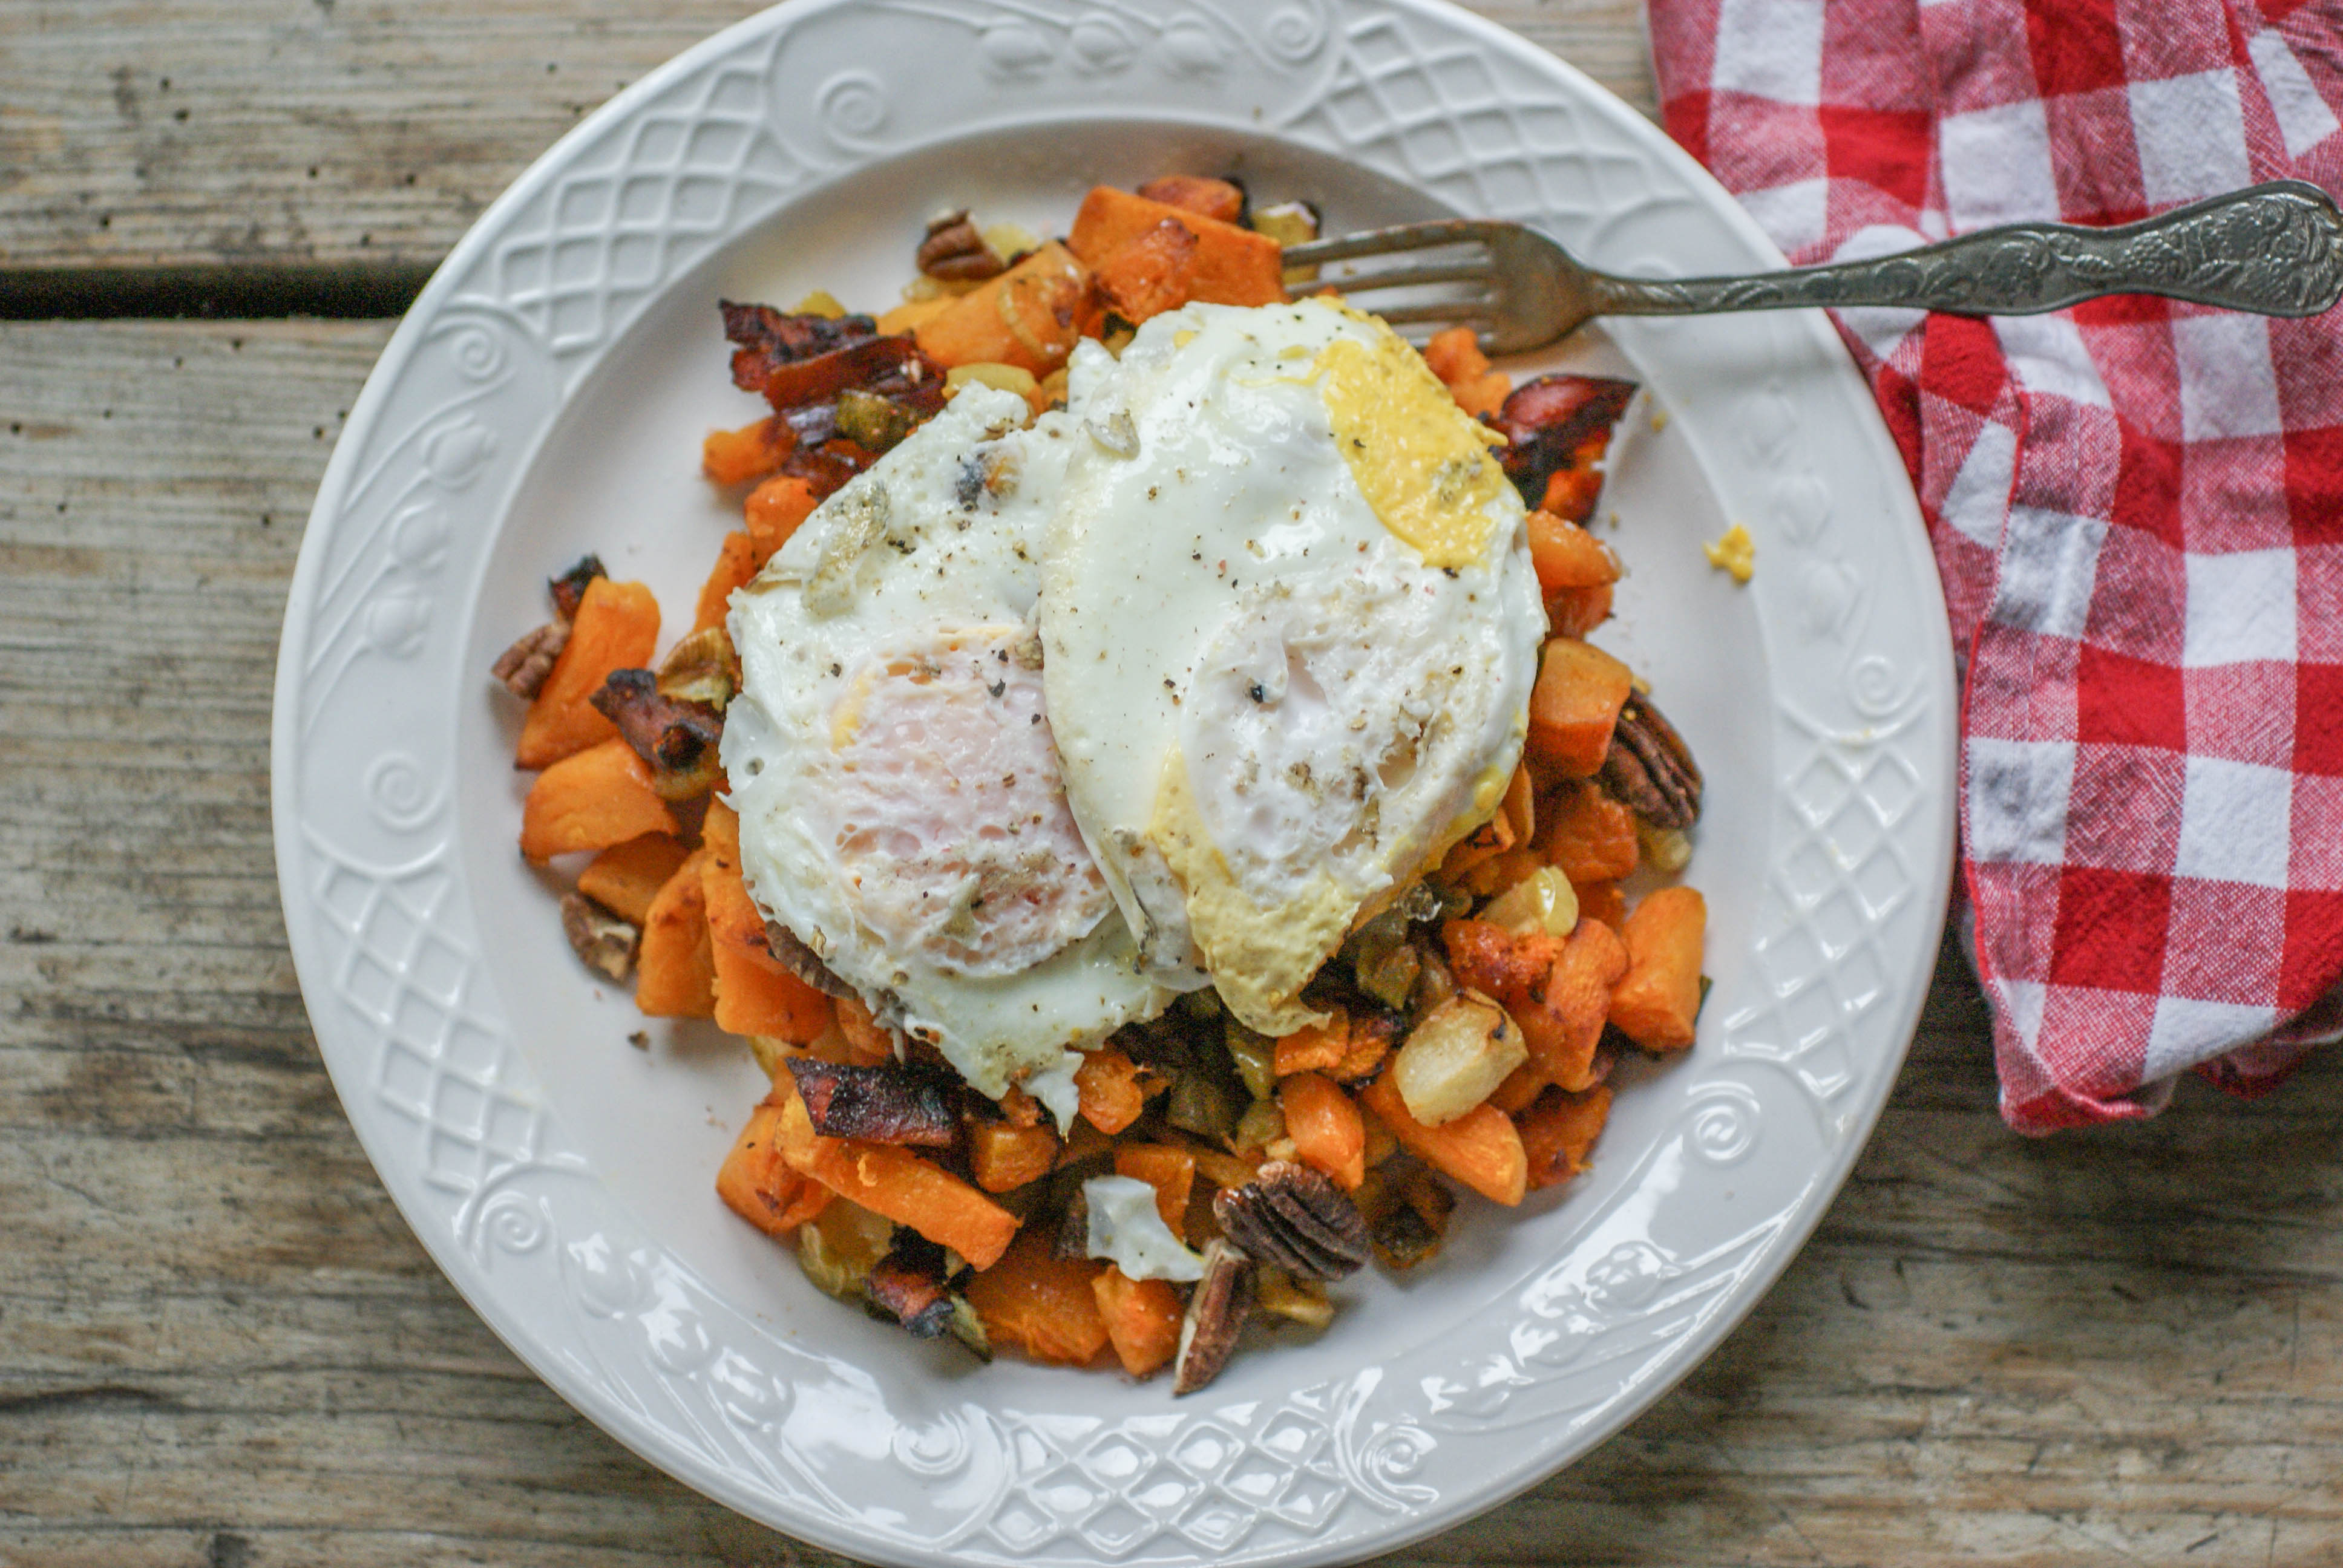
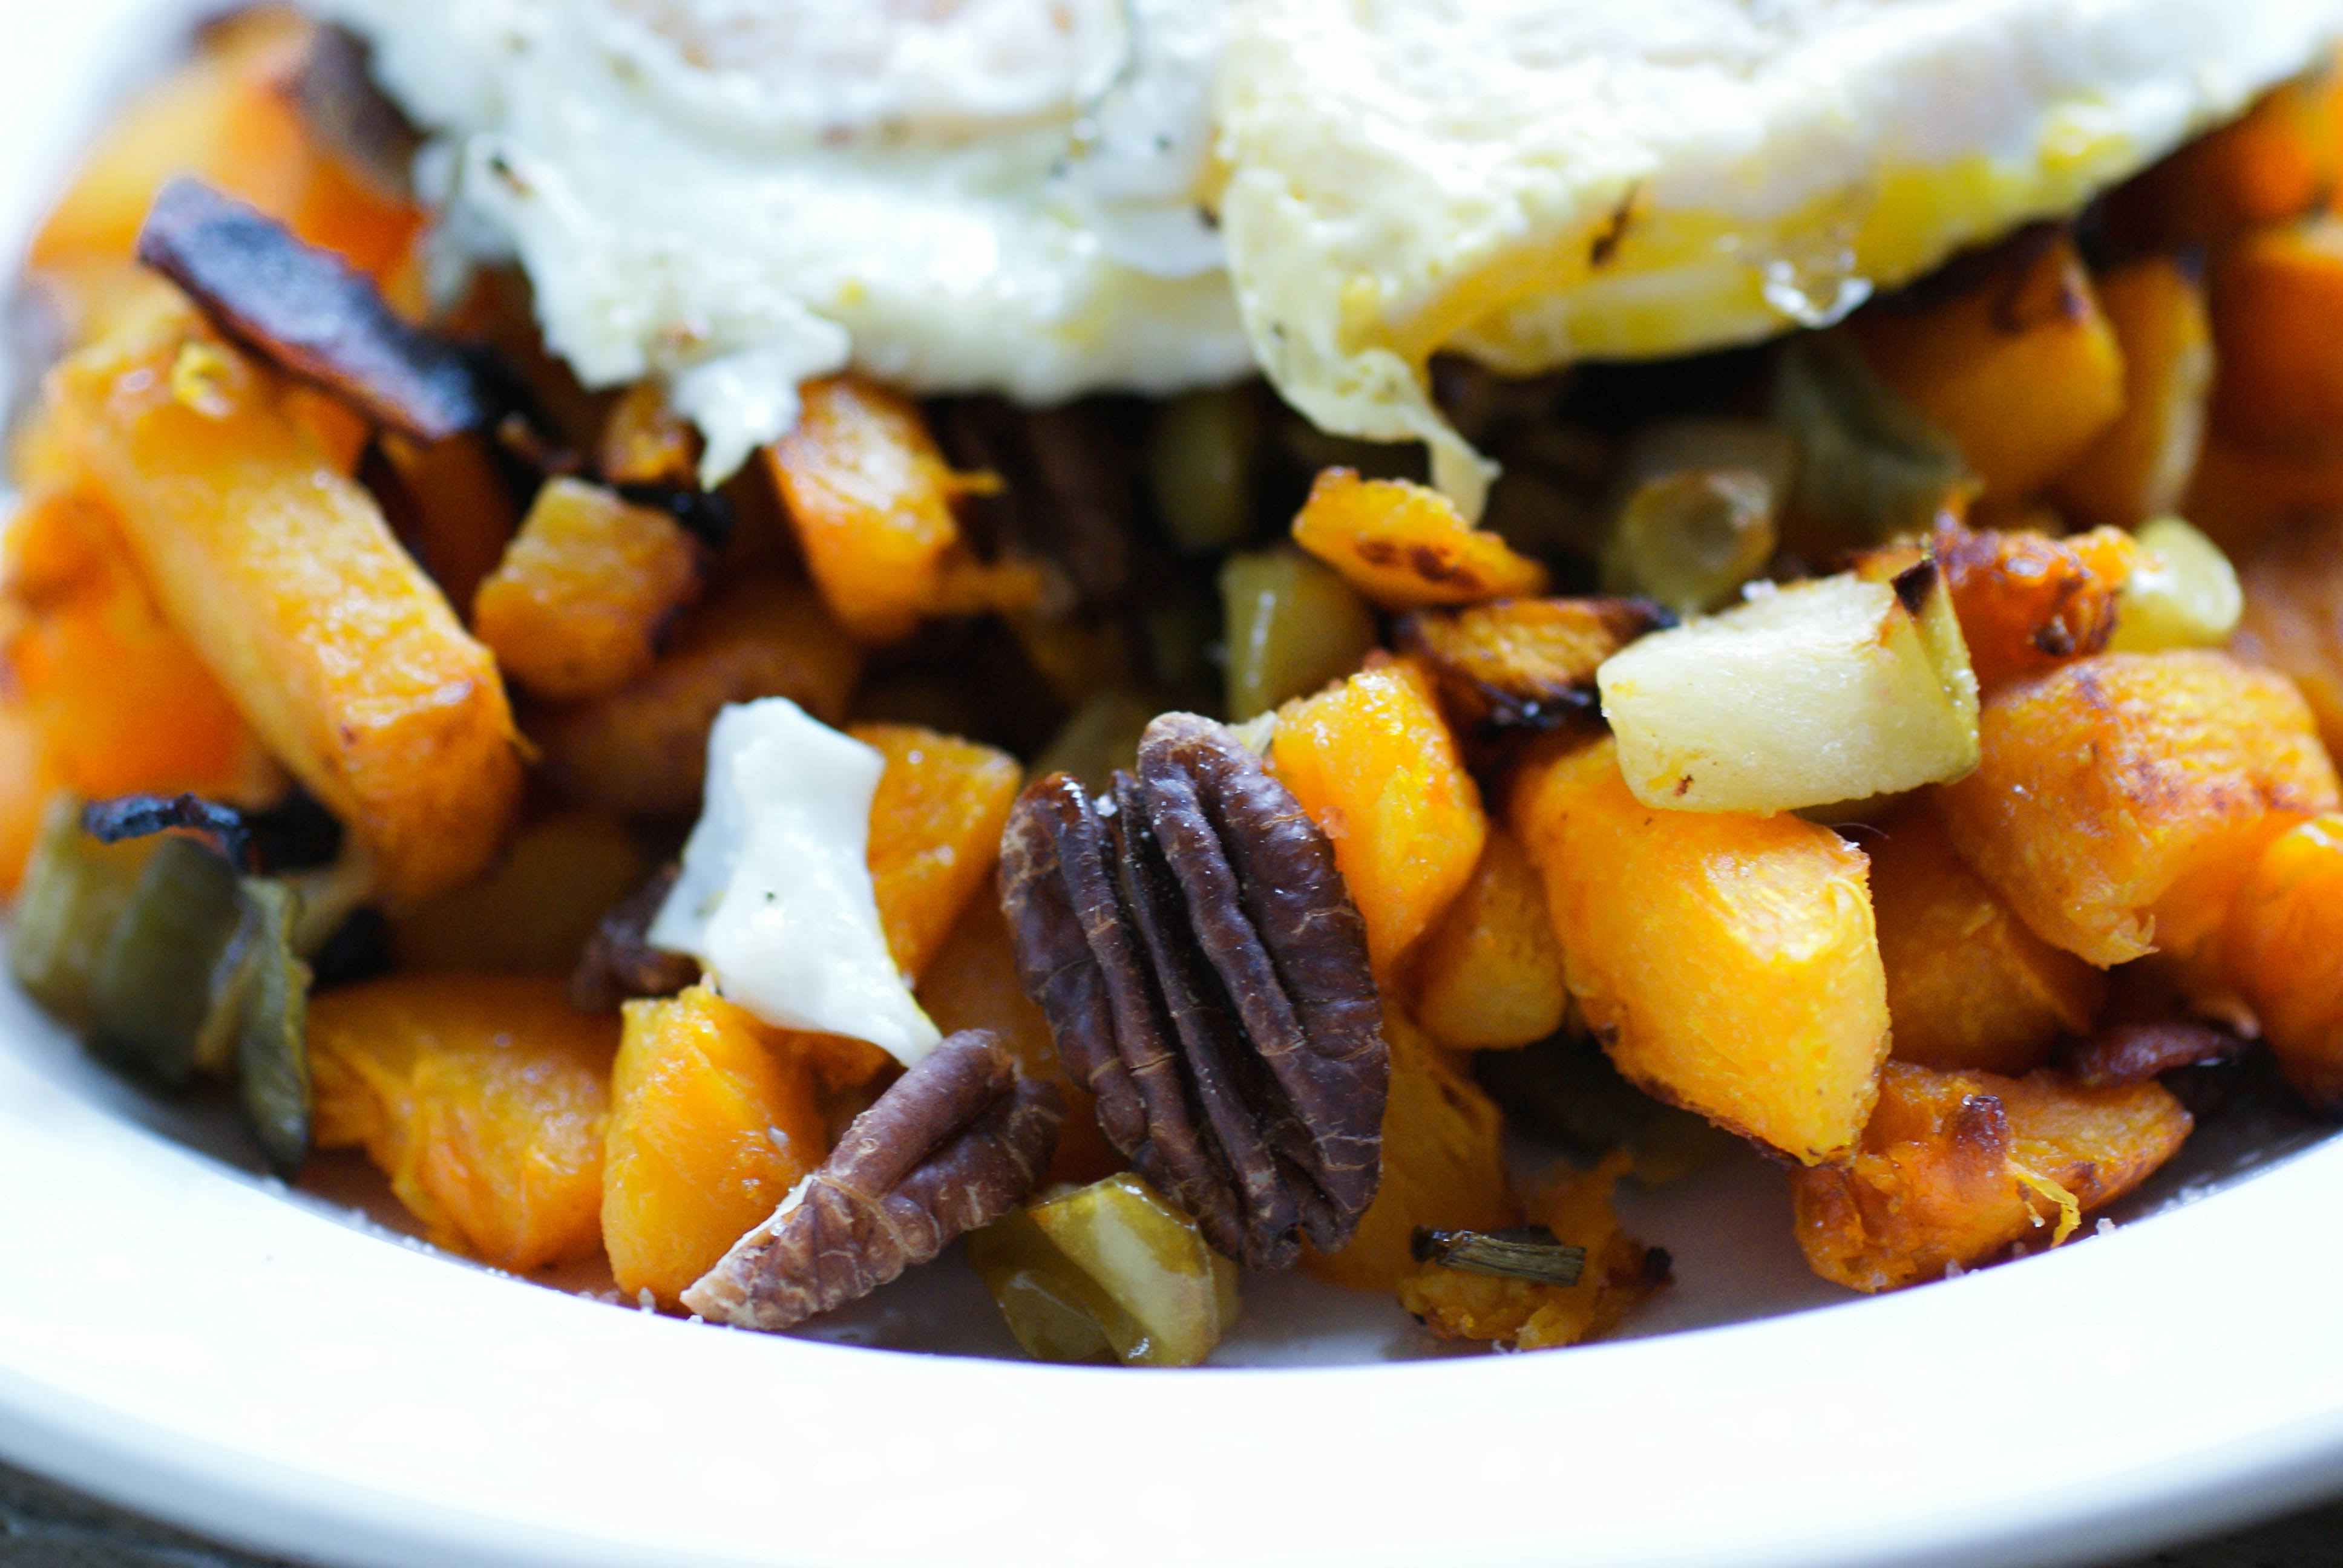
Butternut Squash Breakfast Hash
I’ve made something very similar to this before, only I used sweet potato instead of butternut squash. I needed to use up my last butternut squash of the year. It was a toss up between this recipe and this old favorite (which you can view and learn how to roast your squash with step by step instructions).
We totally enjoyed this and it kept us satisfied until lunchtime. We topped it with a few fried eggs 🙂
Breakfast Hash
Ingredients
- 1 medium size butternut squash, roasted ahead and diced (see this for how to roast it)
- bacon, amount is up to you! We used 8 thin slices, cooked and chopped
- 1 apple, diced (I used a green one)
- 1 spring onion, chopped
- 1/4 cup pecan nuts, chopped
- salt and pepper to taste
Instructions
- Cook the bacon in a frying pan until it’s as crispy as you like it. Remove it from the pan and set aside, but leave the grease in the pan.
- Add the diced butternut squash and chopped apple into the bacon grease and cook over medium heat until warm and until the apple starts to soften a bit (but you don’t want it to get mushy).
- Chop up the cooked bacon and add it back to the pan along with the chopped spring onions. Stir and cook until it’s all heated through.
- Toss in the chopped pecans and salt and pepper to taste.
- We topped our hash with fried eggs
Ingredients
- 1 medium size butternut squash, roasted ahead and diced
- bacon, amount is up to you! We used 8 thin slices, cooked and chopped
- 1 apple, diced (I used a green one)
- 1 spring onion, chopped
- 1/4 cup pecan nuts, chopped
- salt and pepper to taste
Instructions
- Cook the bacon in a frying pan until it's as crispy as you like it. Remove it from the pan and set aside, but leave the grease in the pan.
- Add the diced butternut squash and chopped apple into the bacon grease and cook over medium heat until warm and until the apple starts to soften a bit (but you don't want it to get mushy).
- Chop up the cooked bacon and add it back to the pan along with the chopped spring onions. Stir and cook until it's all heated through.
- Toss in the chopped pecans and salt and pepper to taste.
- We topped our hash with fried eggs.
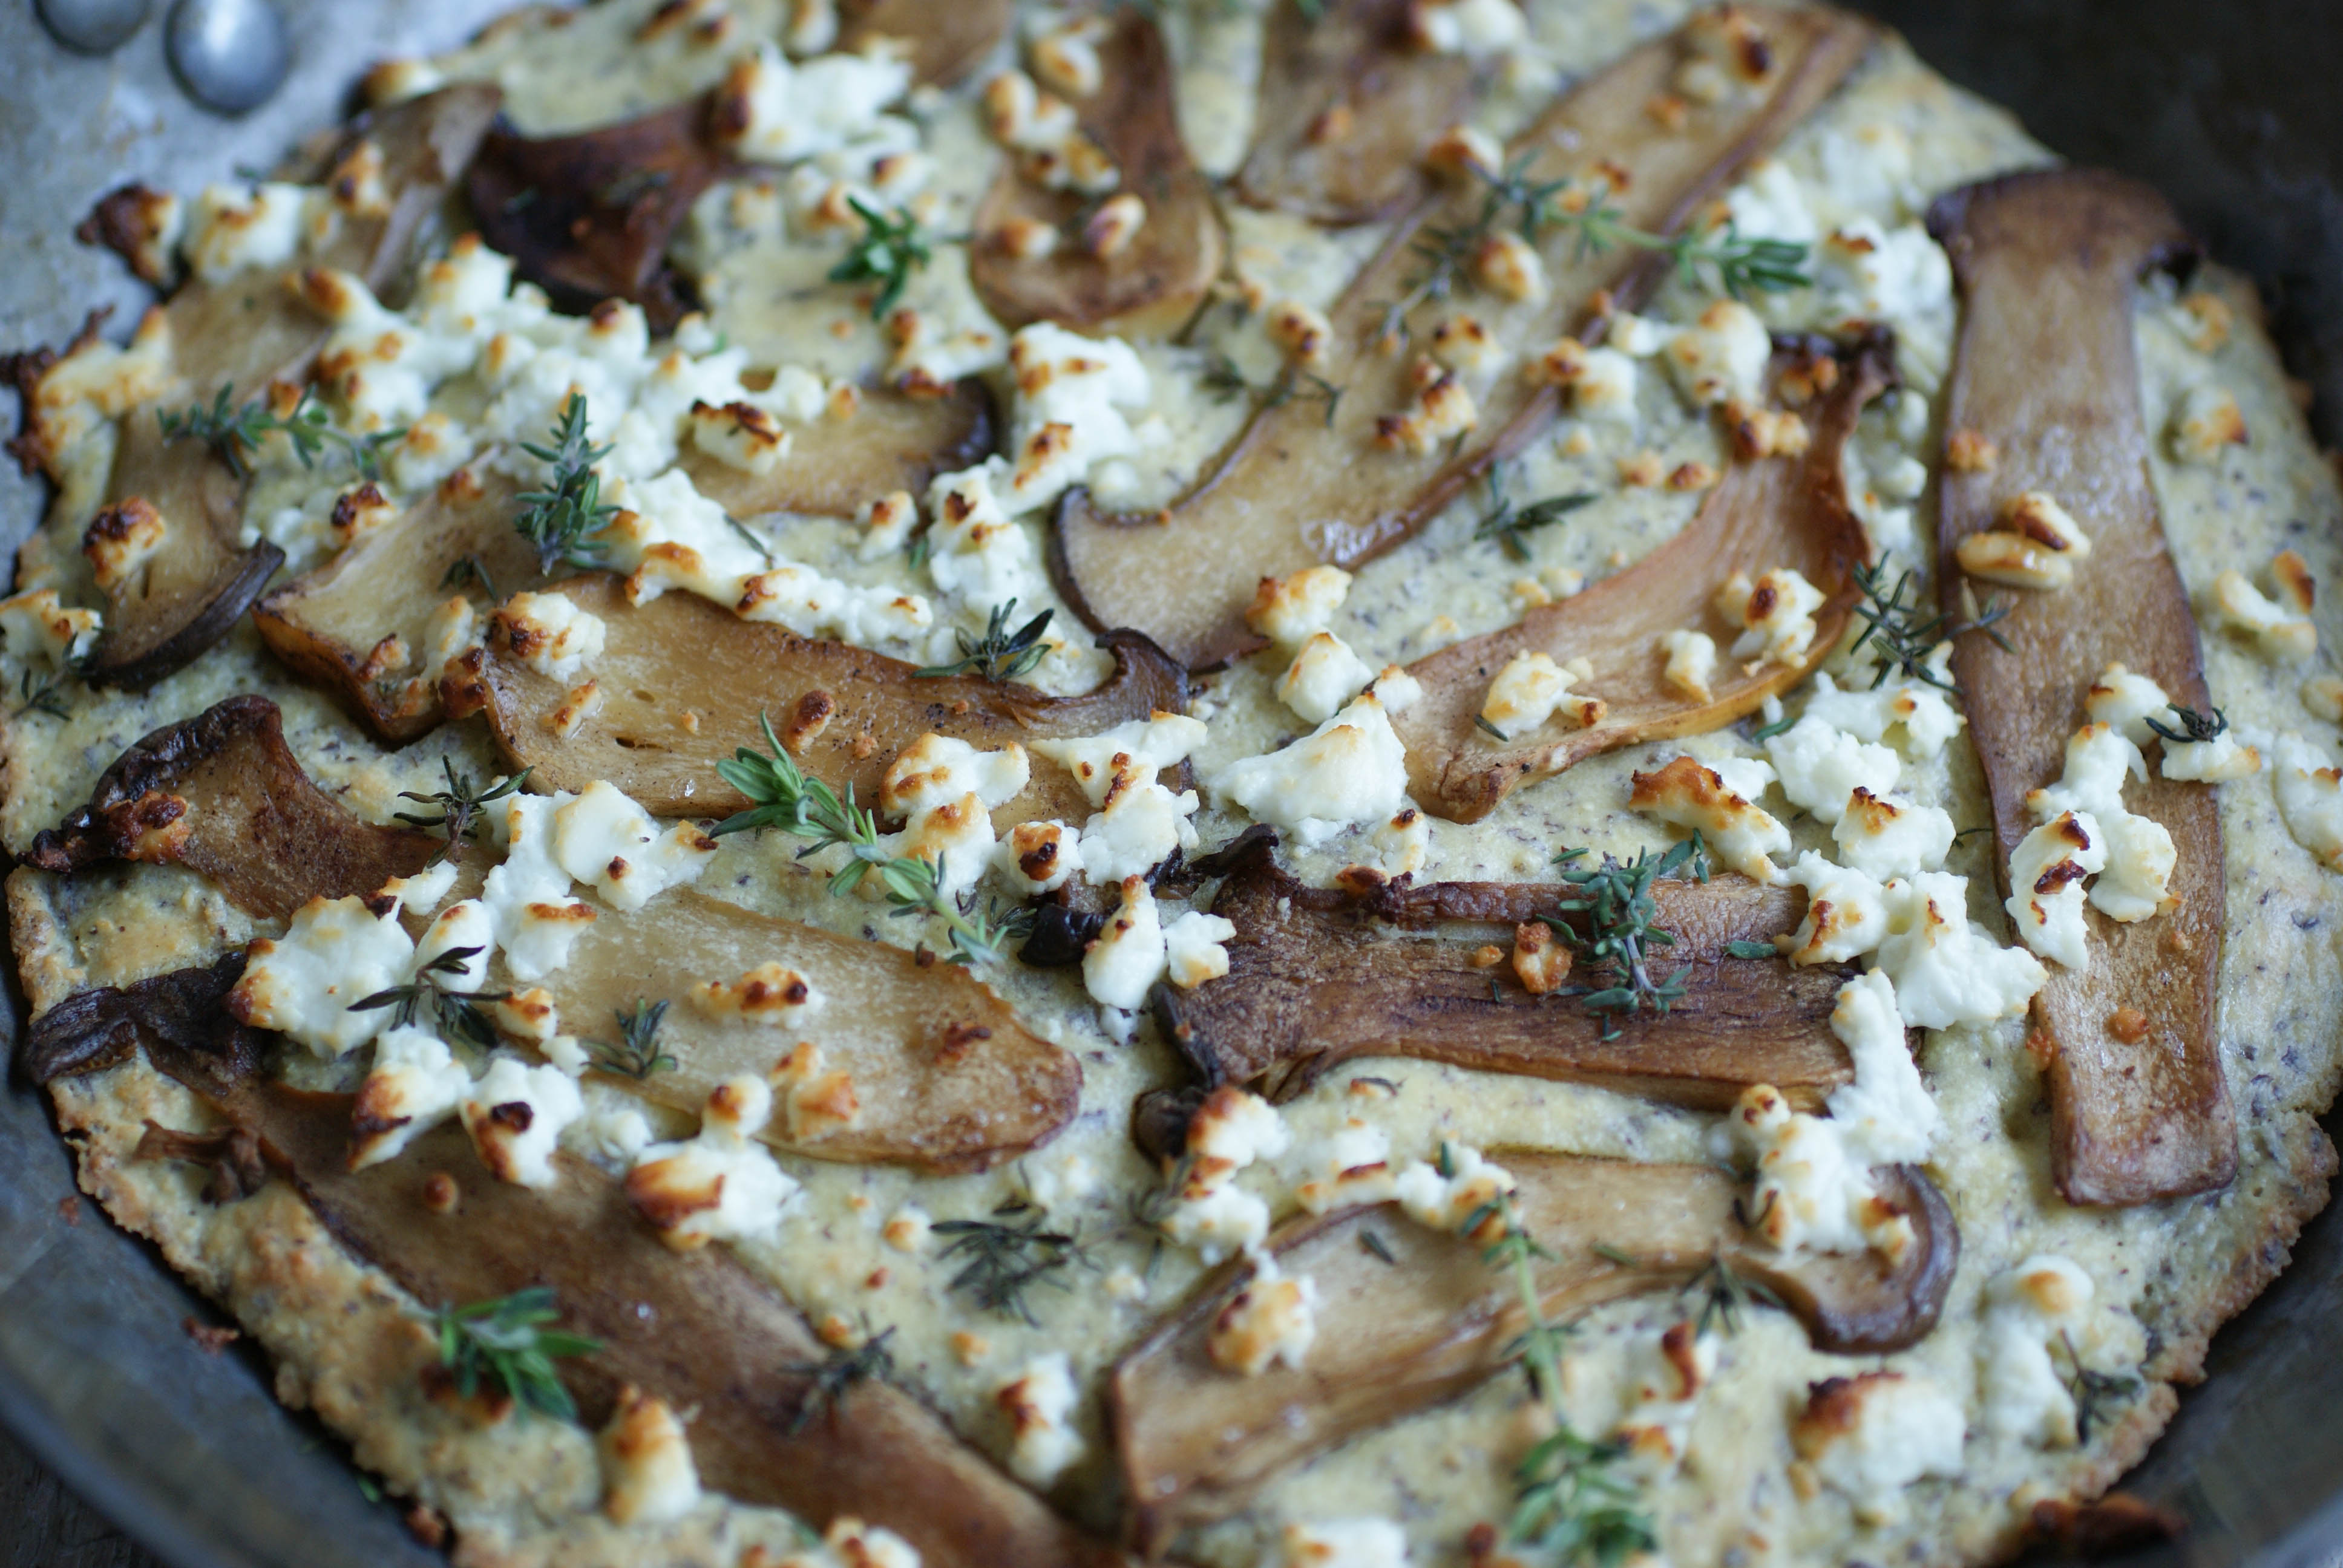
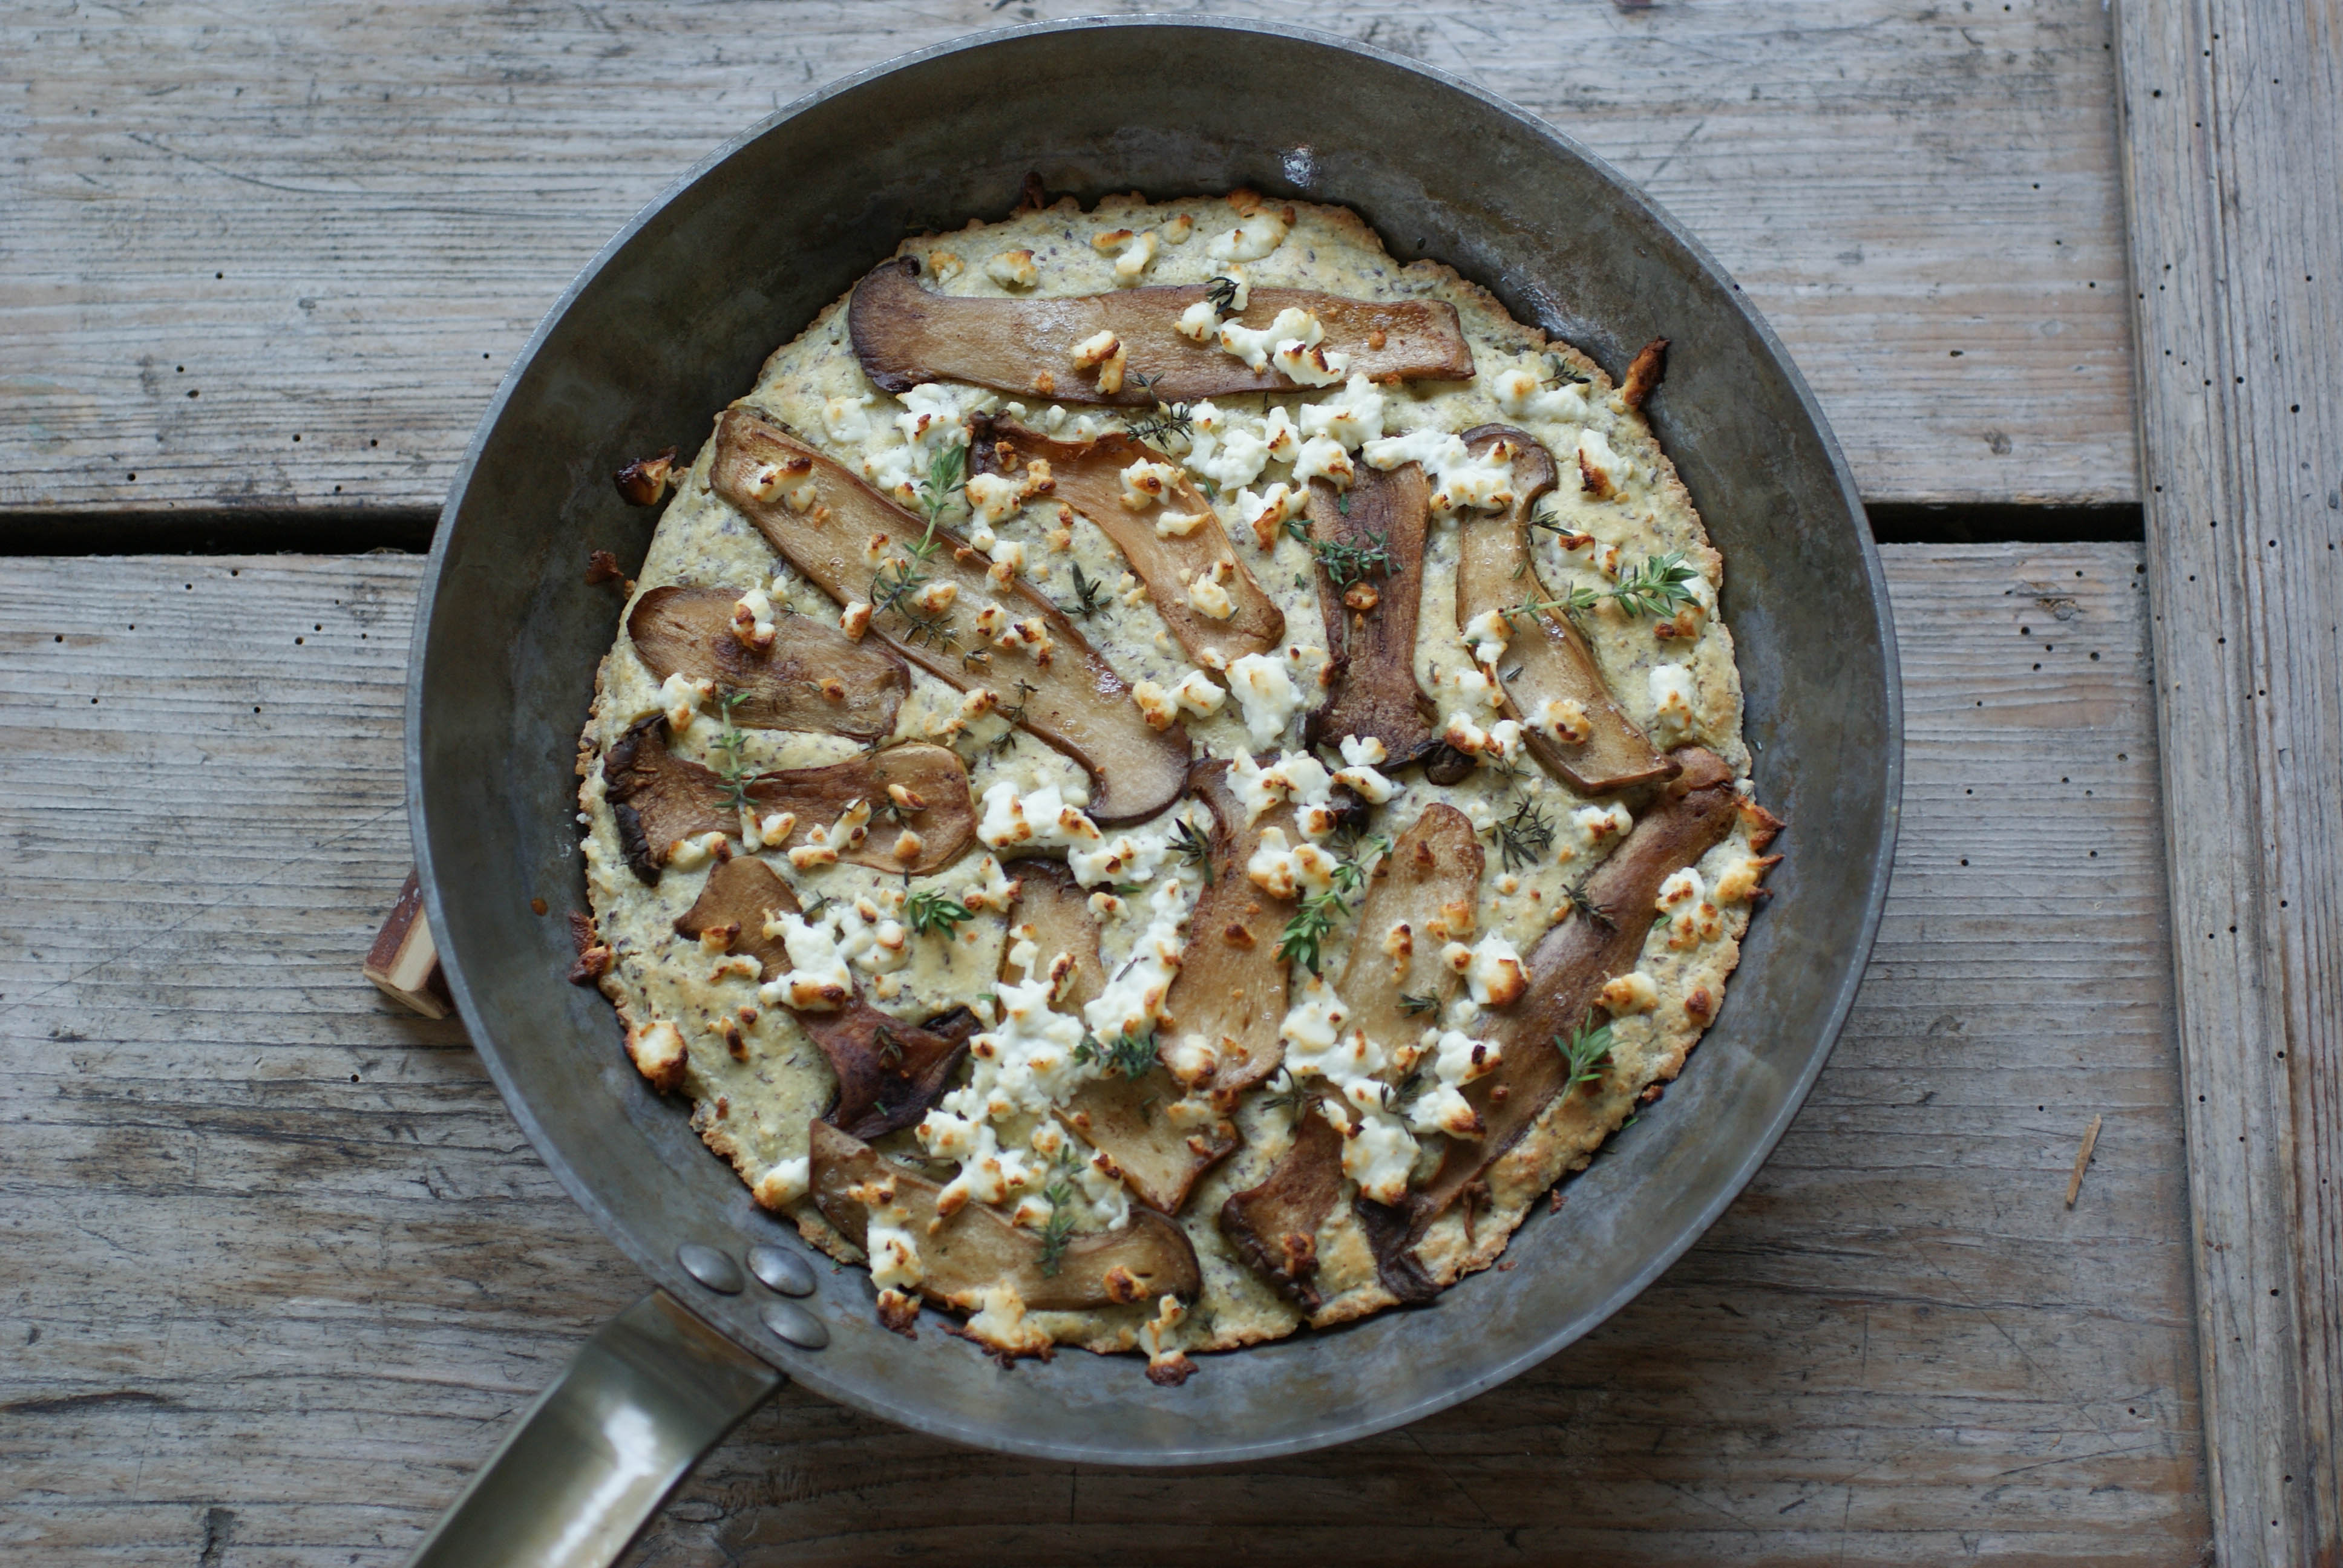
Mushroom Tart
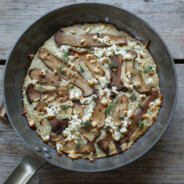
I have a Pinterest problem. I love to look at food. Most of what I look at is not paleo or anywhere close. I came across a mushroom tart on Pinterest and then just couldn’t get it out of my mind. It’s made with puff pastry and all kinds of decadent stuff. But, I really wanted it.
What I came up with may not be anything like the original, but it sure was good and now my craving is finally satisfied.
Mushroom Tart
I did use some dairy in this recipe, but you could leave it out or use a cashew nut ricotta instead. I’m totally fine with adding a bit of feta from sheep’s milk into my diet, but you need to decide for yourself what paleo means to you.
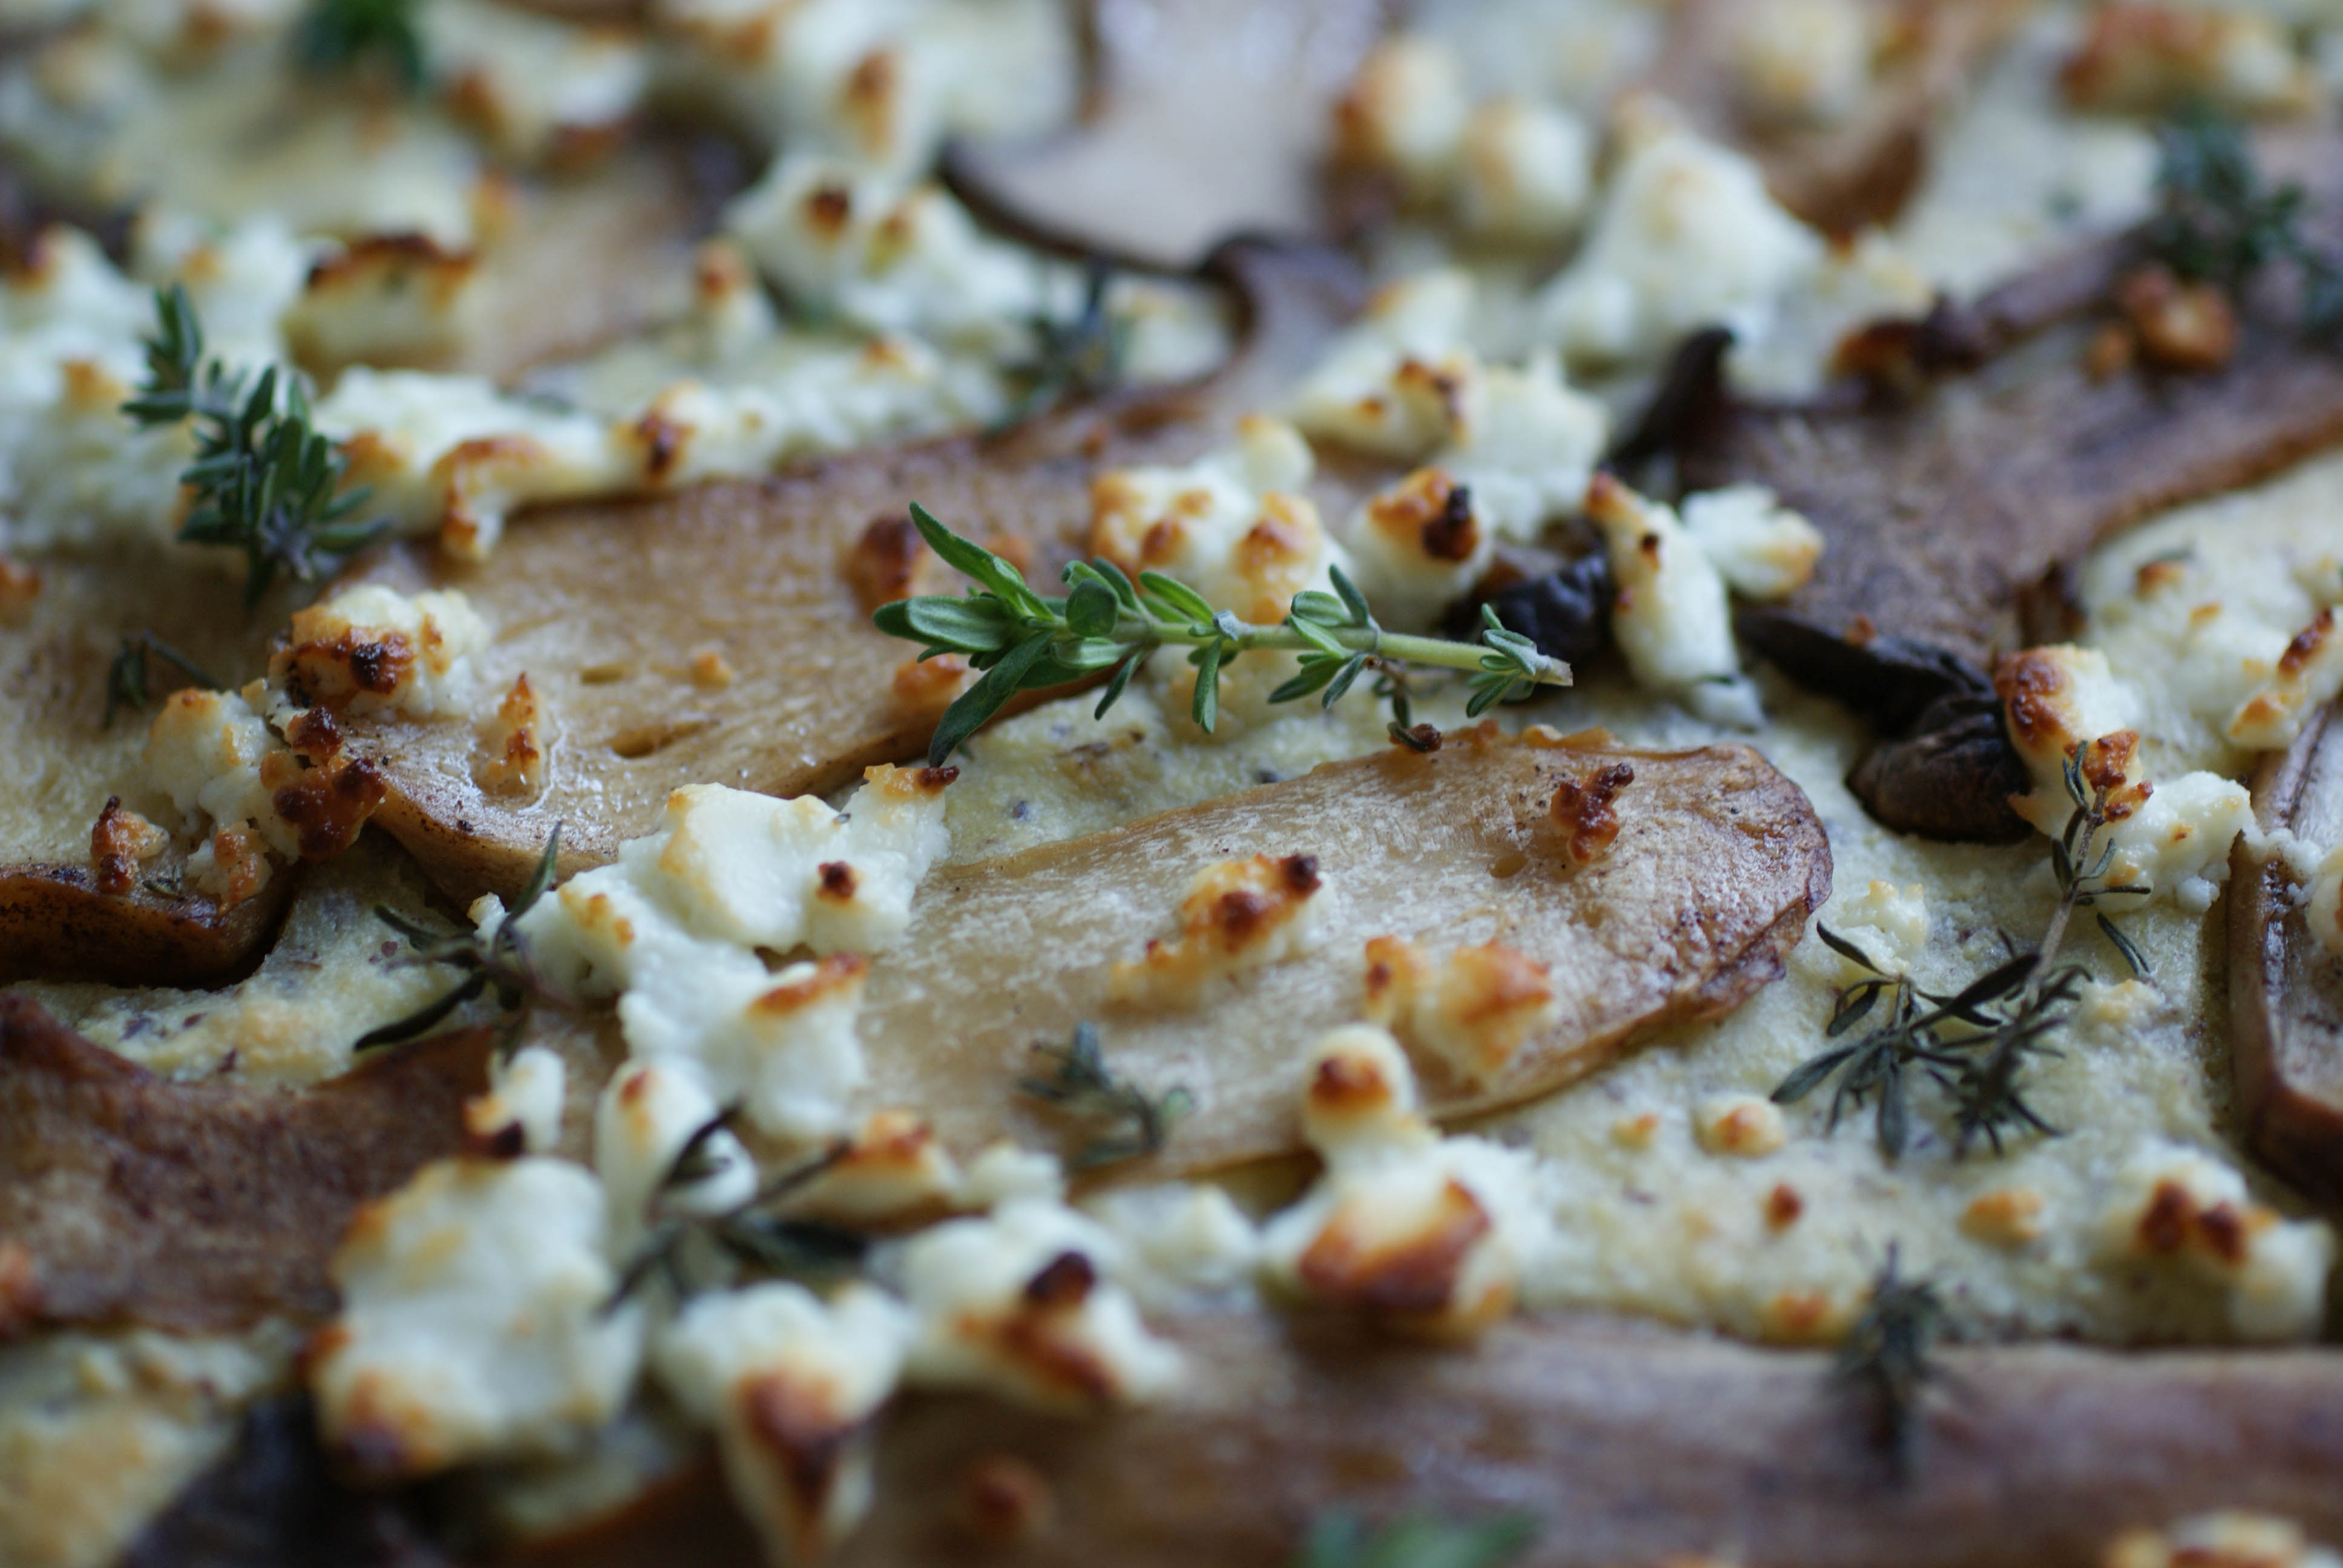
You should smell this right out of the oven
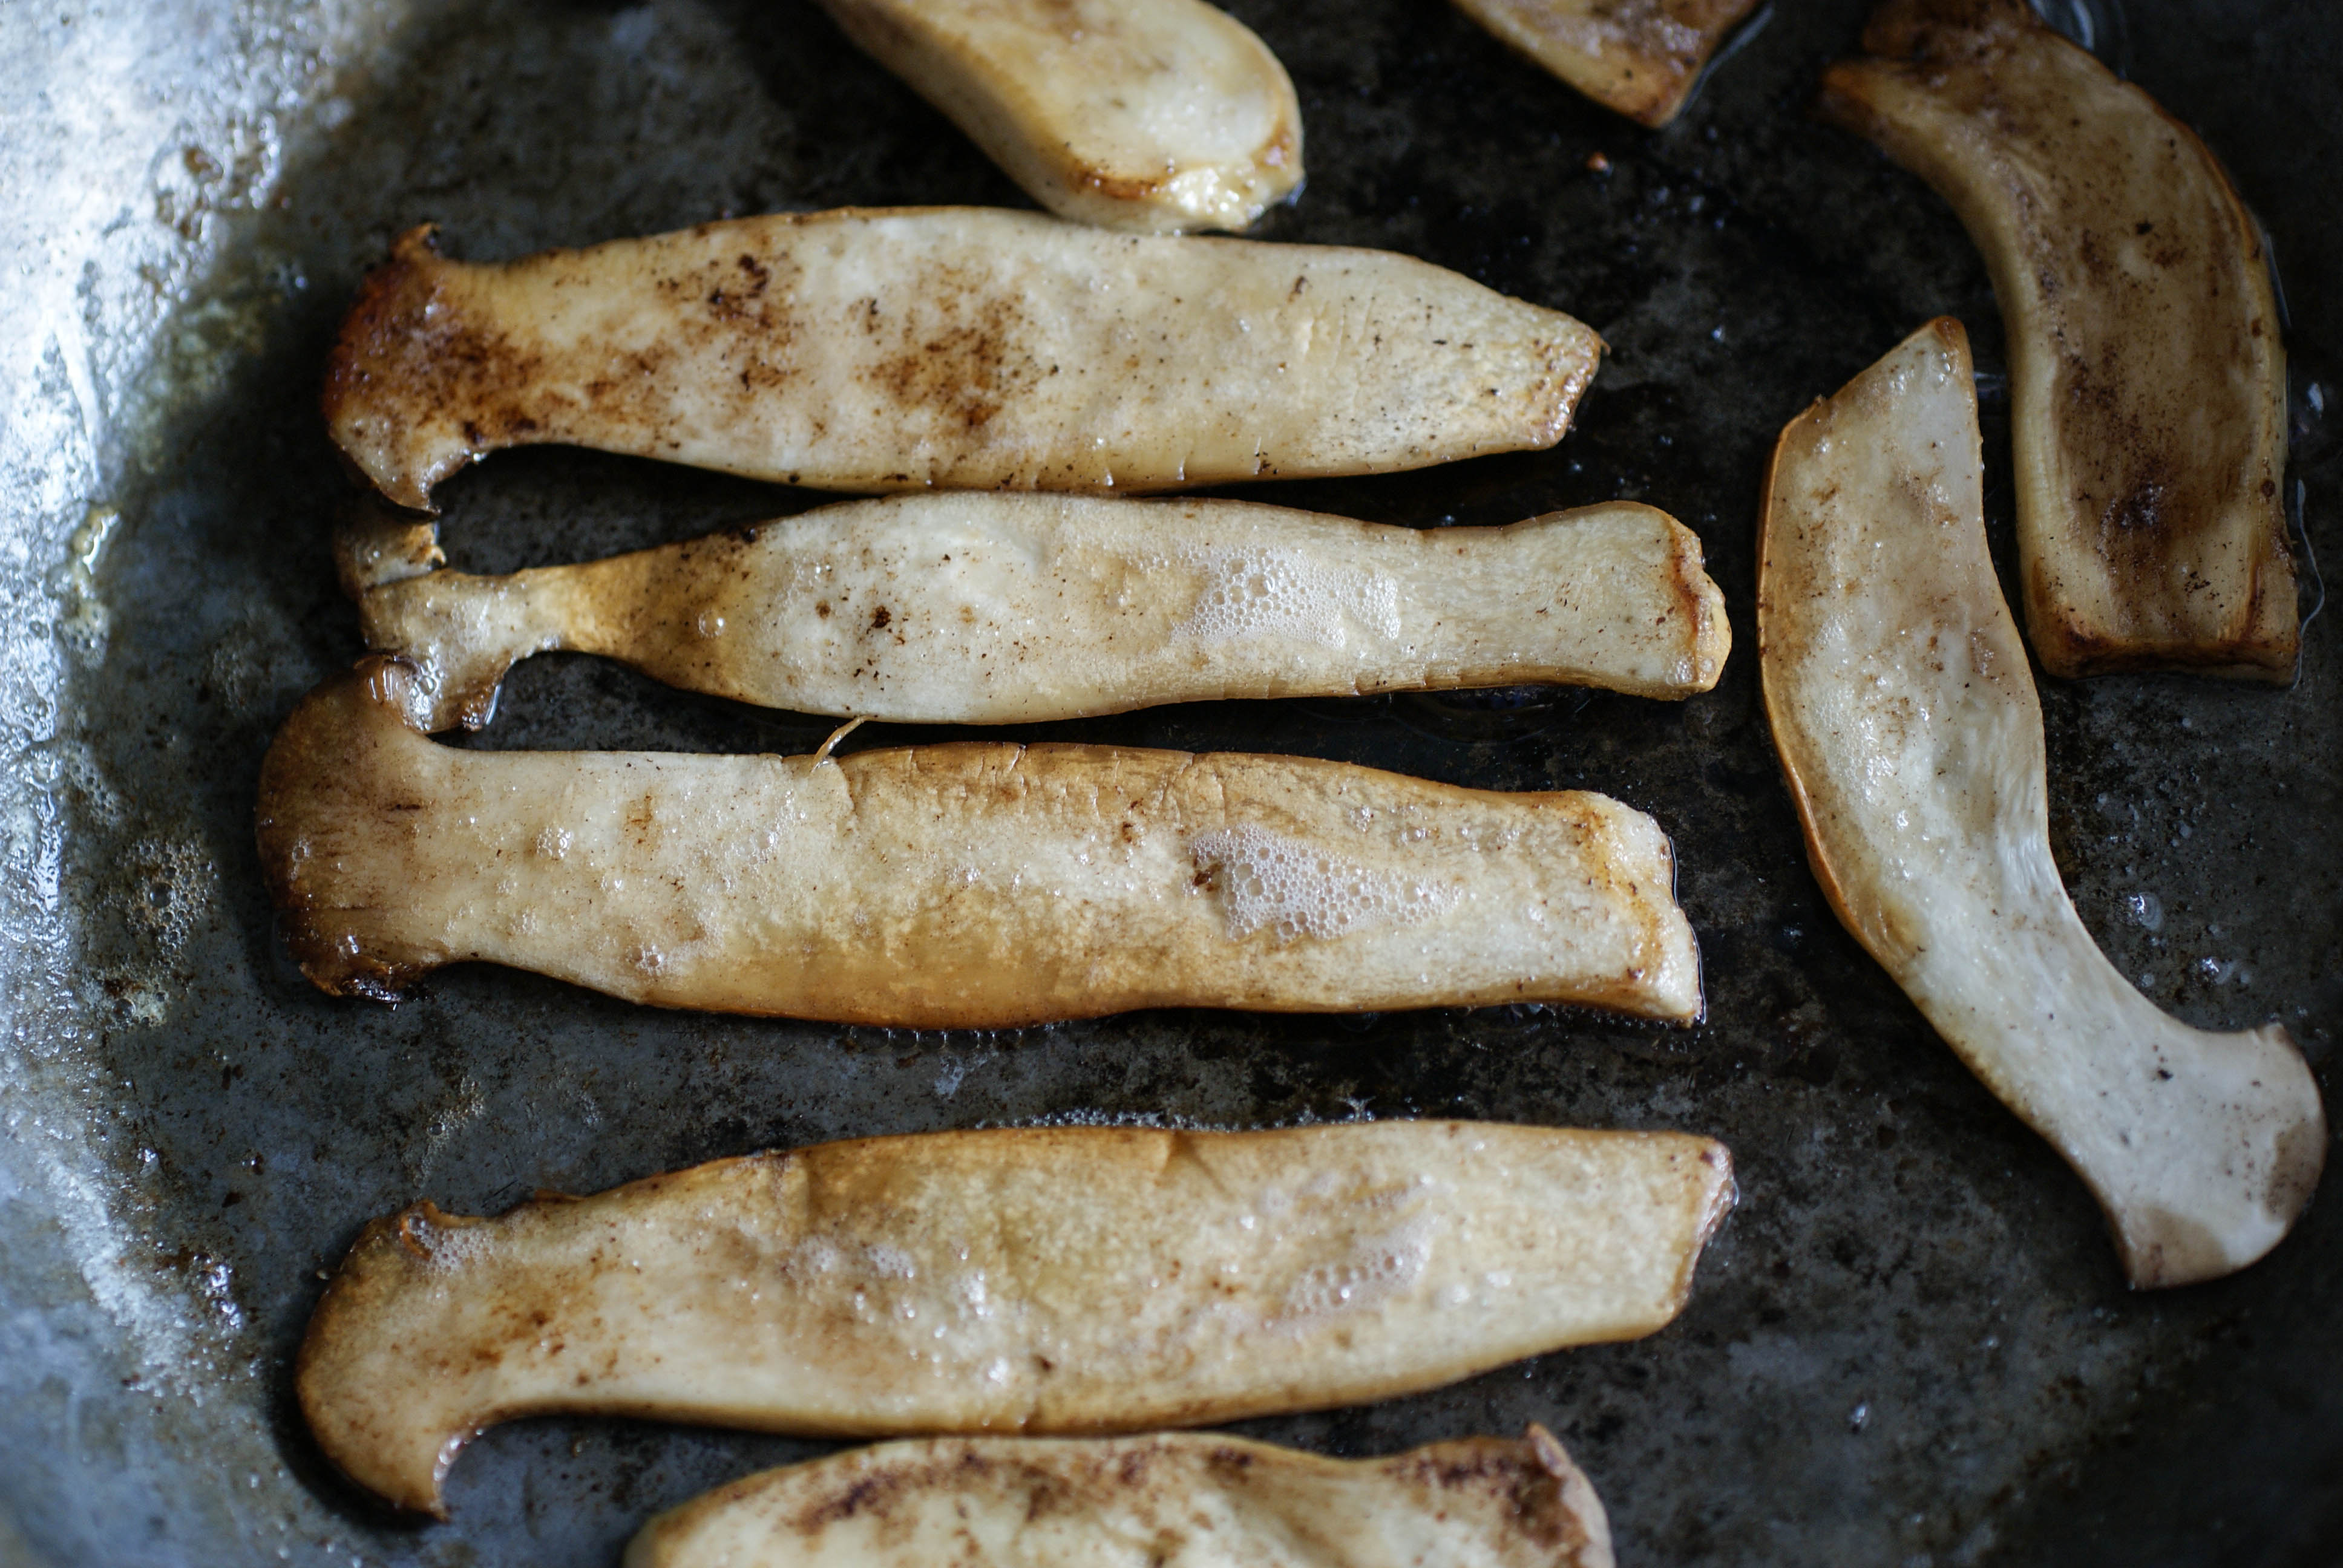
I used Kräuterseitlinge mushrooms which I think are called King Oyster mushrooms in English. They were pretty pricey, but it was worth it for a once in a while thing. I cooked up all the mushrooms in the picture below (in batches) and had left overs.
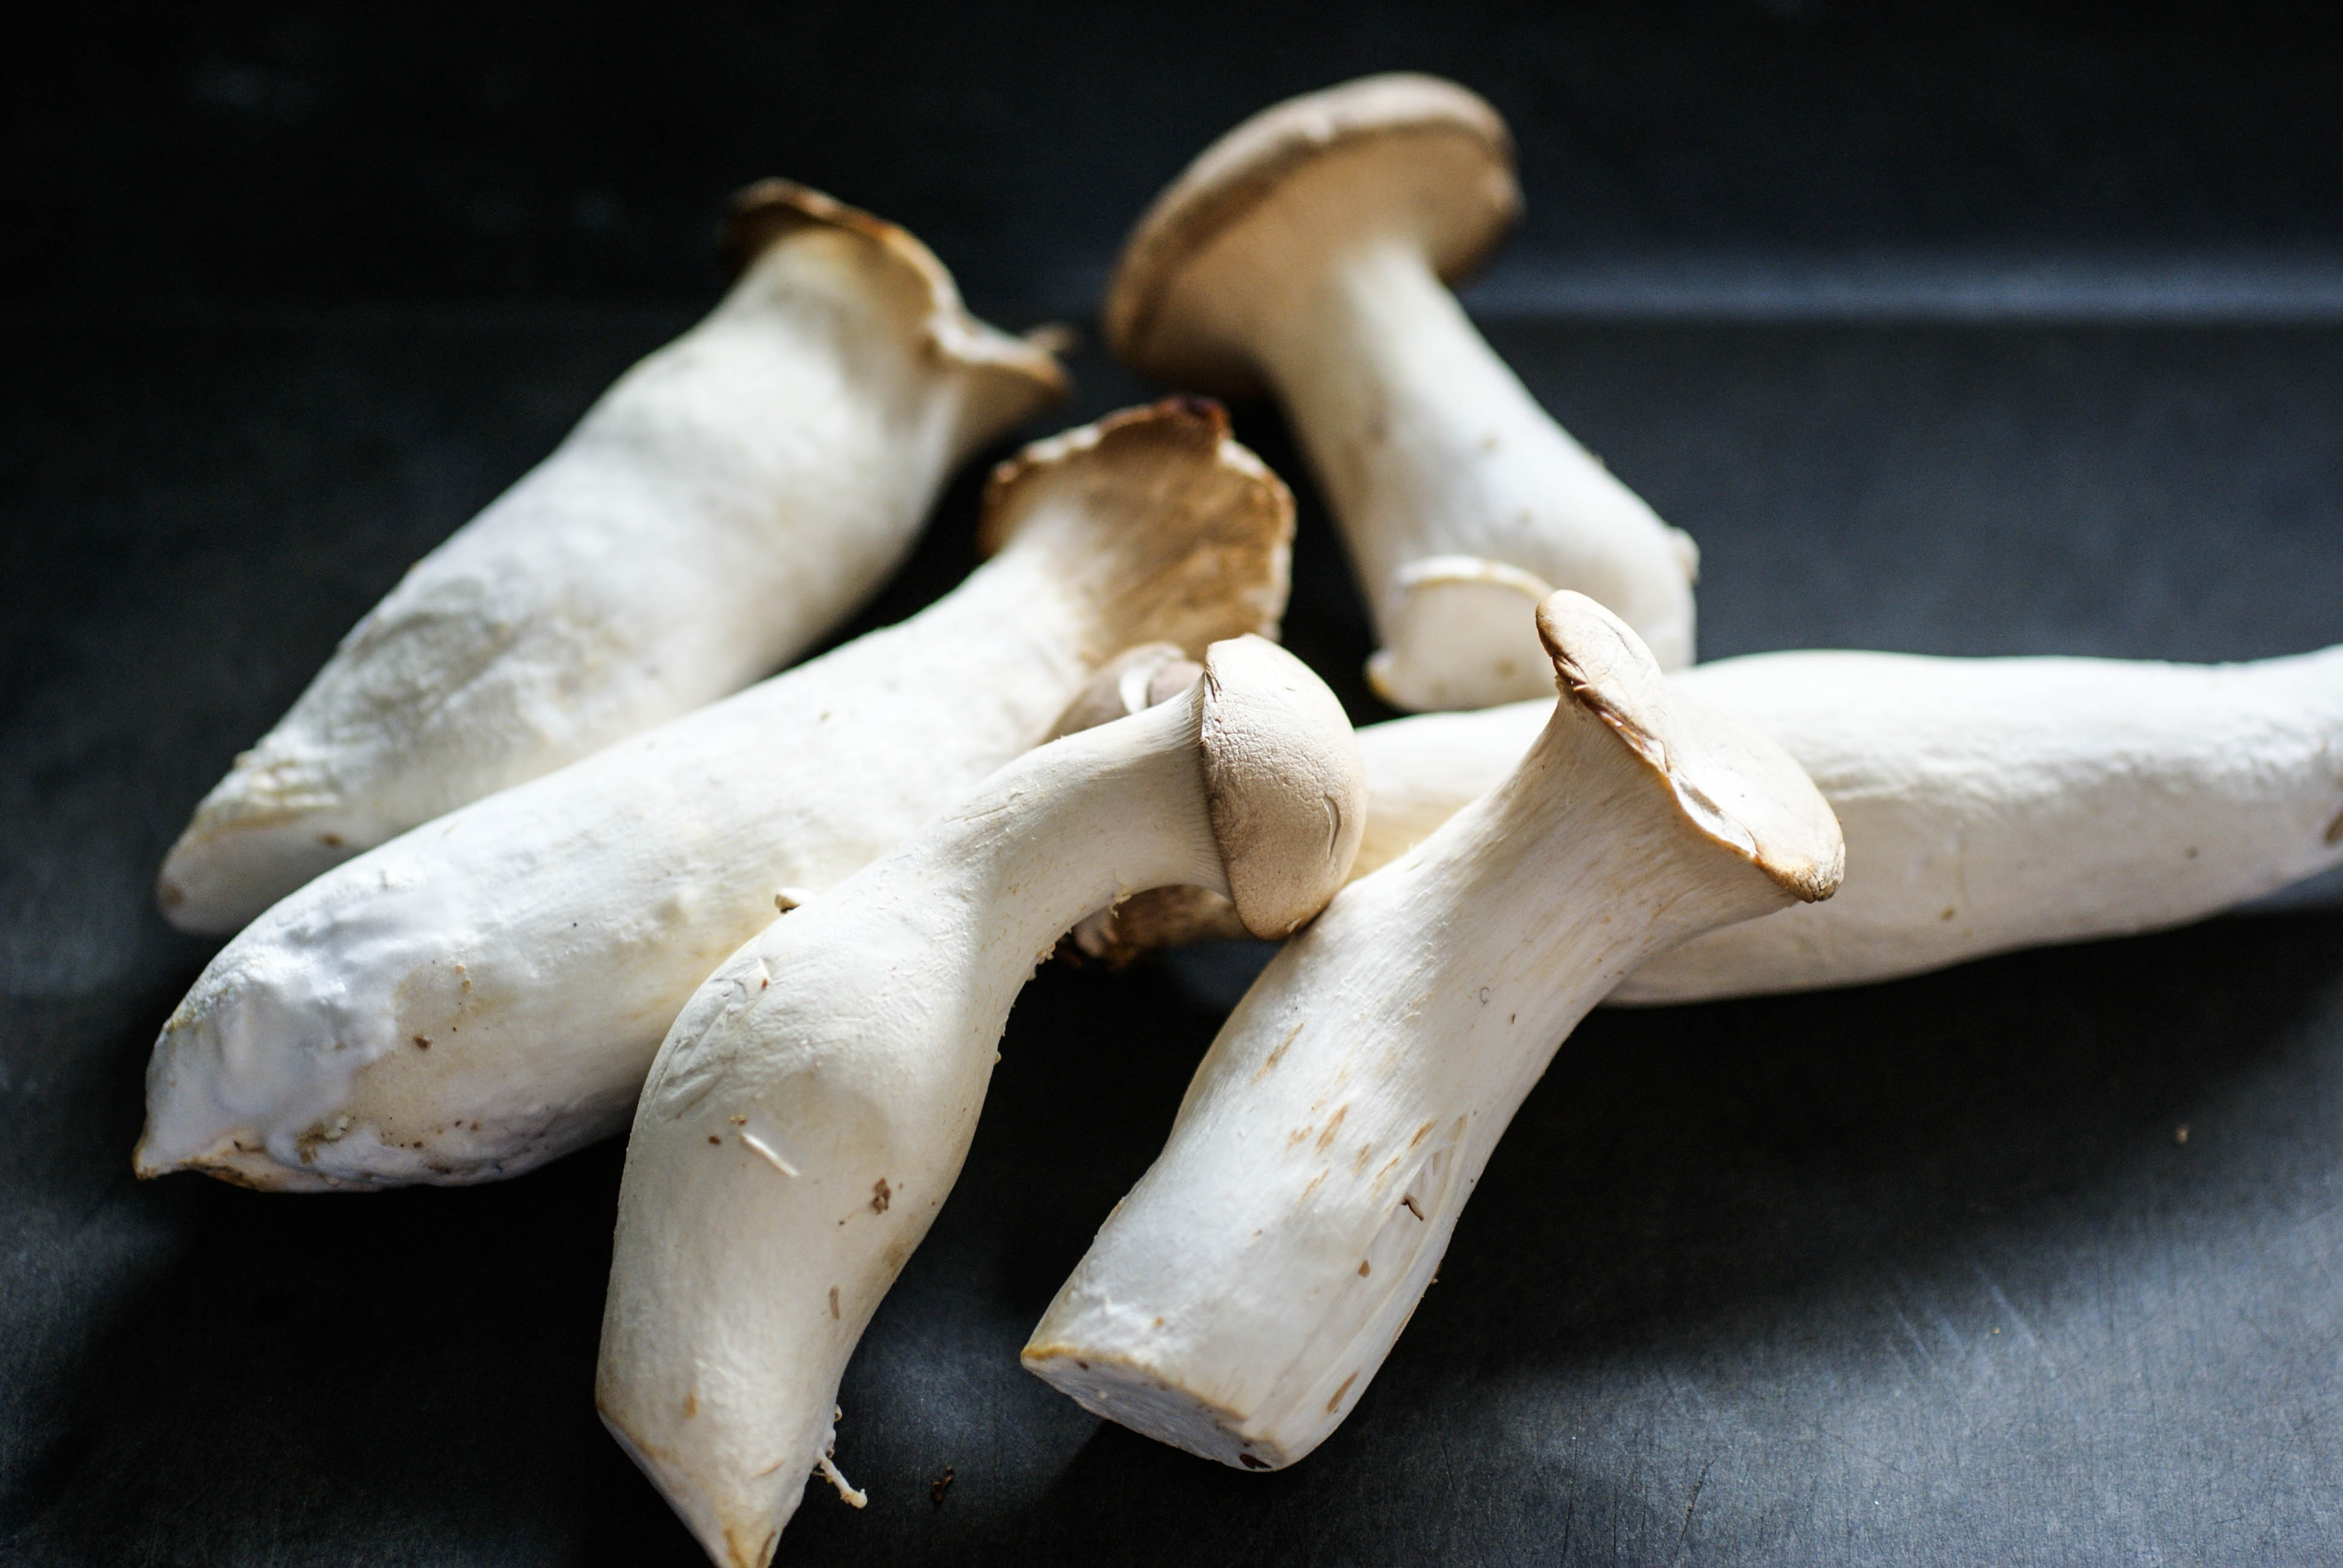
Mushrooms
Ingredients
- 2 Tablespoons butter
- King oyster mushrooms (or any kind you prefer)
- Fresh thyme sprigs
- Feta cheese, as much as you want or none at all
For the bread part
- 3 Tablespoons ground flax seeds
- 2 eggs
- 1/3 cup coconut milk (refrigerate it and use the thick part) or Greek yogurt
- 1/8 cup olive oil
- 1/4 cup coconut flour
- 1/2 cup arrowroot powder
- 3/4 teaspoon baking powder
- 1/4 teaspoon salt
- 1/2 teaspoon apple cider vinegar
- 1 Tablespoon coconut oil for the pan
Instructions
- Slice the mushrooms length wise into flat strips.
- Brown the mushrooms (on both sides) in a frying pan in the melted butter. Only takes a few minutes. I had enough mushrooms that I needed to do three batches.
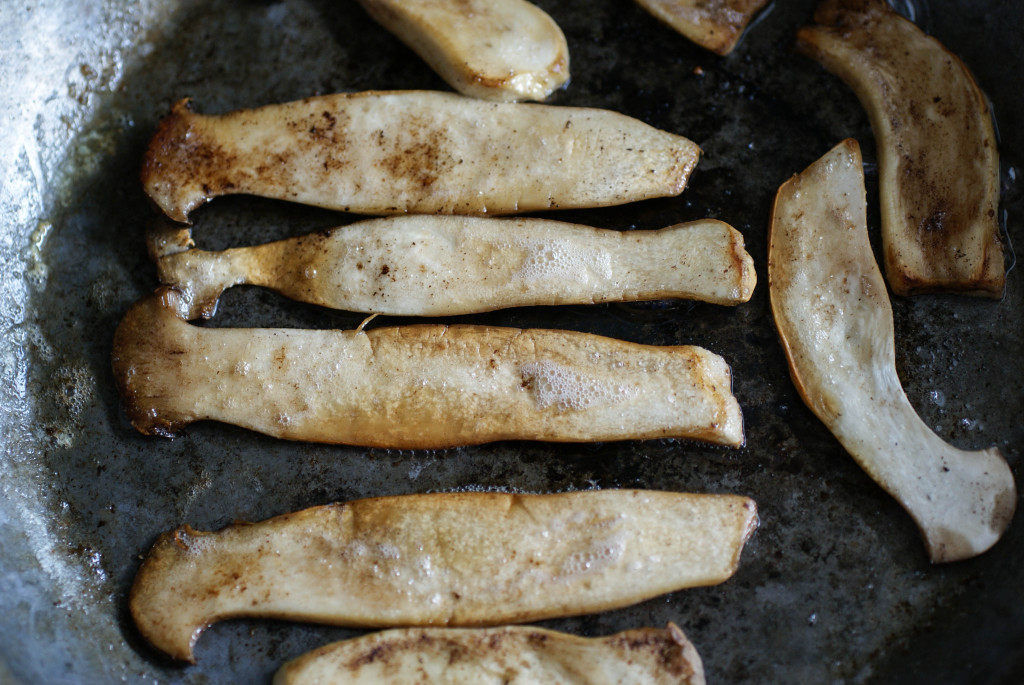
Aren’t they beautiful?
- Set mushrooms aside while you prepare the bread dough.
For the Bread
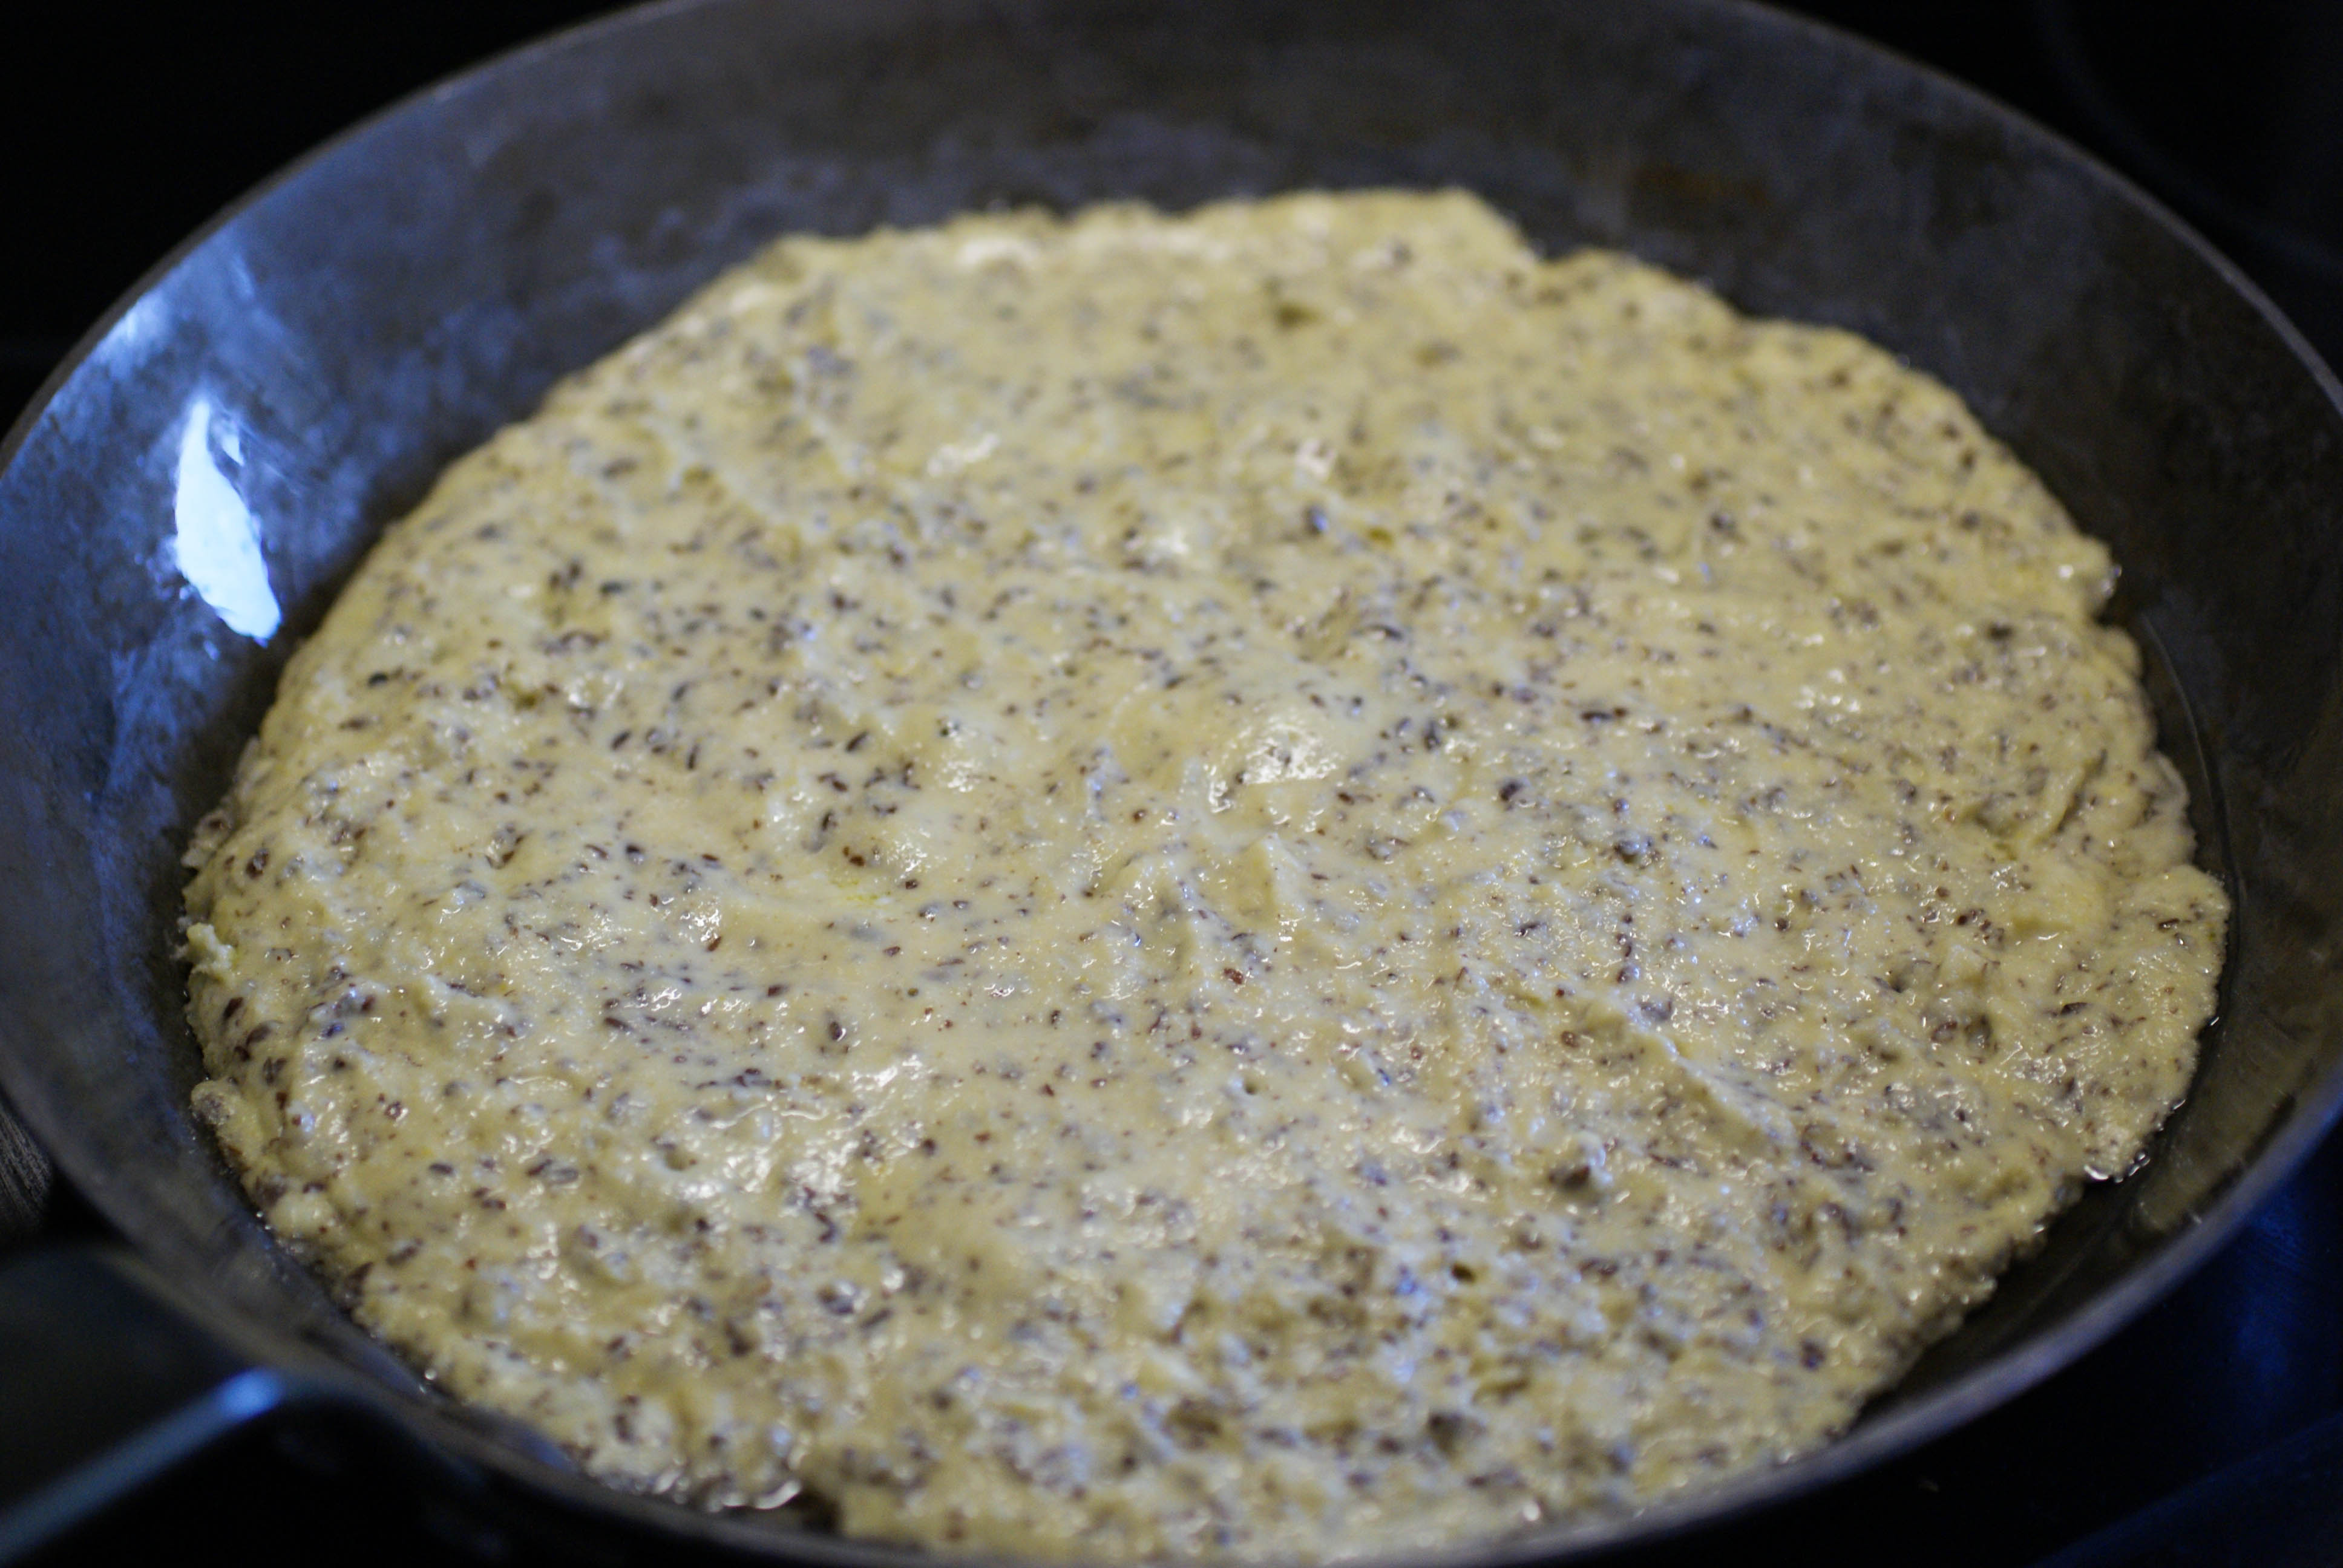
- Put all ingredients together in a food process and mix well. It will be the consistency of pancake batter.
- Melt coconut oil in an oven proof frying pan.
- When the oil is hot, pour in the dough and spread it out in the pan.

Dough part
- Cook for 2 minutes.
- Remove from heat and place the mushrooms and feta cheese on top. Salt and pepper to taste and add a few sprigs of fresh thyme (or herbs of your choice).
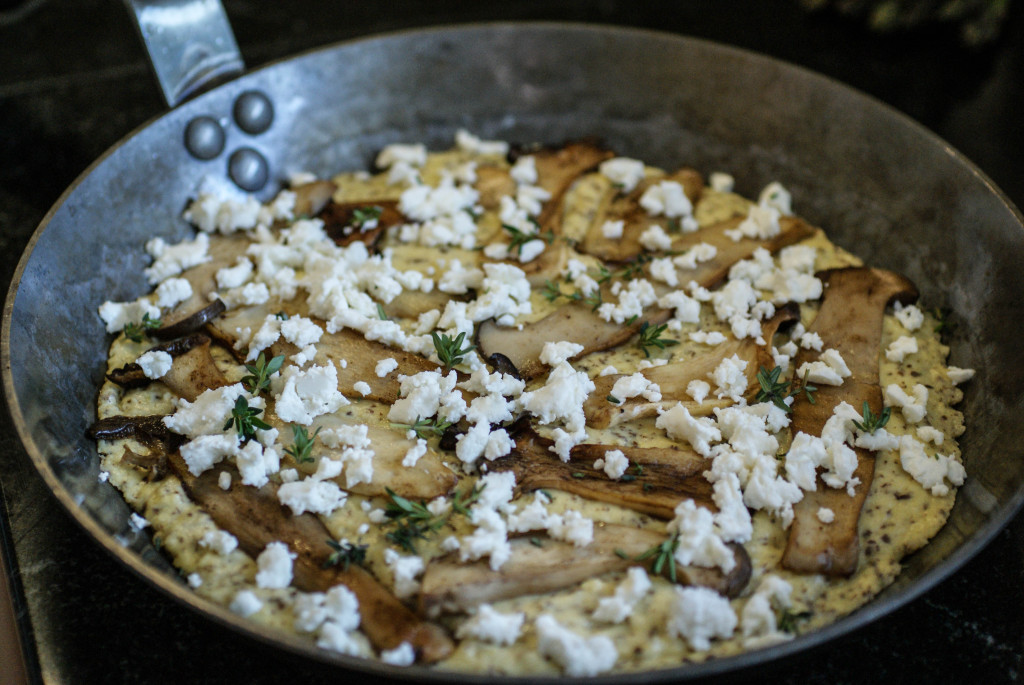
Ready for the oven
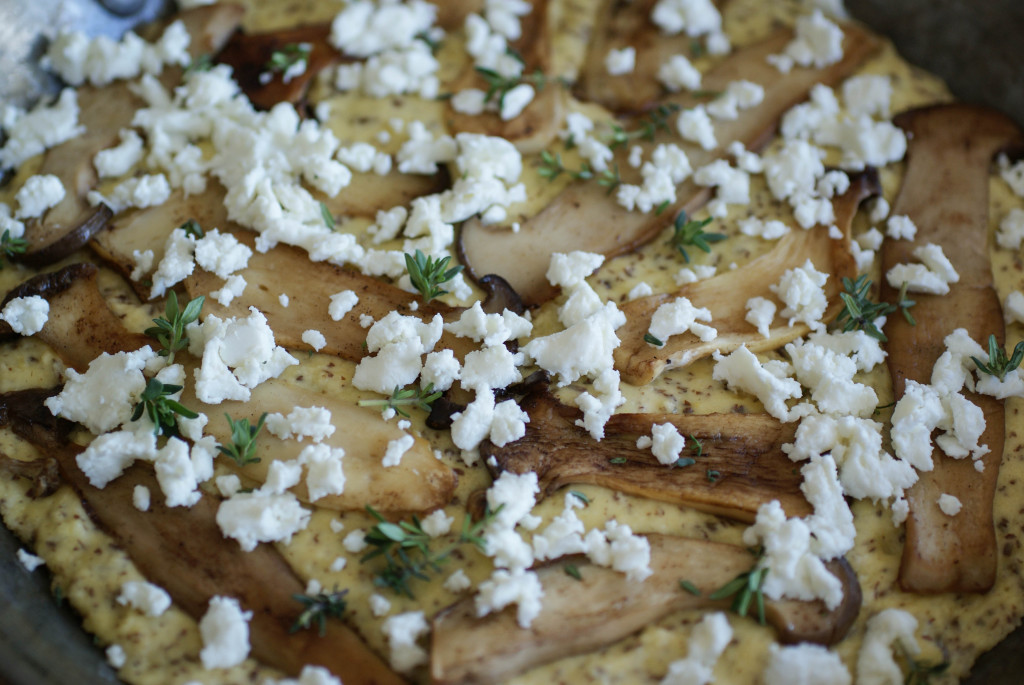
- Place pan in a 200C (400F) oven for 15 minutes or until the feta is browned.
- Drizzle with a little olive oil if you like before serving. I cut it into wedges with a pizza slicer.


Easy to slice and serve
Ingredients
- 2 Tablespoons butter
- King oyster mushrooms (or any kind you prefer)
- Fresh thyme sprigs
- Feta cheese, as much as you want or none at all
- 3 Tablespoons ground flax seeds
- 2 eggs
- 1/3 cup coconut milk (refrigerate it and use the thick part) or Greek yogurt
- 1/8 cup olive oil
- 1/4 cup coconut flour
- 1/2 cup arrowroot powder
- 3/4 teaspoon baking powder
- 1/4 teaspoon salt
- 1/2 teaspoon apple cider vinegar
- 1 Tablespoon coconut oil for the pan
Instructions
- Slice the mushrooms length wise into flat strips.
- Brown the mushrooms (on both sides) in a frying pan in the melted butter. Only takes a few minutes. I had enough mushrooms that I needed to do three batches.
- Set mushrooms aside while you prepare the bread dough.
- Put all ingredients together in a food process and mix well. It will be the consistency of pancake batter.
- Melt coconut oil in an oven proof frying pan.
- When the oil is hot, pour in the dough and spread it out in the pan.
- Cook for 2 minutes.
- Remove from heat and place the mushrooms and feta cheese on top. Salt and pepper to taste and add a few sprigs of fresh thyme (or herbs of your choice).
- Place pan in a 200C (400F) oven for 15 minutes or until the feta is browned.
- Drizzle with a little olive oil if you like before serving.
Sweet Potato Gnocchi
My daughter loves gnocchi. She recently tried some sweet potato gnocchi at a restaurant that she said was super tasty and she asked me to see if I could make her a paleo version. There are quite a few recipes out there, but I decided just to wing it. I was sure that they would fall apart and not work.
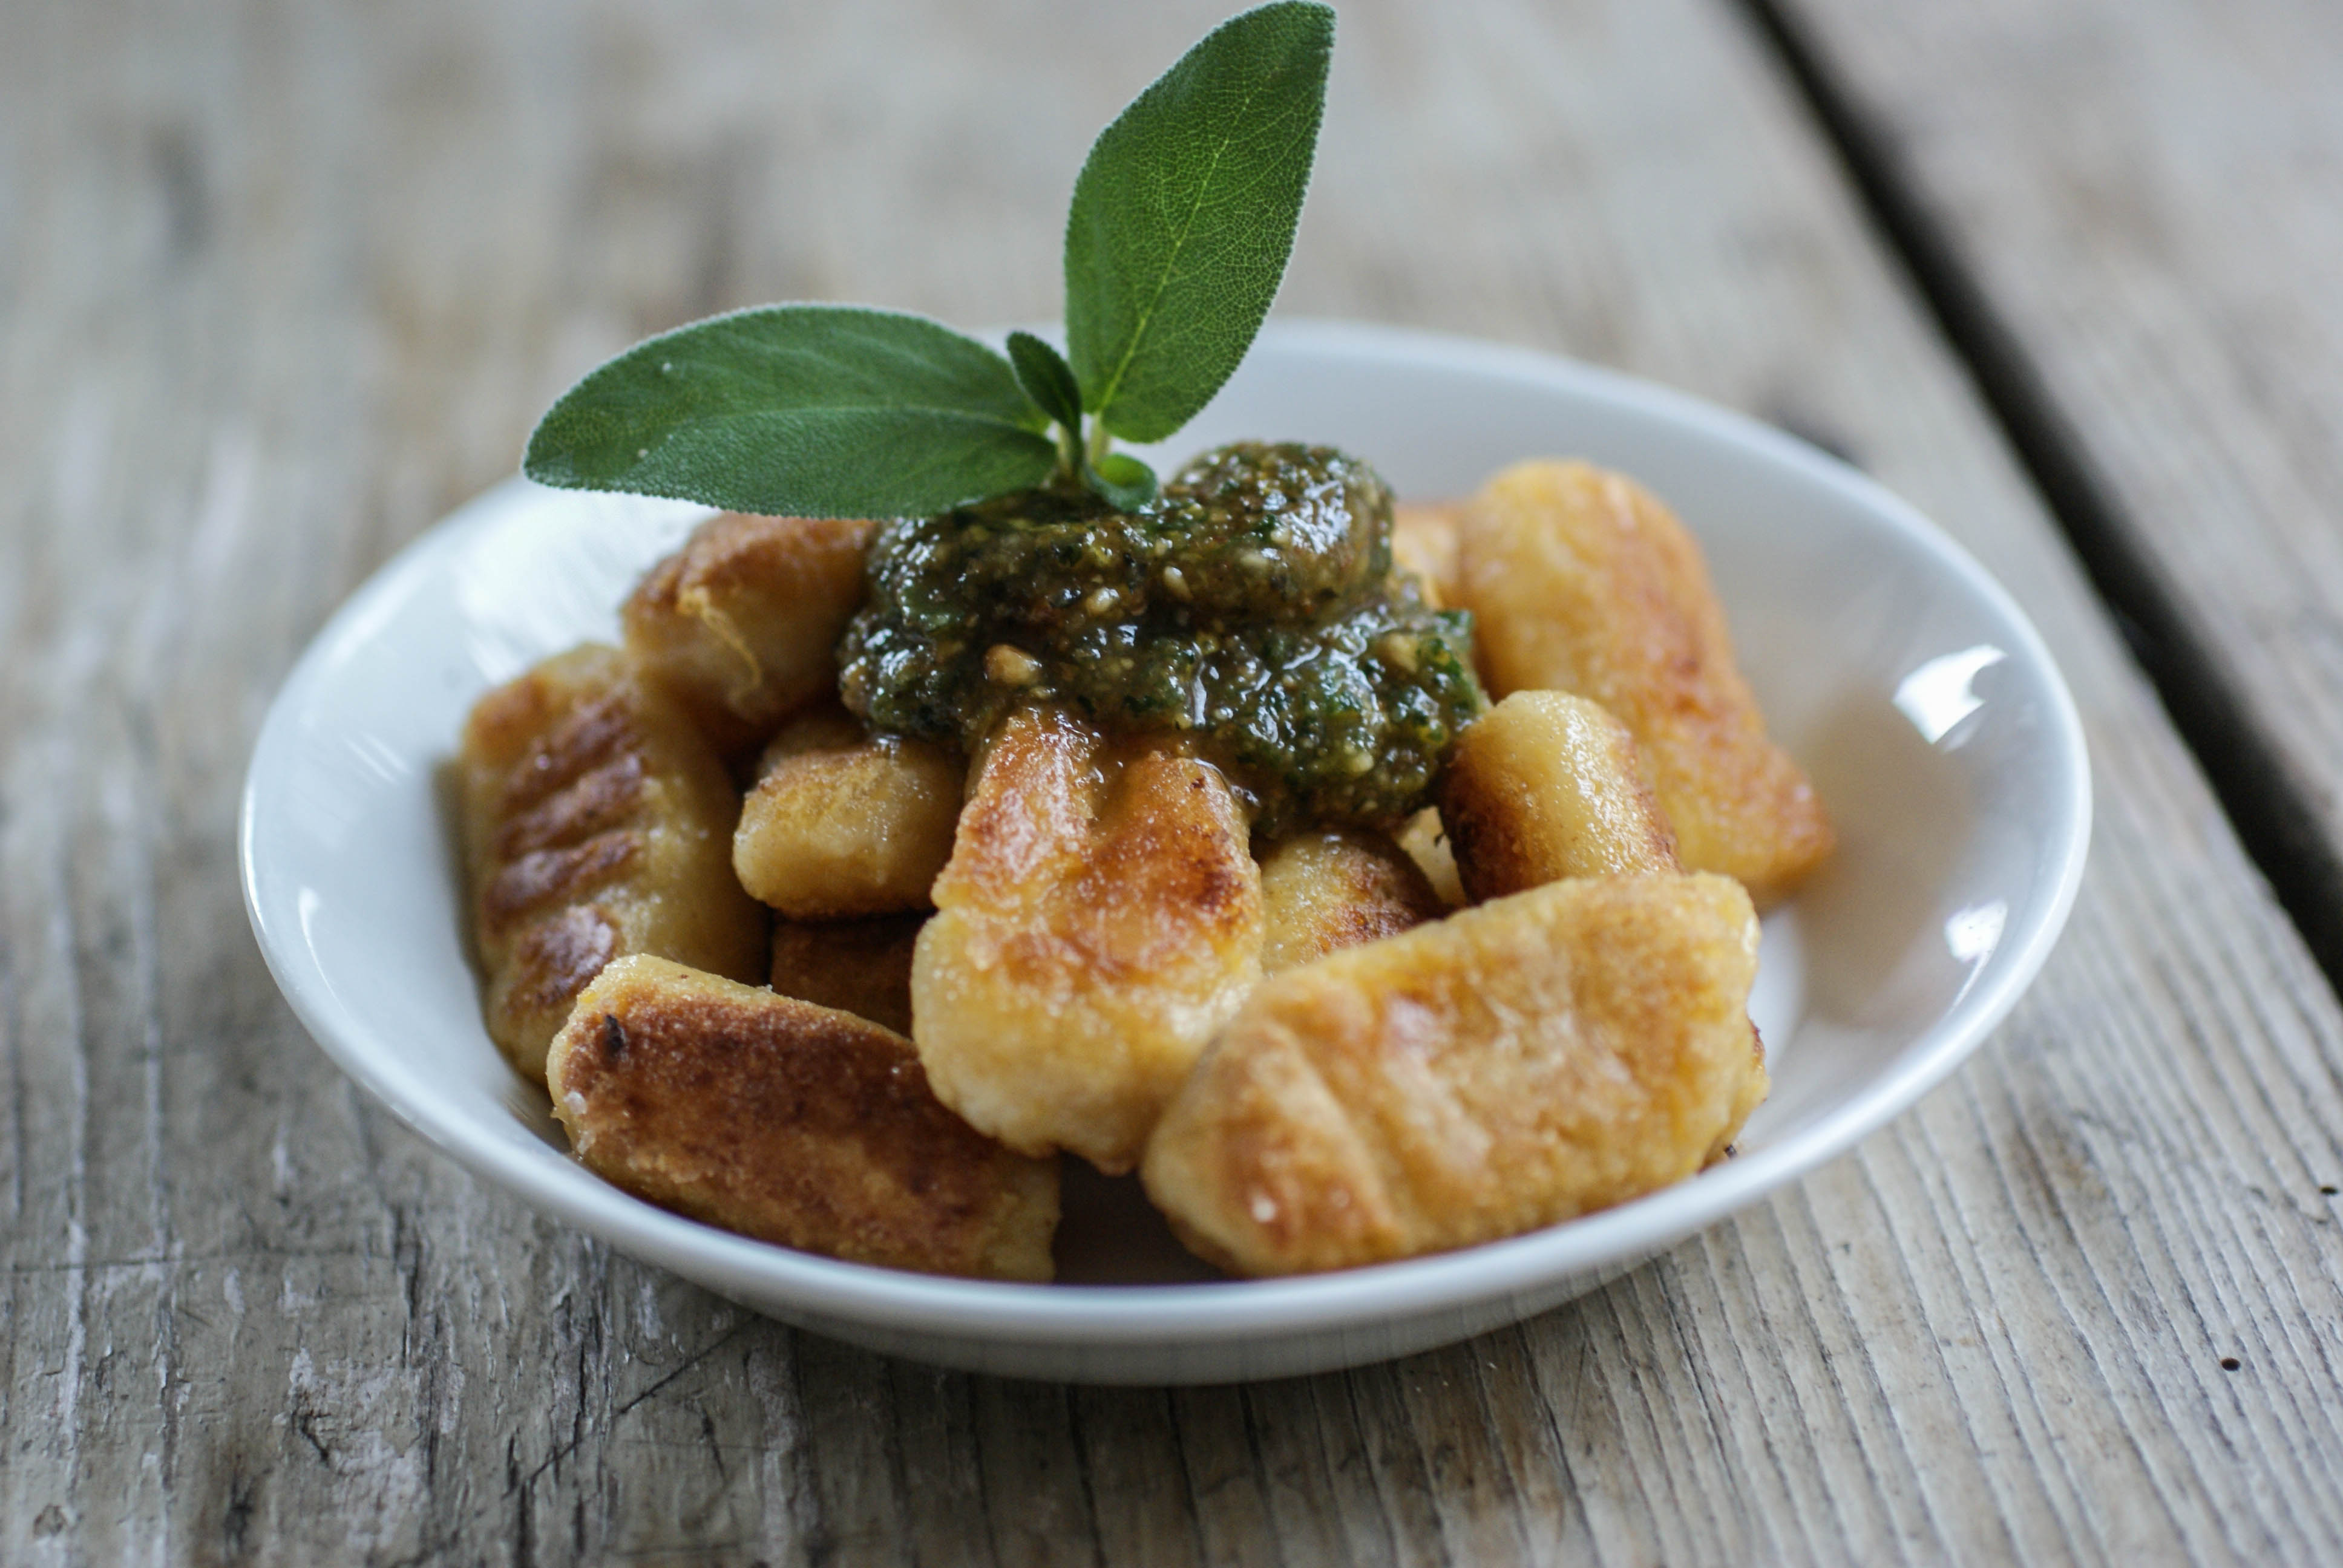
They absolutely worked and they turned out dangerously delicious. We topped off our gnocchi with some roasted walnut and sage pesto and I know my daughter will love them. I’ve put most of what I made in the freezer for her so that she can enjoy them during her visit.
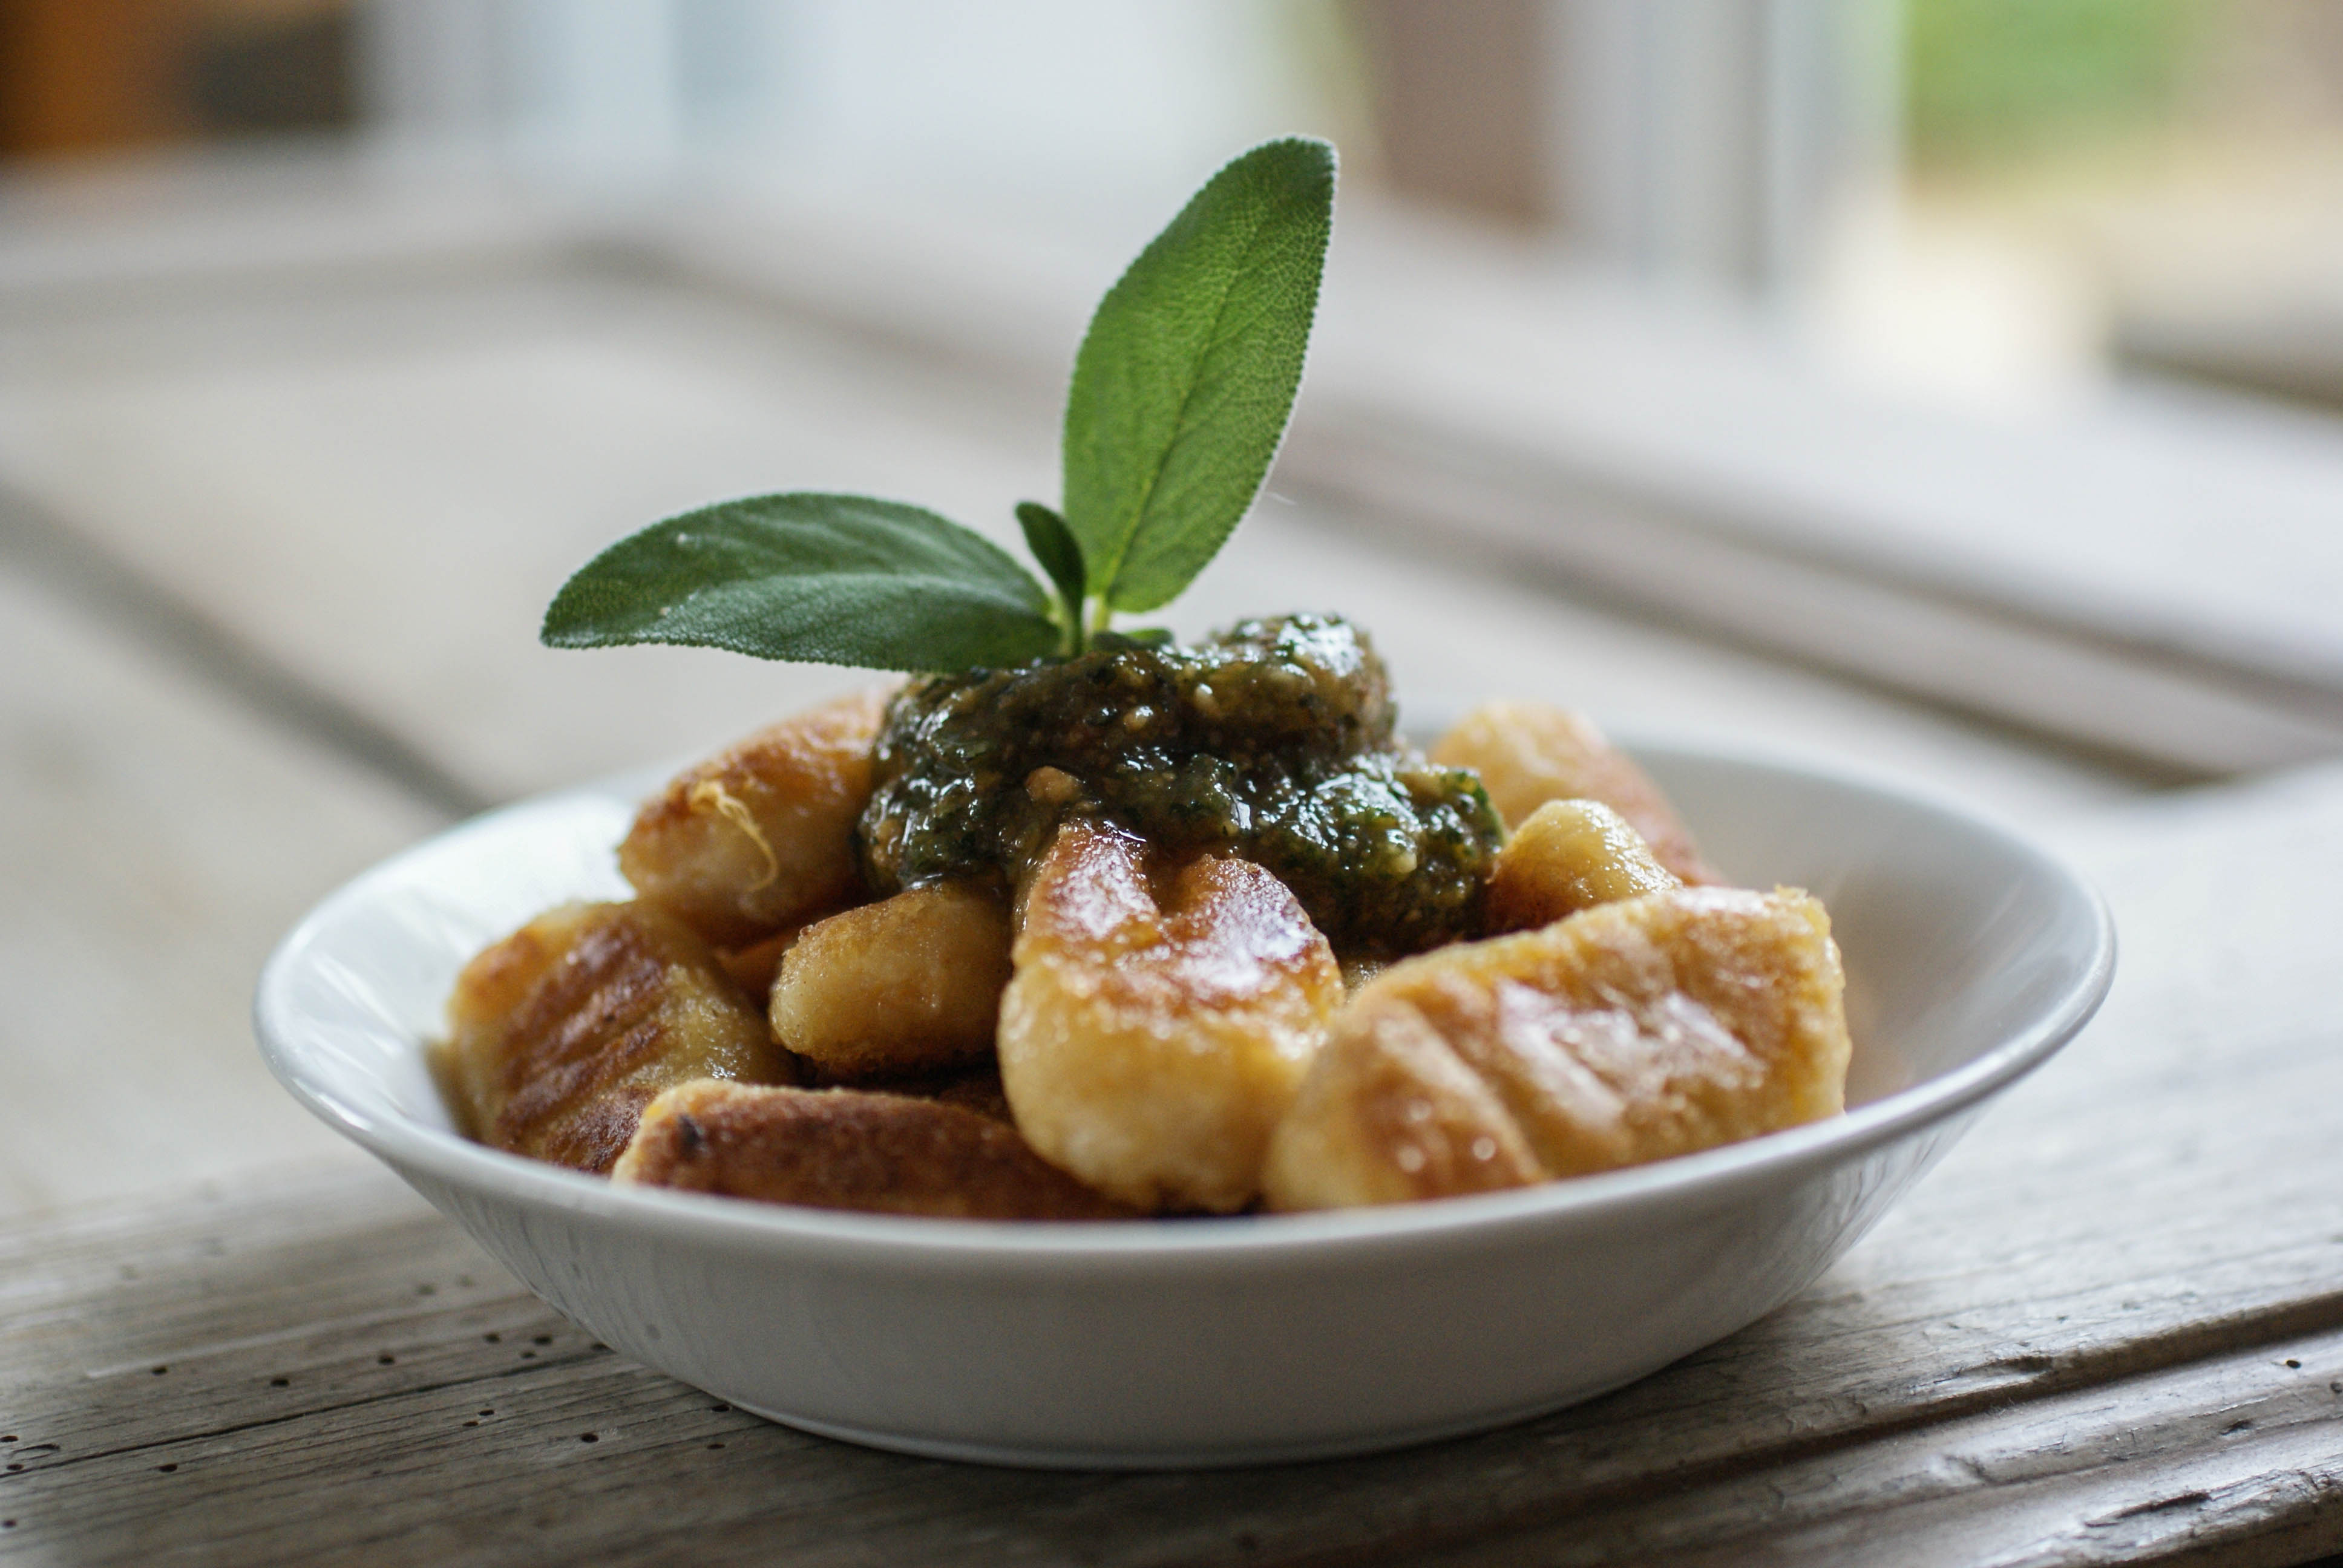
Worth the effort (but actually pretty easy to make)
Don’t let the long instructions put you off. These really are quite easy and well worth the effort.
Ingredients
- 2 large sweet potatoes (mine totaled 550 grams), baked and peeled
- 2 1/2 cups arrowroot powder (plus a bit more for rolling)
- 2 1/2 cups almond flour
- 1 teaspoon salt
- 1 teaspoon baking soda
- 1 egg white
Instructions
- Poke a few holes in the sweet potatoes and bake them in a 400 F (200 C) oven for about an hour (or until soft and done).
- Remove from the oven and cool completely.
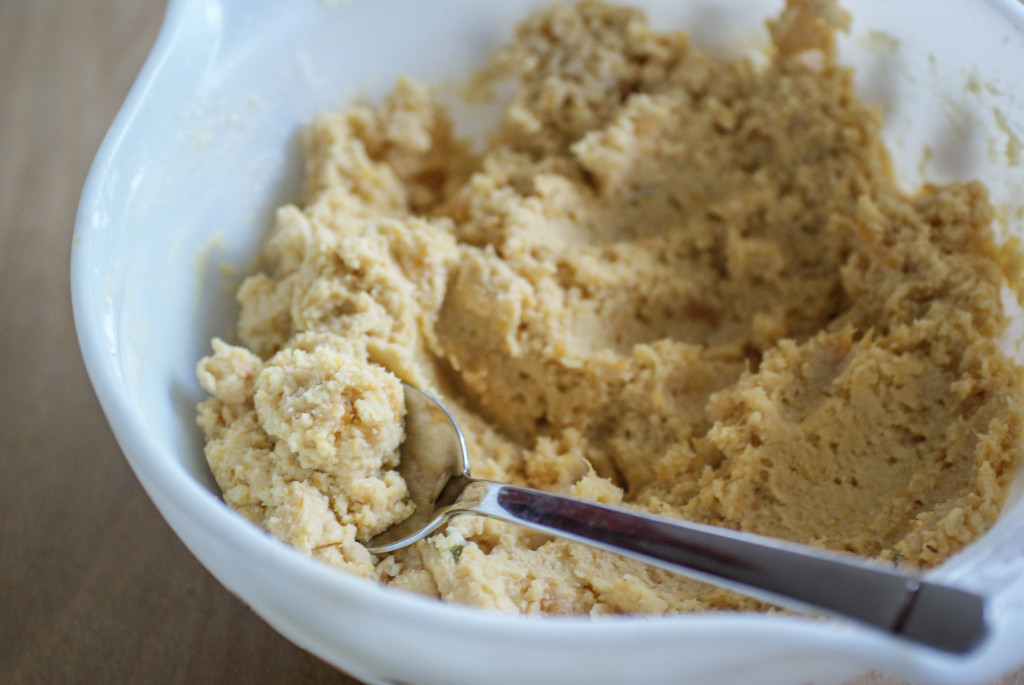
- Peel the sweet potatoes and then mash them in a large mixing bowl.
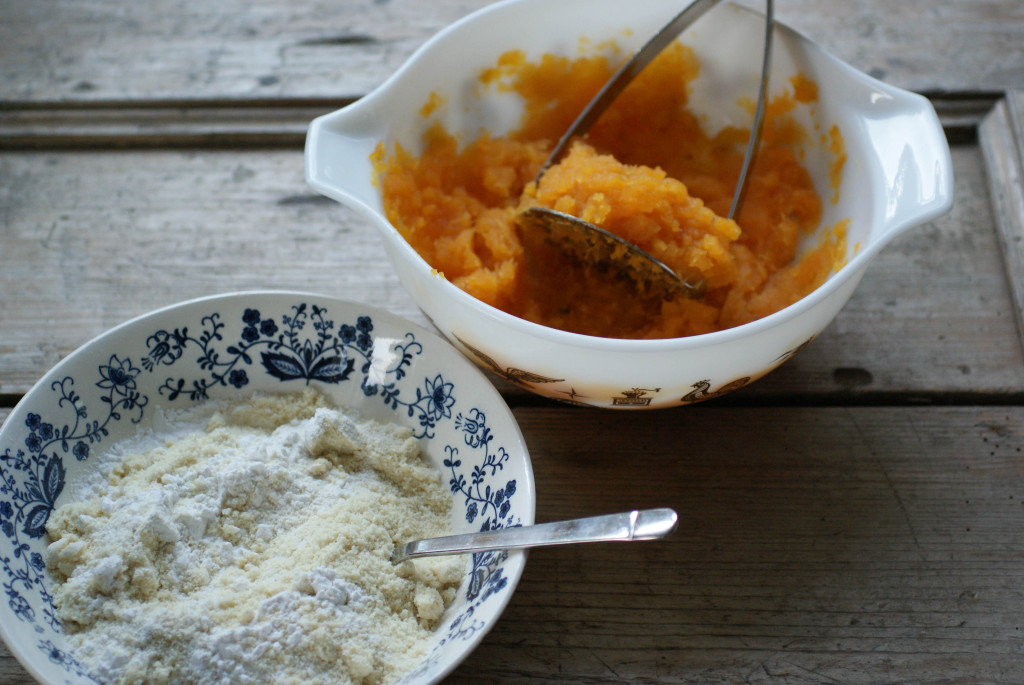
Mashed sweet potato and flours
- Add your flours in 1/2 cup at a time (1/2 cup almond flour, 1/2 cup arrowroot then stir before adding more).
- After you have a whole cup of each flour added in, mix in the salt and baking soda and stir.
- Now beat your egg white until it is frothy and then stir it in.
- Resume adding in the flours half a cup at a time until you reach a dough consistency that you are able to grab a handful of and roll into a ball. For me, this equaled 2 1/2 cups of each flour. You may need a little more or a little less depending on the humidity where you are.
- Put your dough in the fridge for at least half an hour.
Ready for the fridge
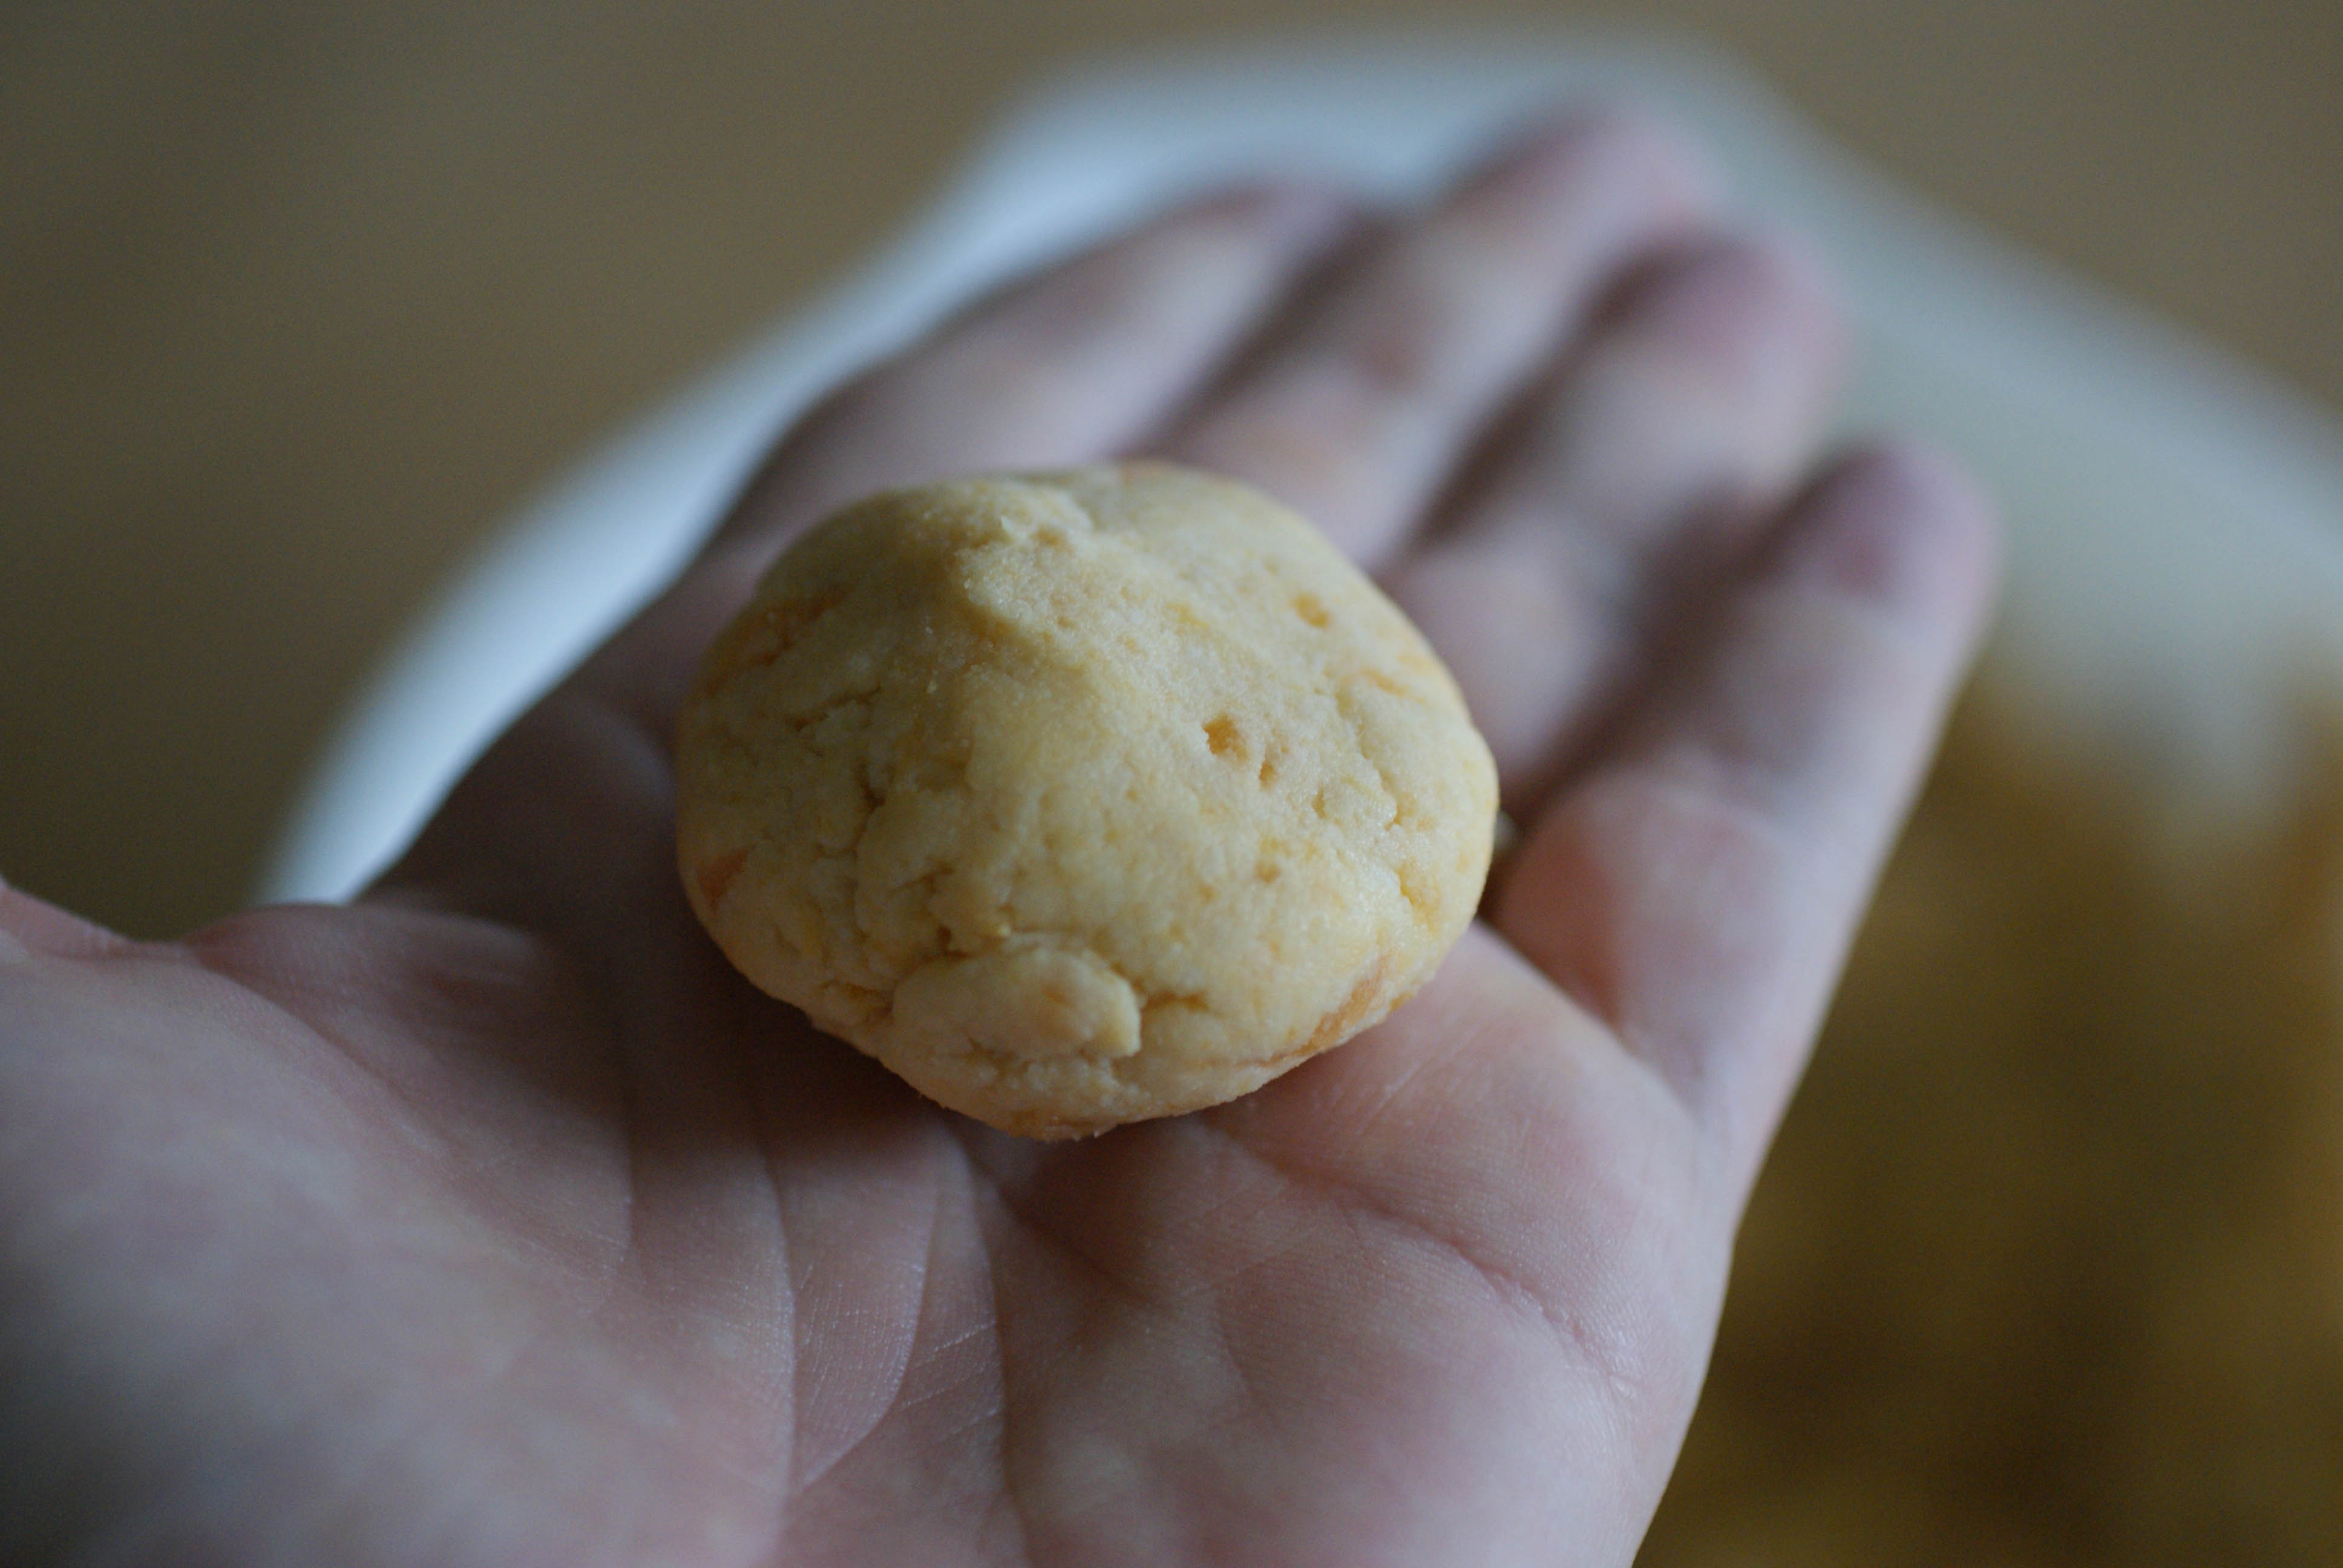
- Once it’s chilled, dust your counter top or a sheet of parchment paper with some arrowroot powder.
- Take a handful of dough and roll it out into a long snake shape with your hands. If it’s sticking to your hands, just dust your hands with some of the arrowroot powder.
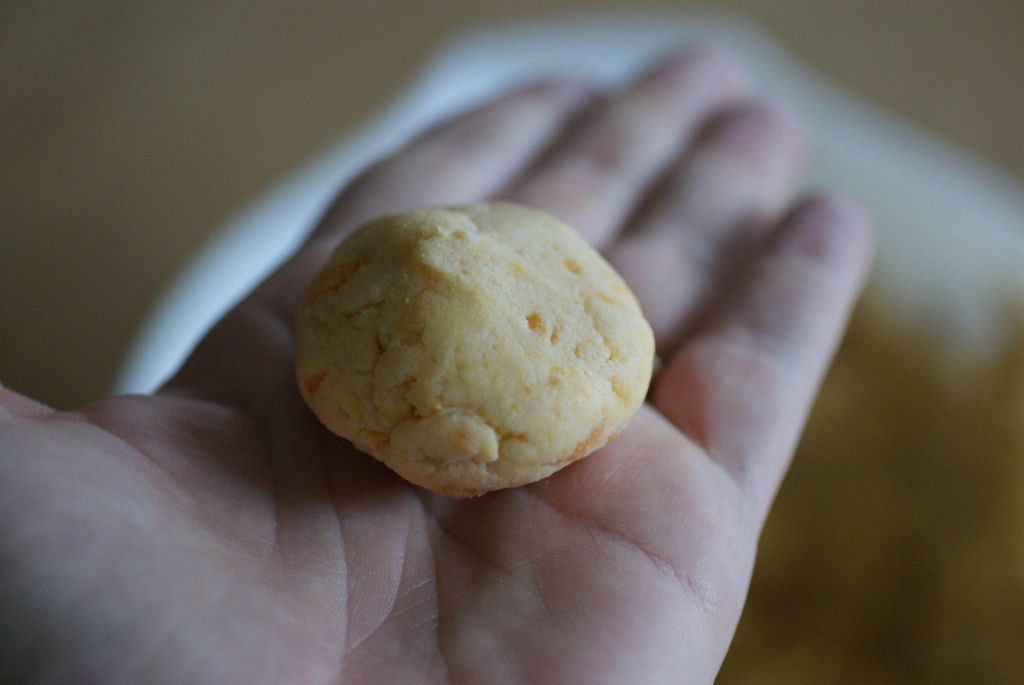
Grab a small clump for rolling out
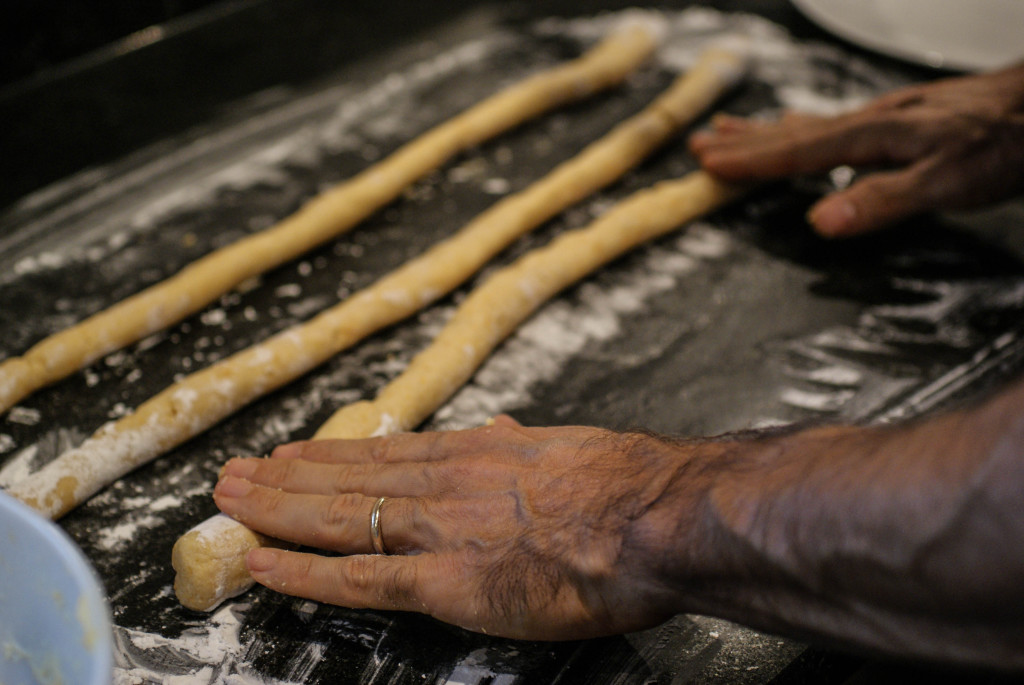
Roll out into snakes
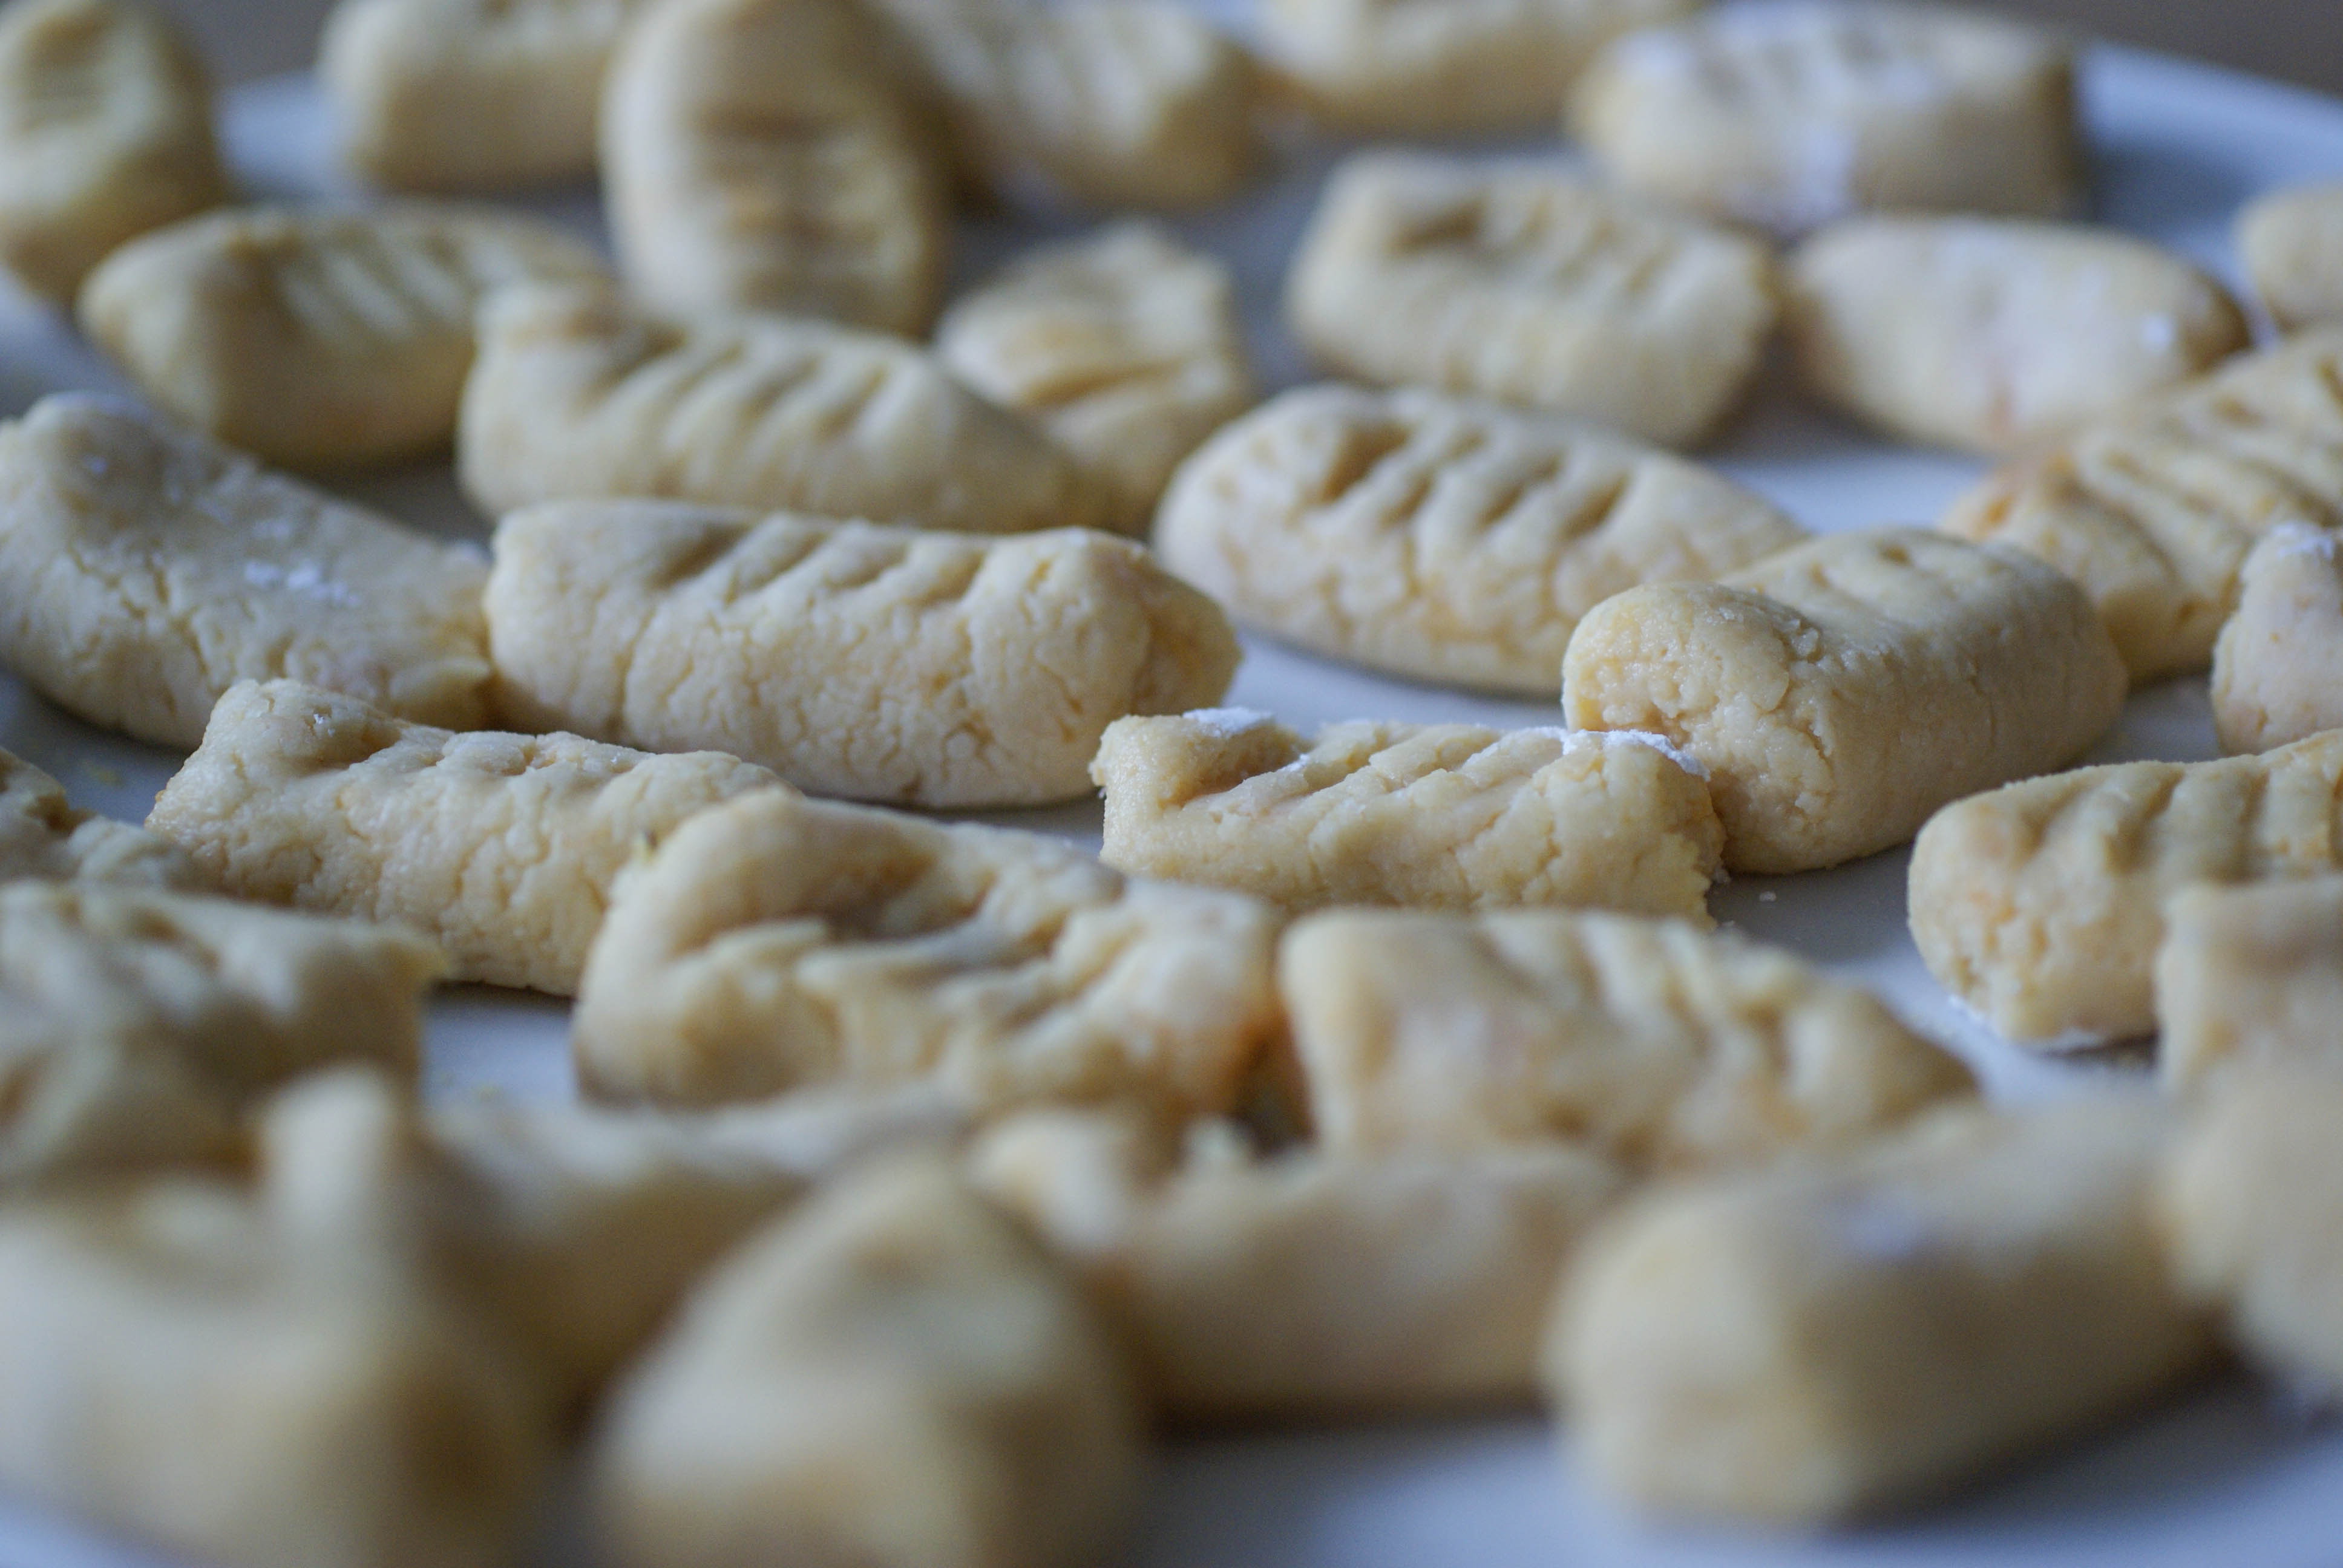
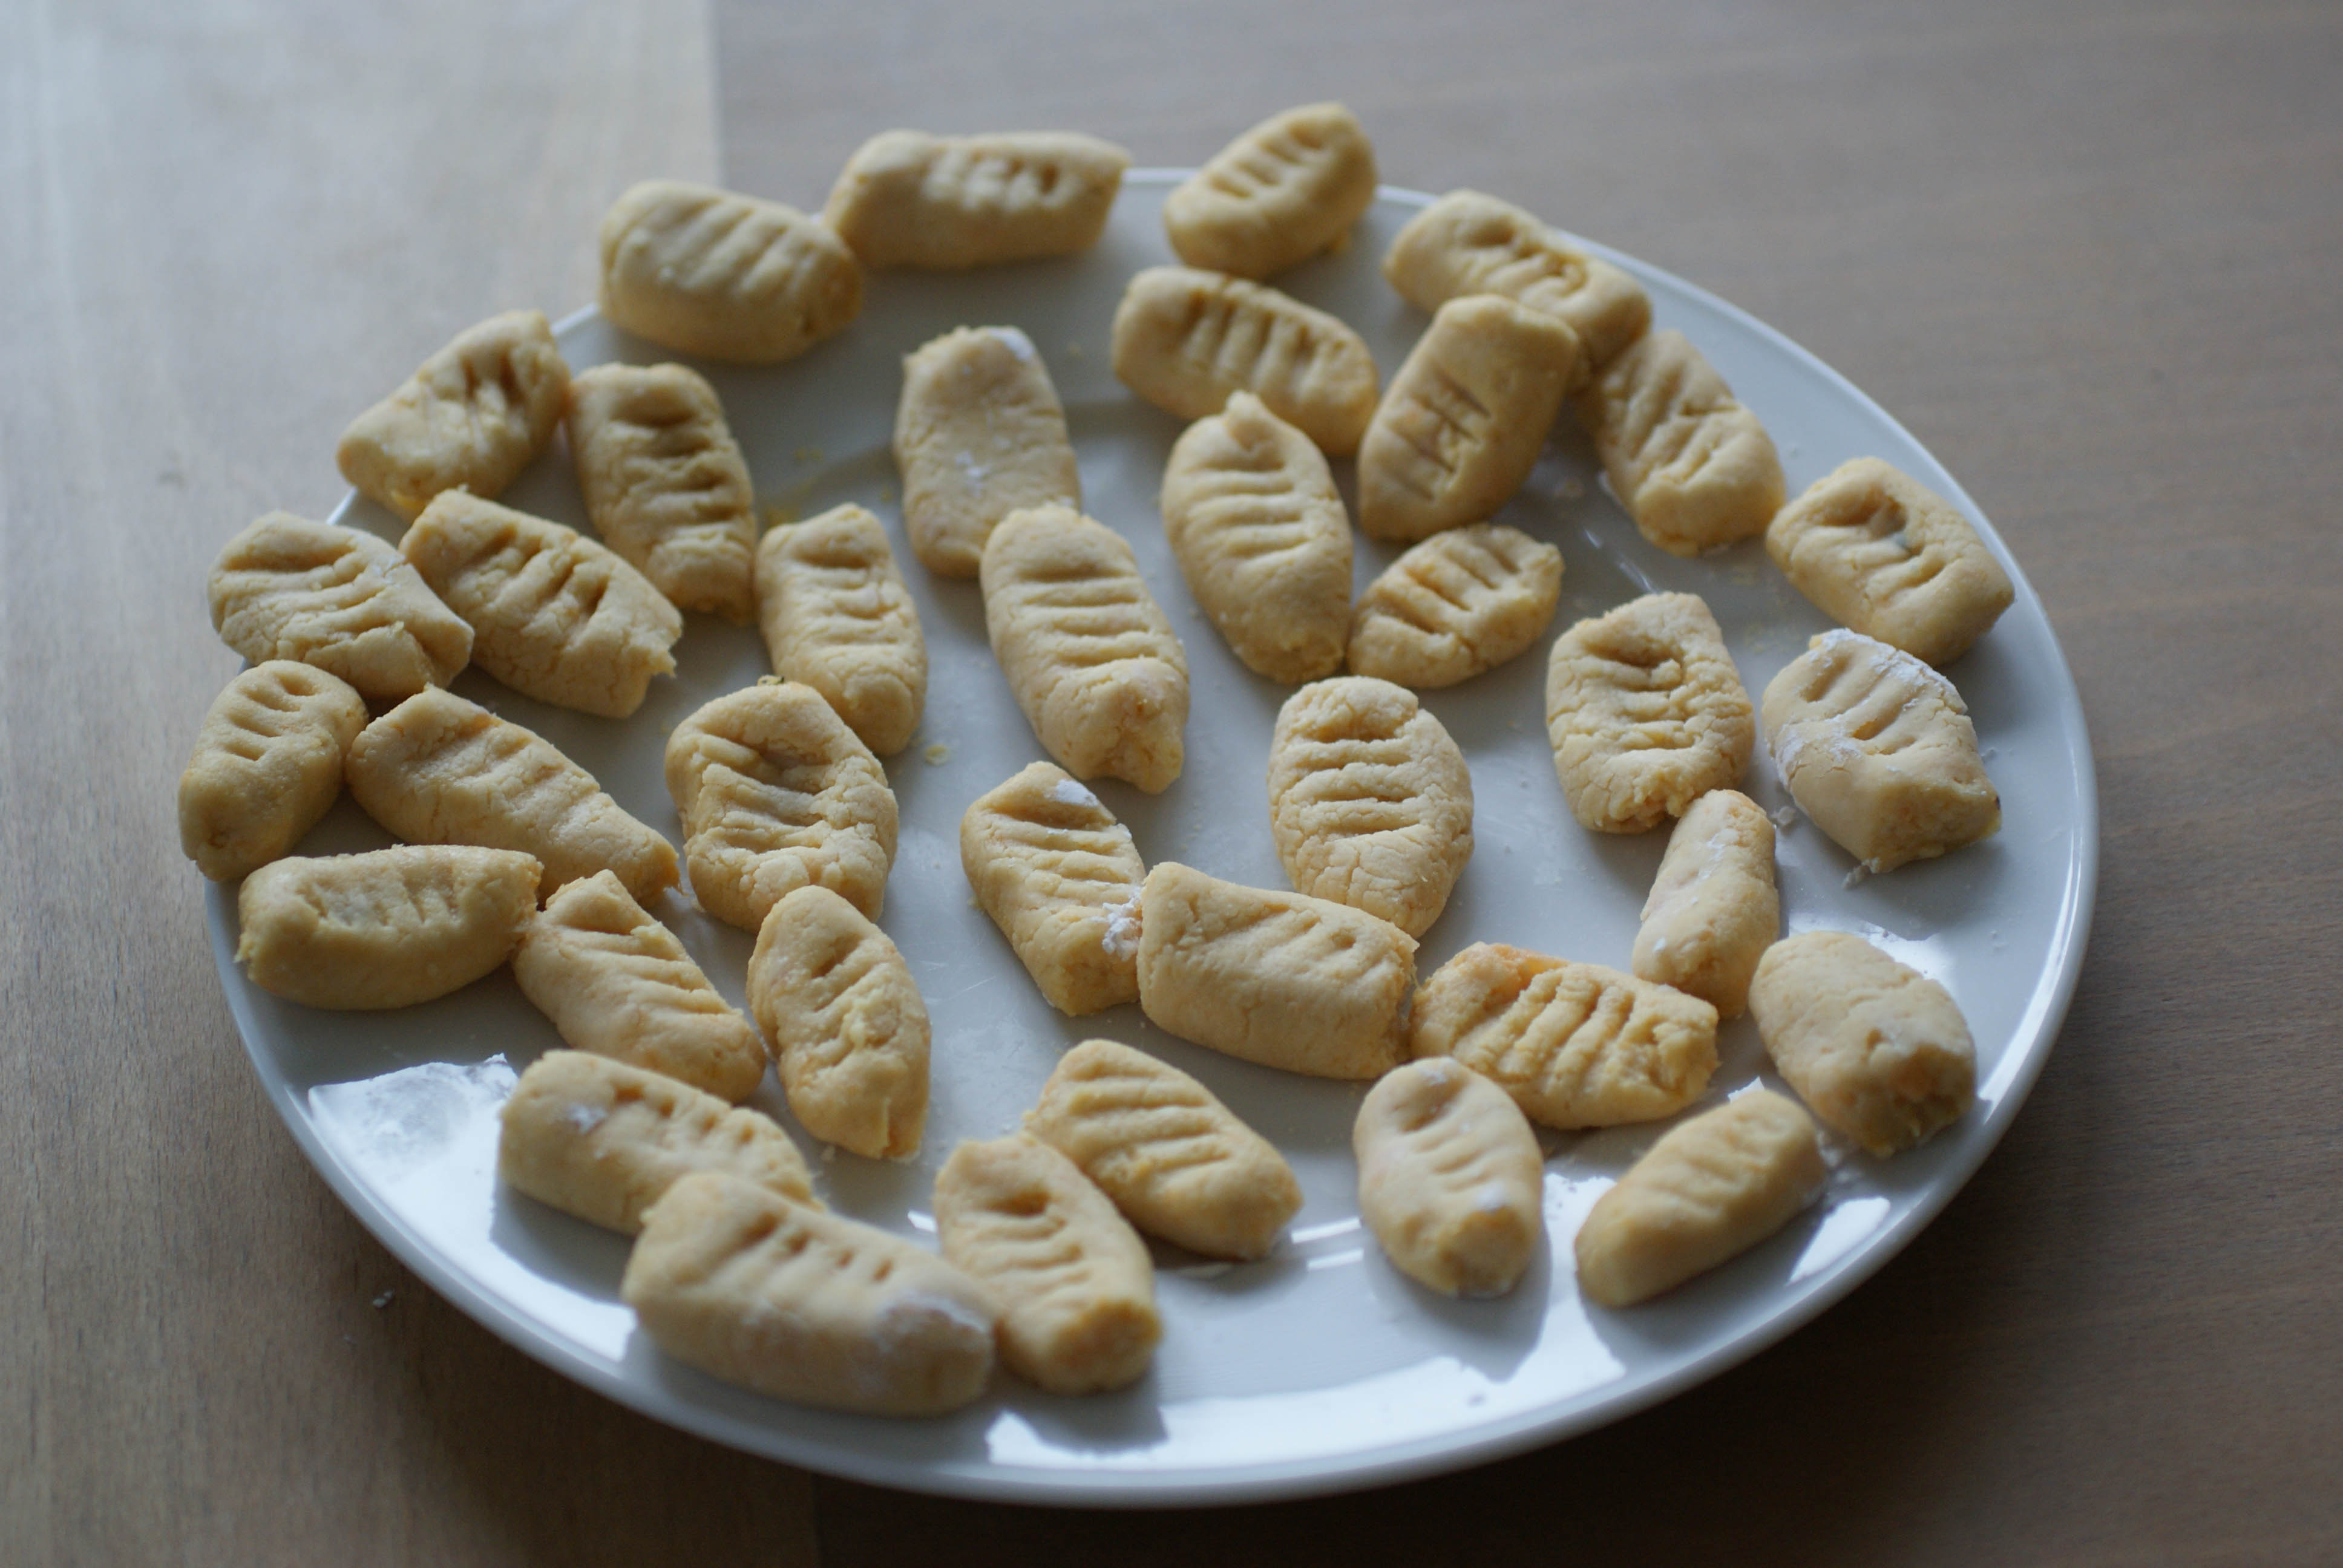
- Cut your snakes into segments about an inch each. You can leave them in that shape or you can flatten them a bit with a fork dipped in arrowroot.
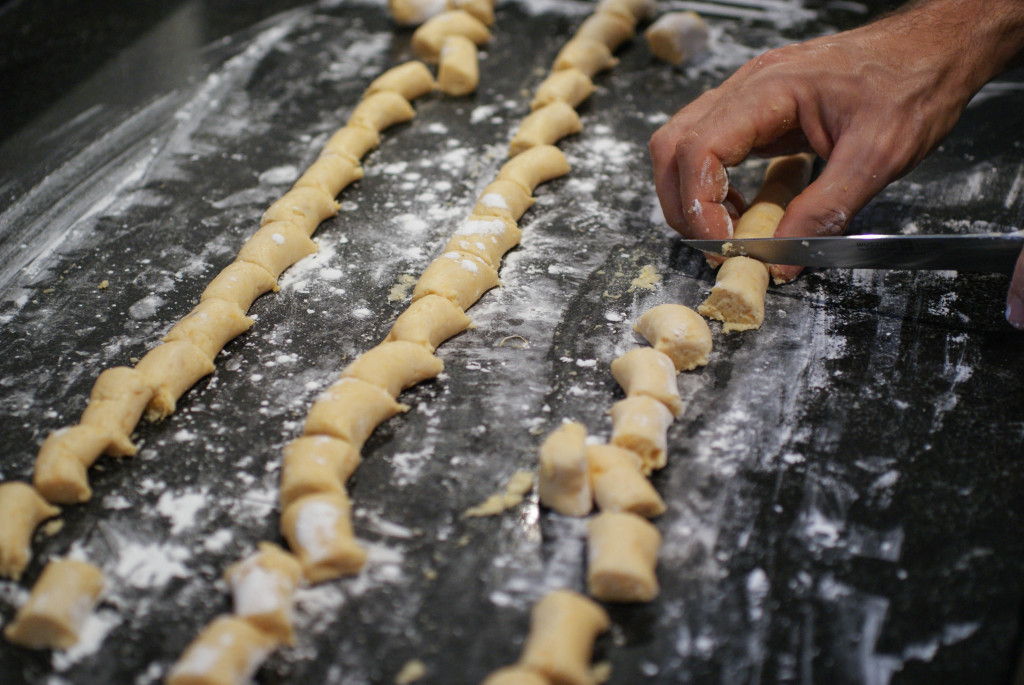
Cut into segments

We made fork prints on ours
- Once all of your dough has been shaped and cut, drop each piece of gnocchi into a pot of boiling water.

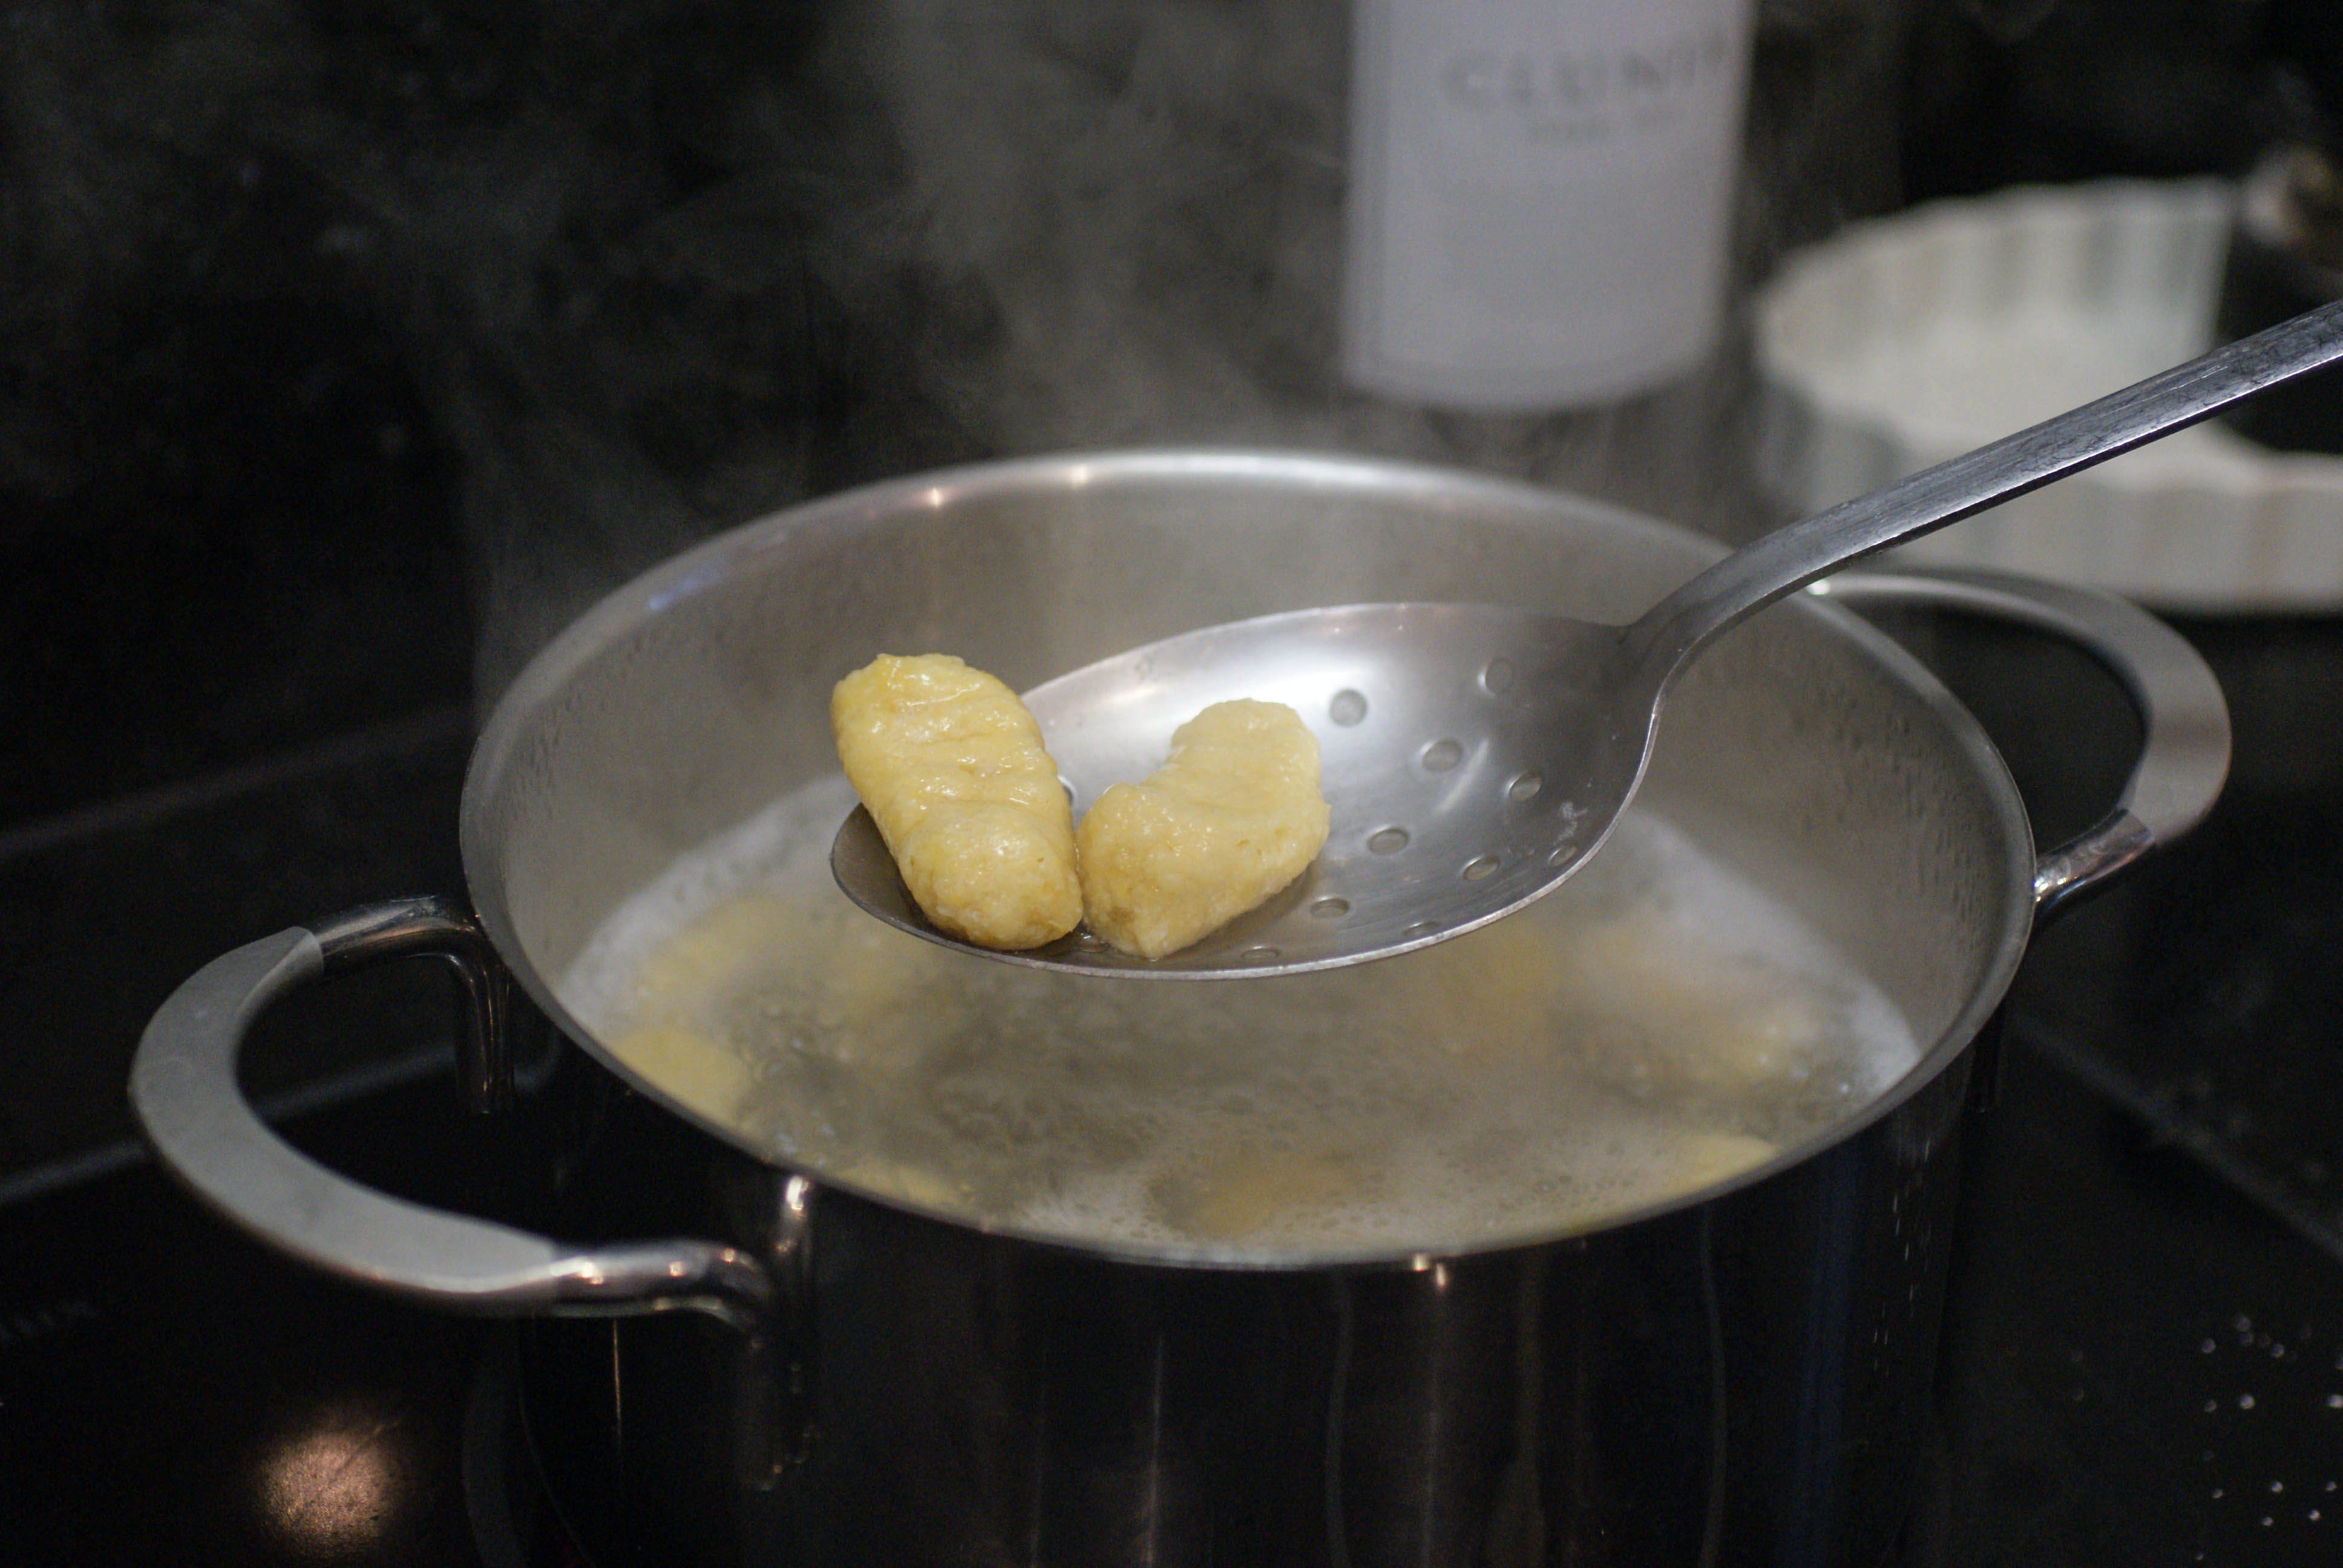
Ready for the boiling water
- Within about a minute, they will float to the surface. Let them cook for about 30 seconds after they float to the top and them remove them to a colander with a slotted spoon.
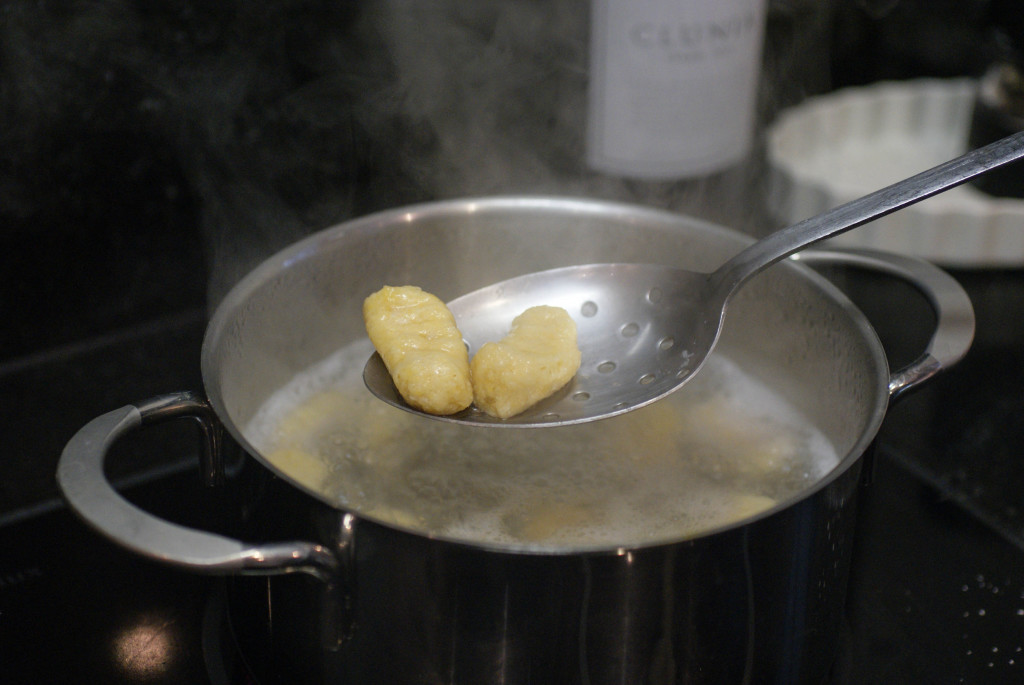
They hold together really well
- If you want, you can serve them at this point.
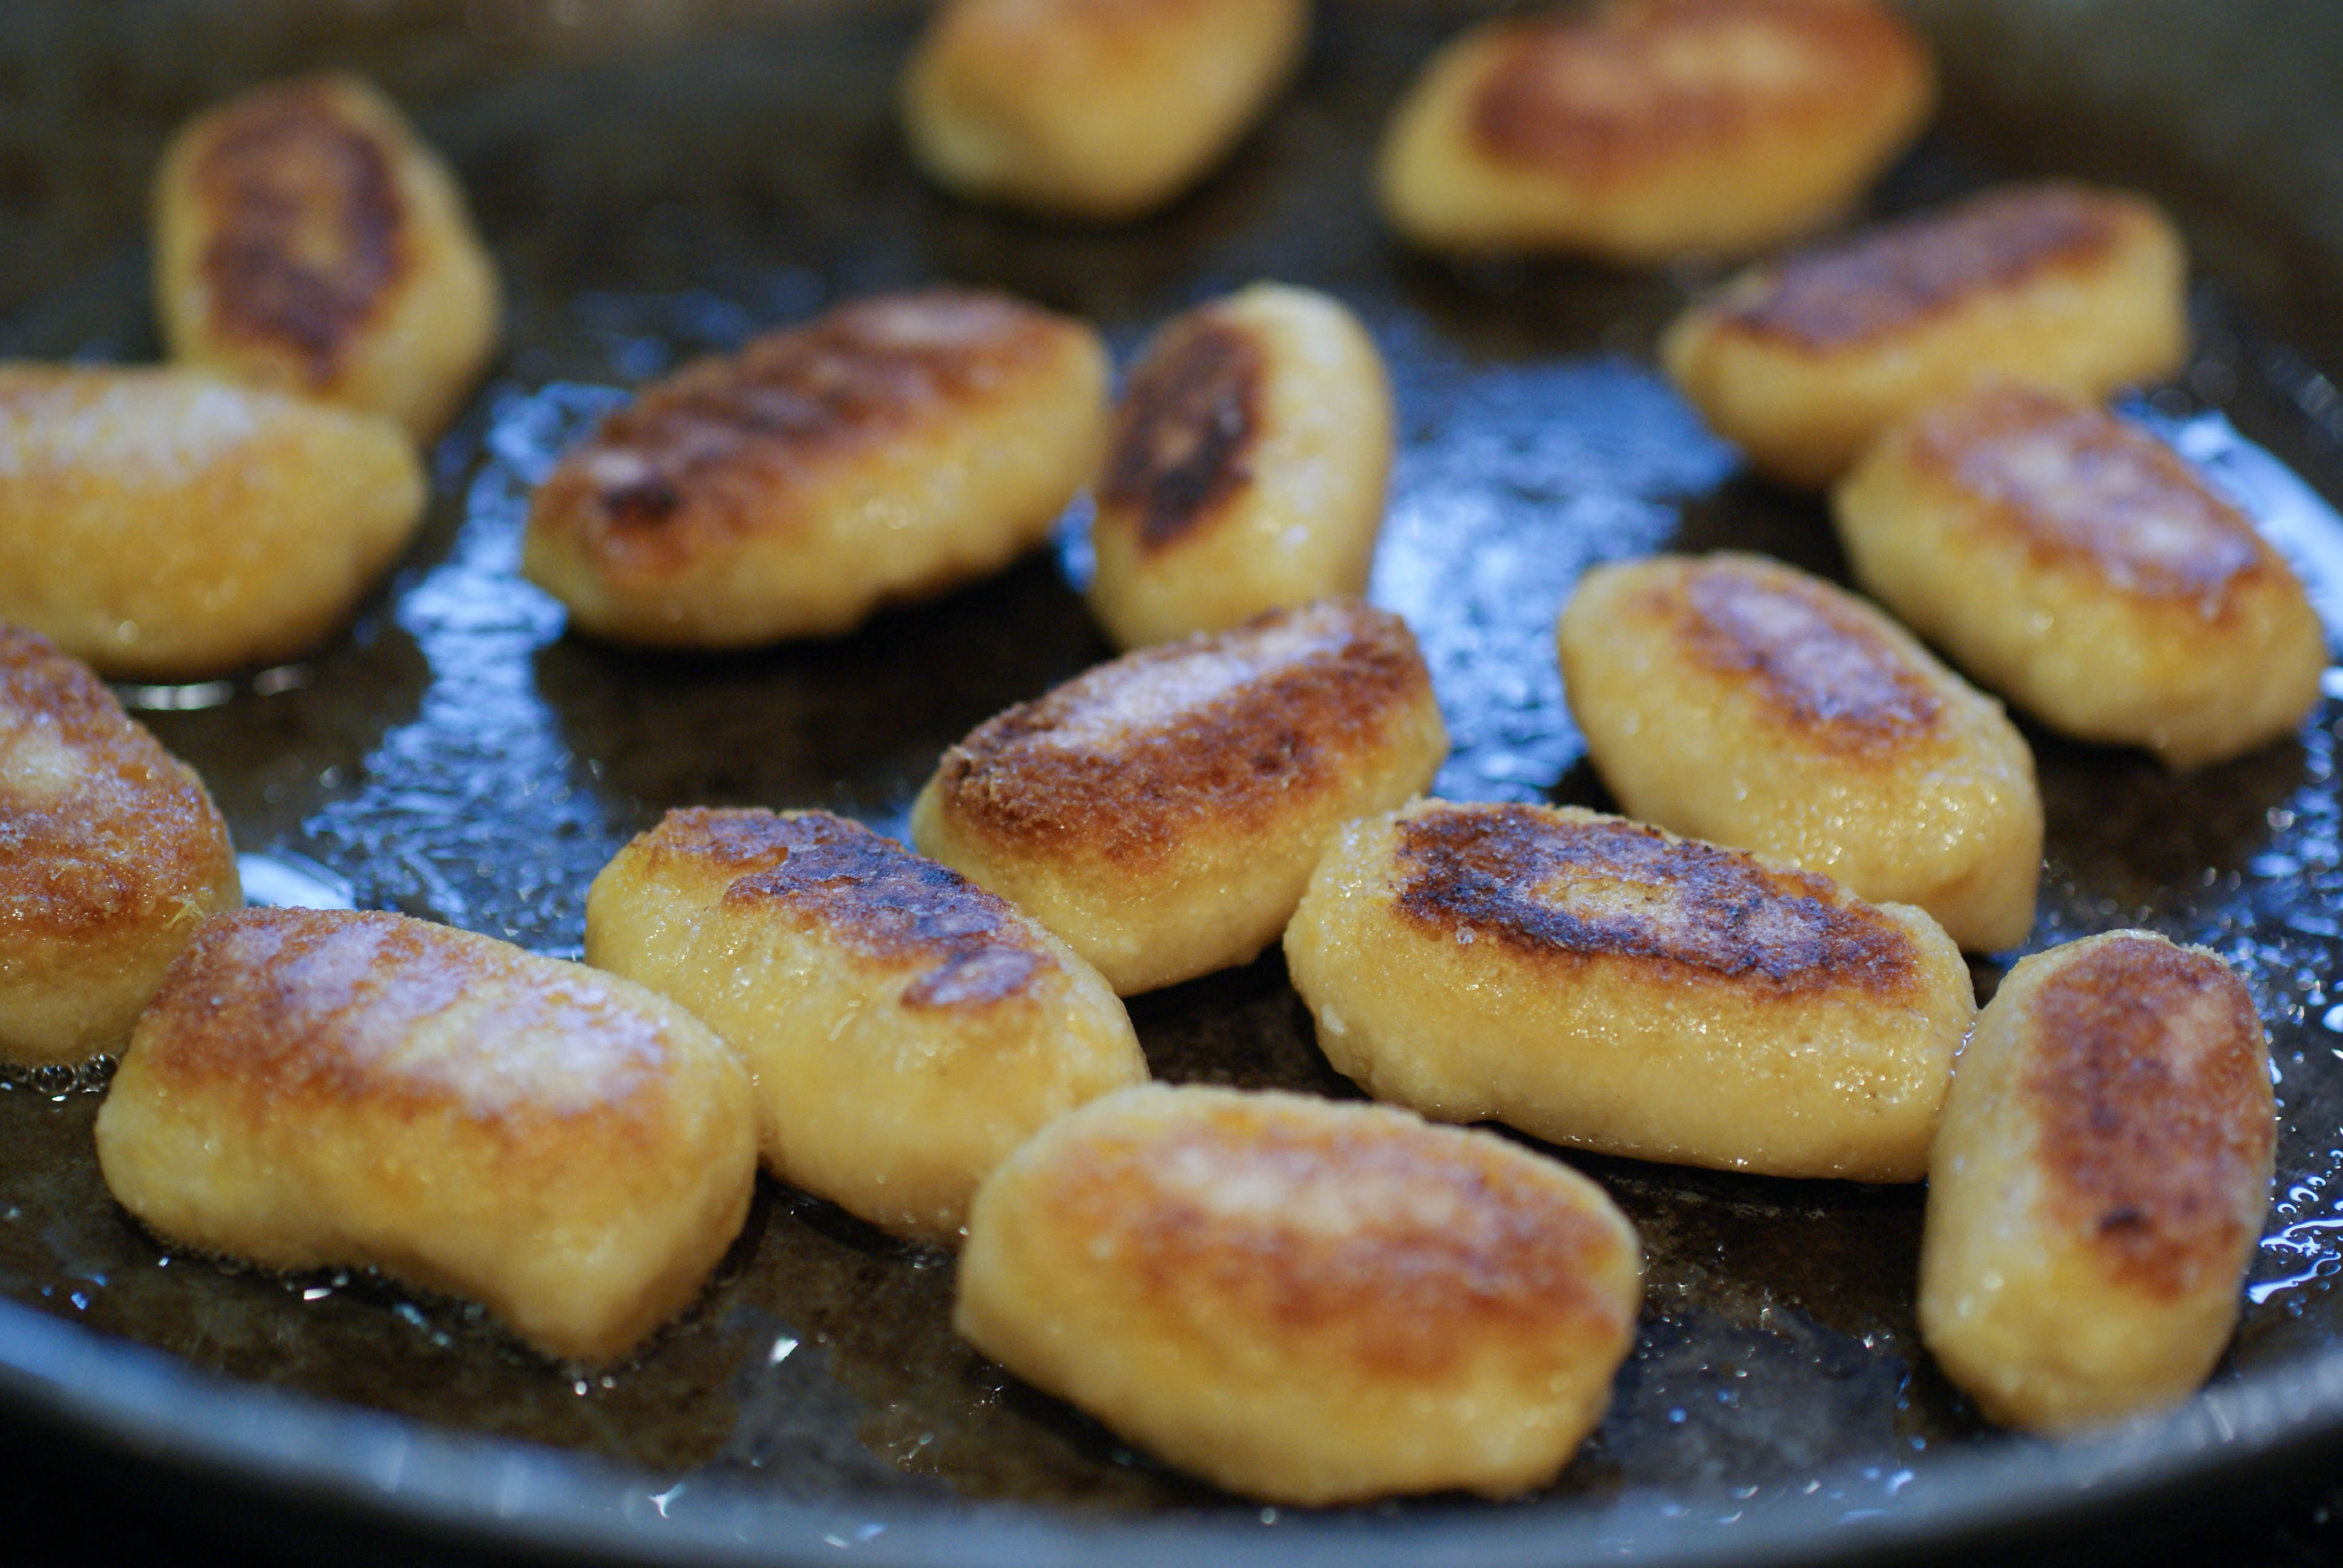
- We went a step further and melted some ghee in a frying pan with a pinch of salt over medium heat and pan fried the gnocchi. It’s important to let it brown before flipping it to brown the other side. If you flip too soon, they will stick and you will know you are trying to turn them too soon.

Fried in ghee
- Remove to a serving plate and top with the sauce of your choice.

Dangerously delicious


Ingredients
- 2 large sweet potatoes (mine totaled 550 grams), baked and peeled
- 2 1/2 cups arrowroot powder (plus a bit more for rolling)
- 2 1/2 cups almond flour
- 1 teaspoon salt
- 1 teaspoon baking soda
- 1 egg white
Instructions
- Poke a few holes in the sweet potatoes and bake them in a 400 F (200 C) oven for about an hour (or until soft and done).
- Remove from the oven and cool completely.
- Peel the sweet potatoes and then mash them in a large mixing bowl.
- Add your flours in 1/2 cup at a time (1/2 cup almond flour, 1/2 cup arrowroot then stir before adding more).
- After you have a whole cup of each flour added in, mix in the salt and baking soda and stir.
- Now beat your egg white until it is frothy and then stir it in.
- Resume adding in the flours half a cup at a time until you reach a dough consistency that you are able to grab a handful of and roll into a ball. For me, this equaled 2 1/2 cups of each flour. You may need a little more or a little less depending on the humidity where you are.
- Put your dough in the fridge for at least half an hour.
- Once it's chilled, dust your counter top or a sheet of parchment paper with some arrowroot powder.
- Take a handful of dough and roll it out into a long snake shape with your hands. If it's sticking to your hands, just dust your hands with some of the arrowroot powder.
- Cut your snakes into segments about an inch each. You can leave them in that shape or you can flatten them a bit with a fork dipped in arrowroot.
- Once all of your dough has been shaped and cut, drop each piece of gnocchi into a pot of boiling water.
- Within about a minute, they will float to the surface. Let them cook for about 30 seconds after they float to the top and them remove them to a colander with a slotted spoon.
- If you want, you can serve them at this point.
- We went a step further and melted some ghee in a frying pan with a pinch of salt over medium heat and pan fried the gnocchi. It's important to let it brown before flipping it to brown the other side. If you flip too soon, they will stick and you will know you are trying to turn them too soon.
- Remove to a serving plate and top with the sauce of your choice.
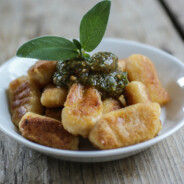
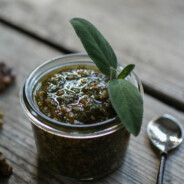
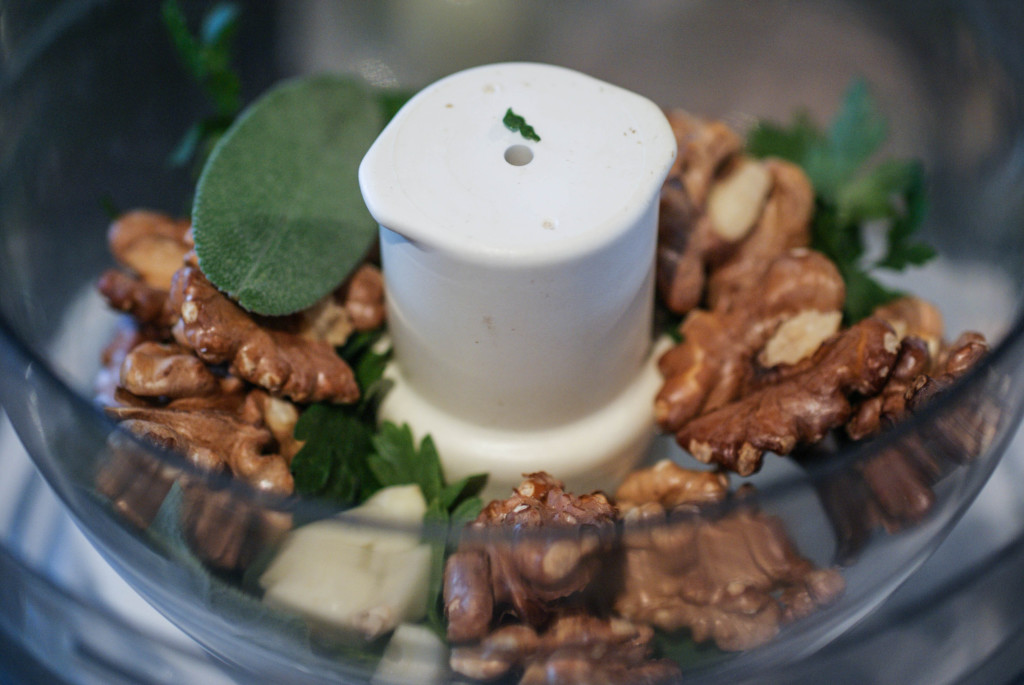
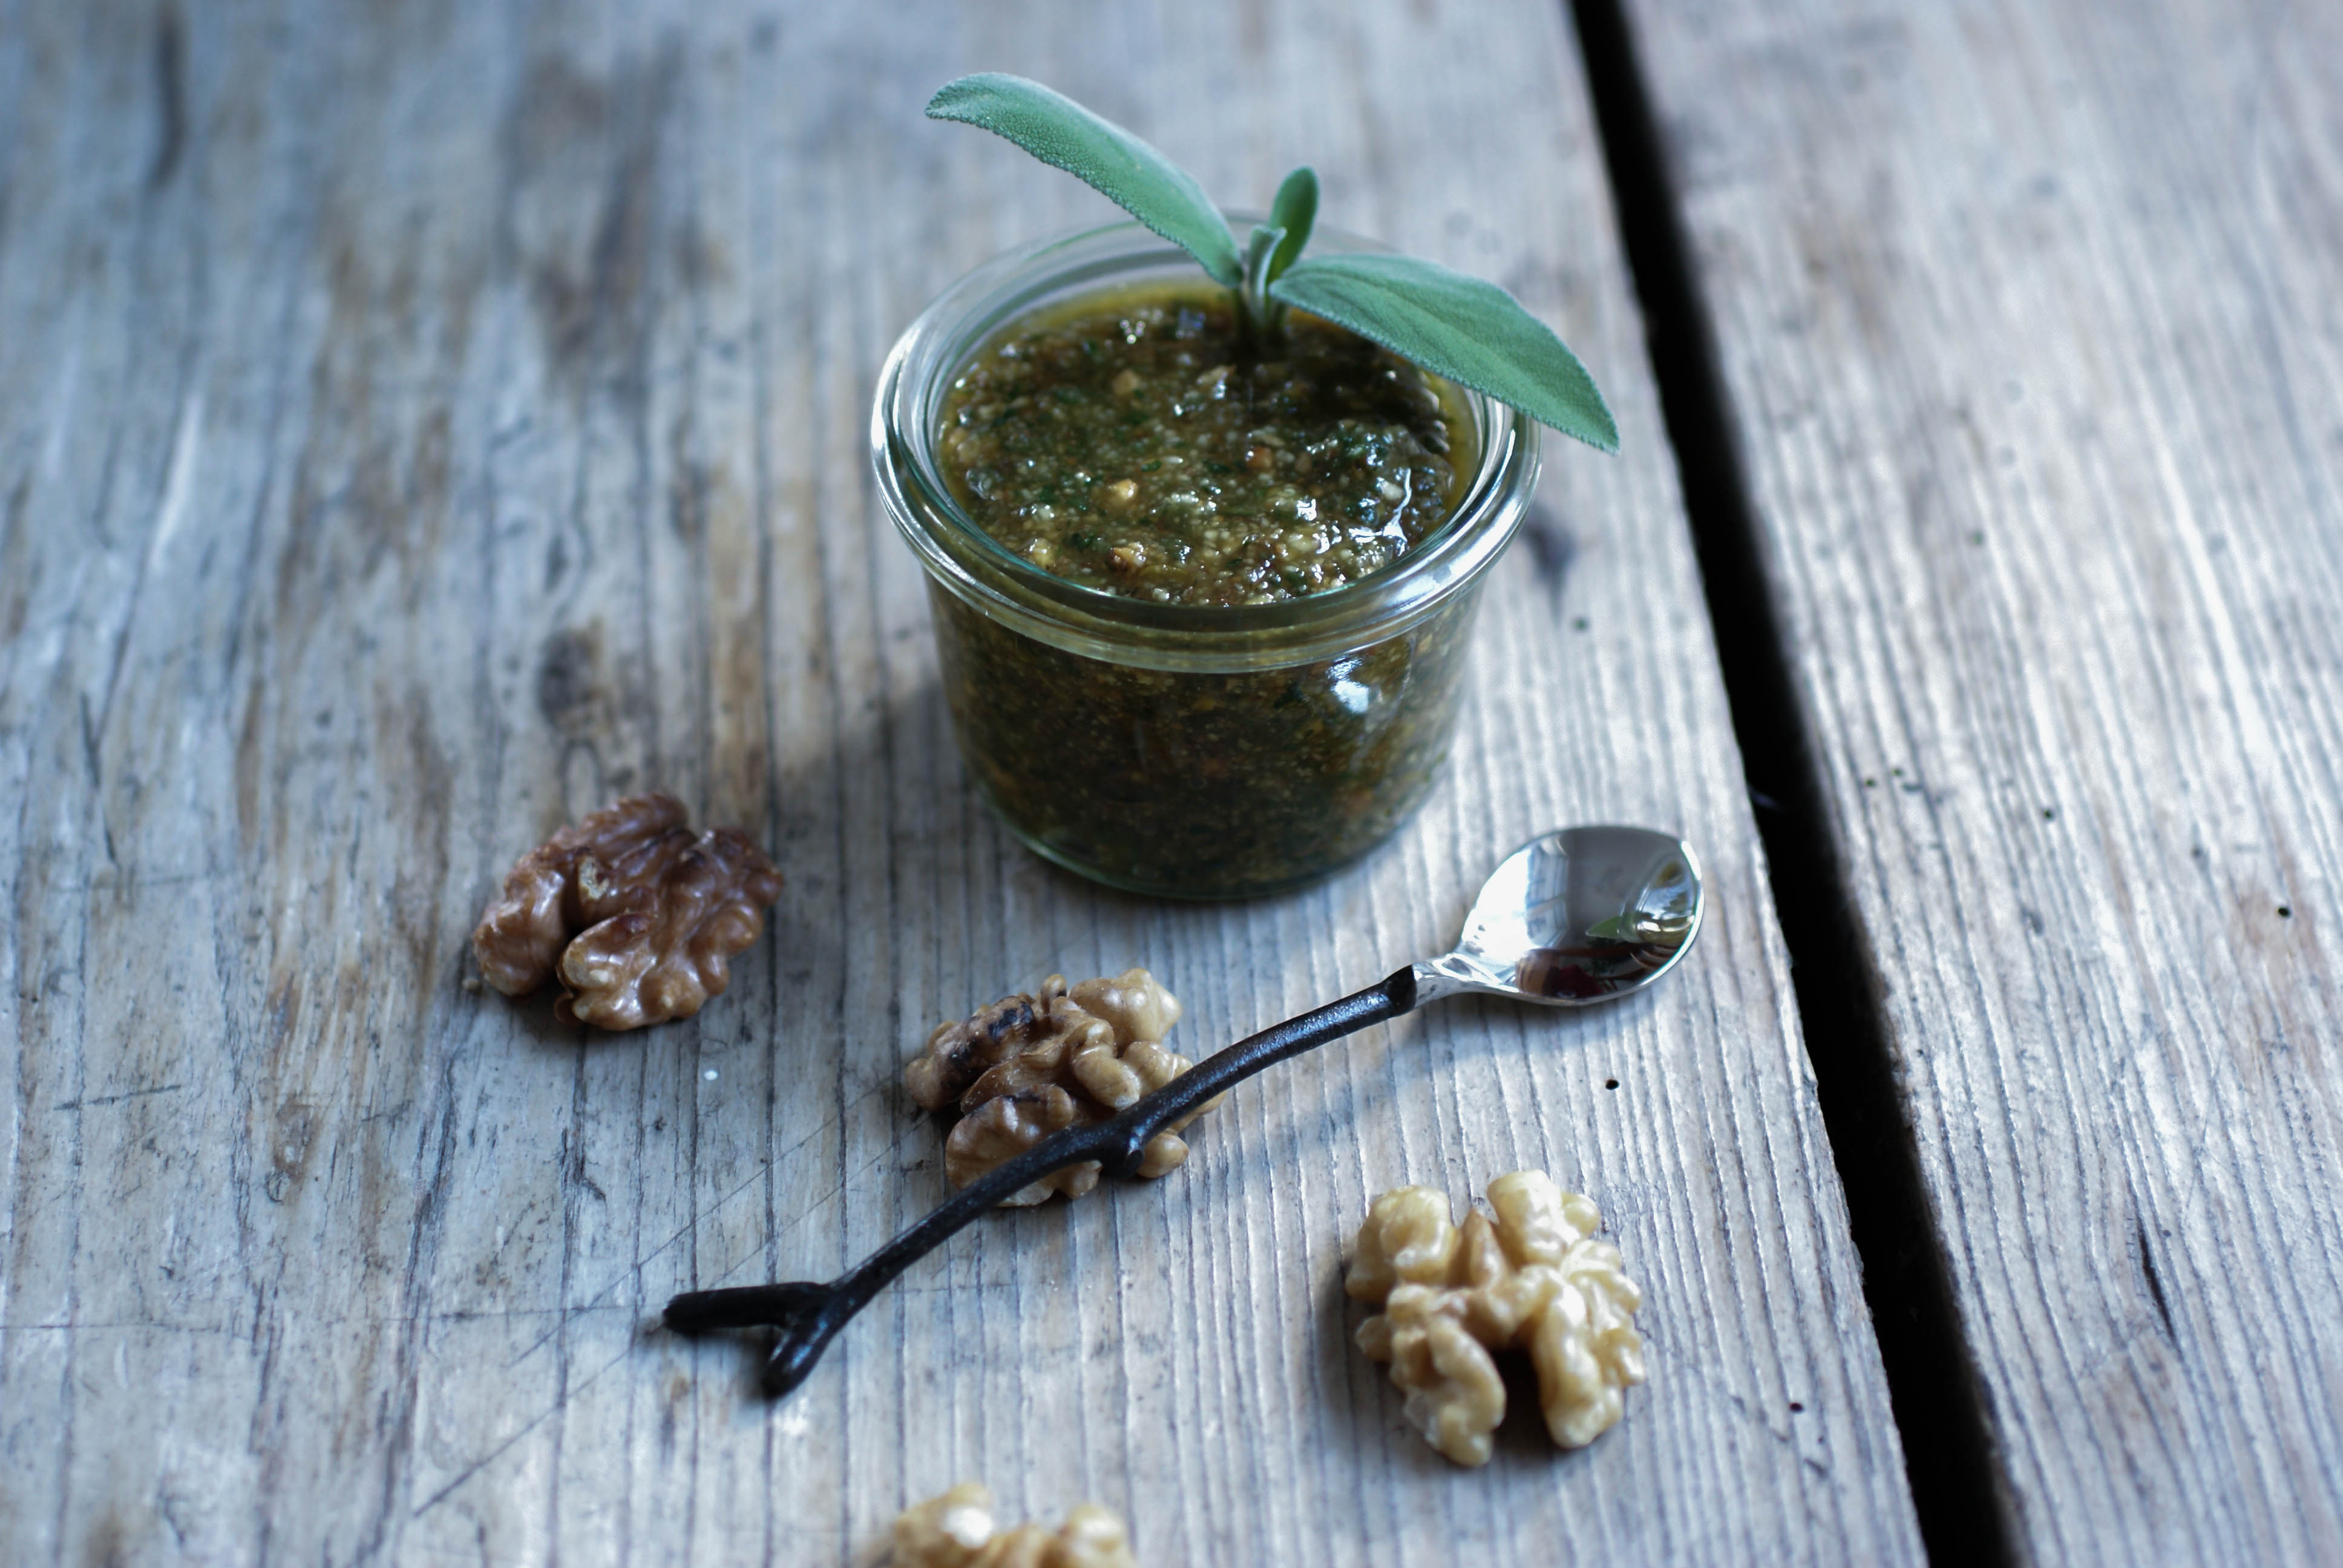
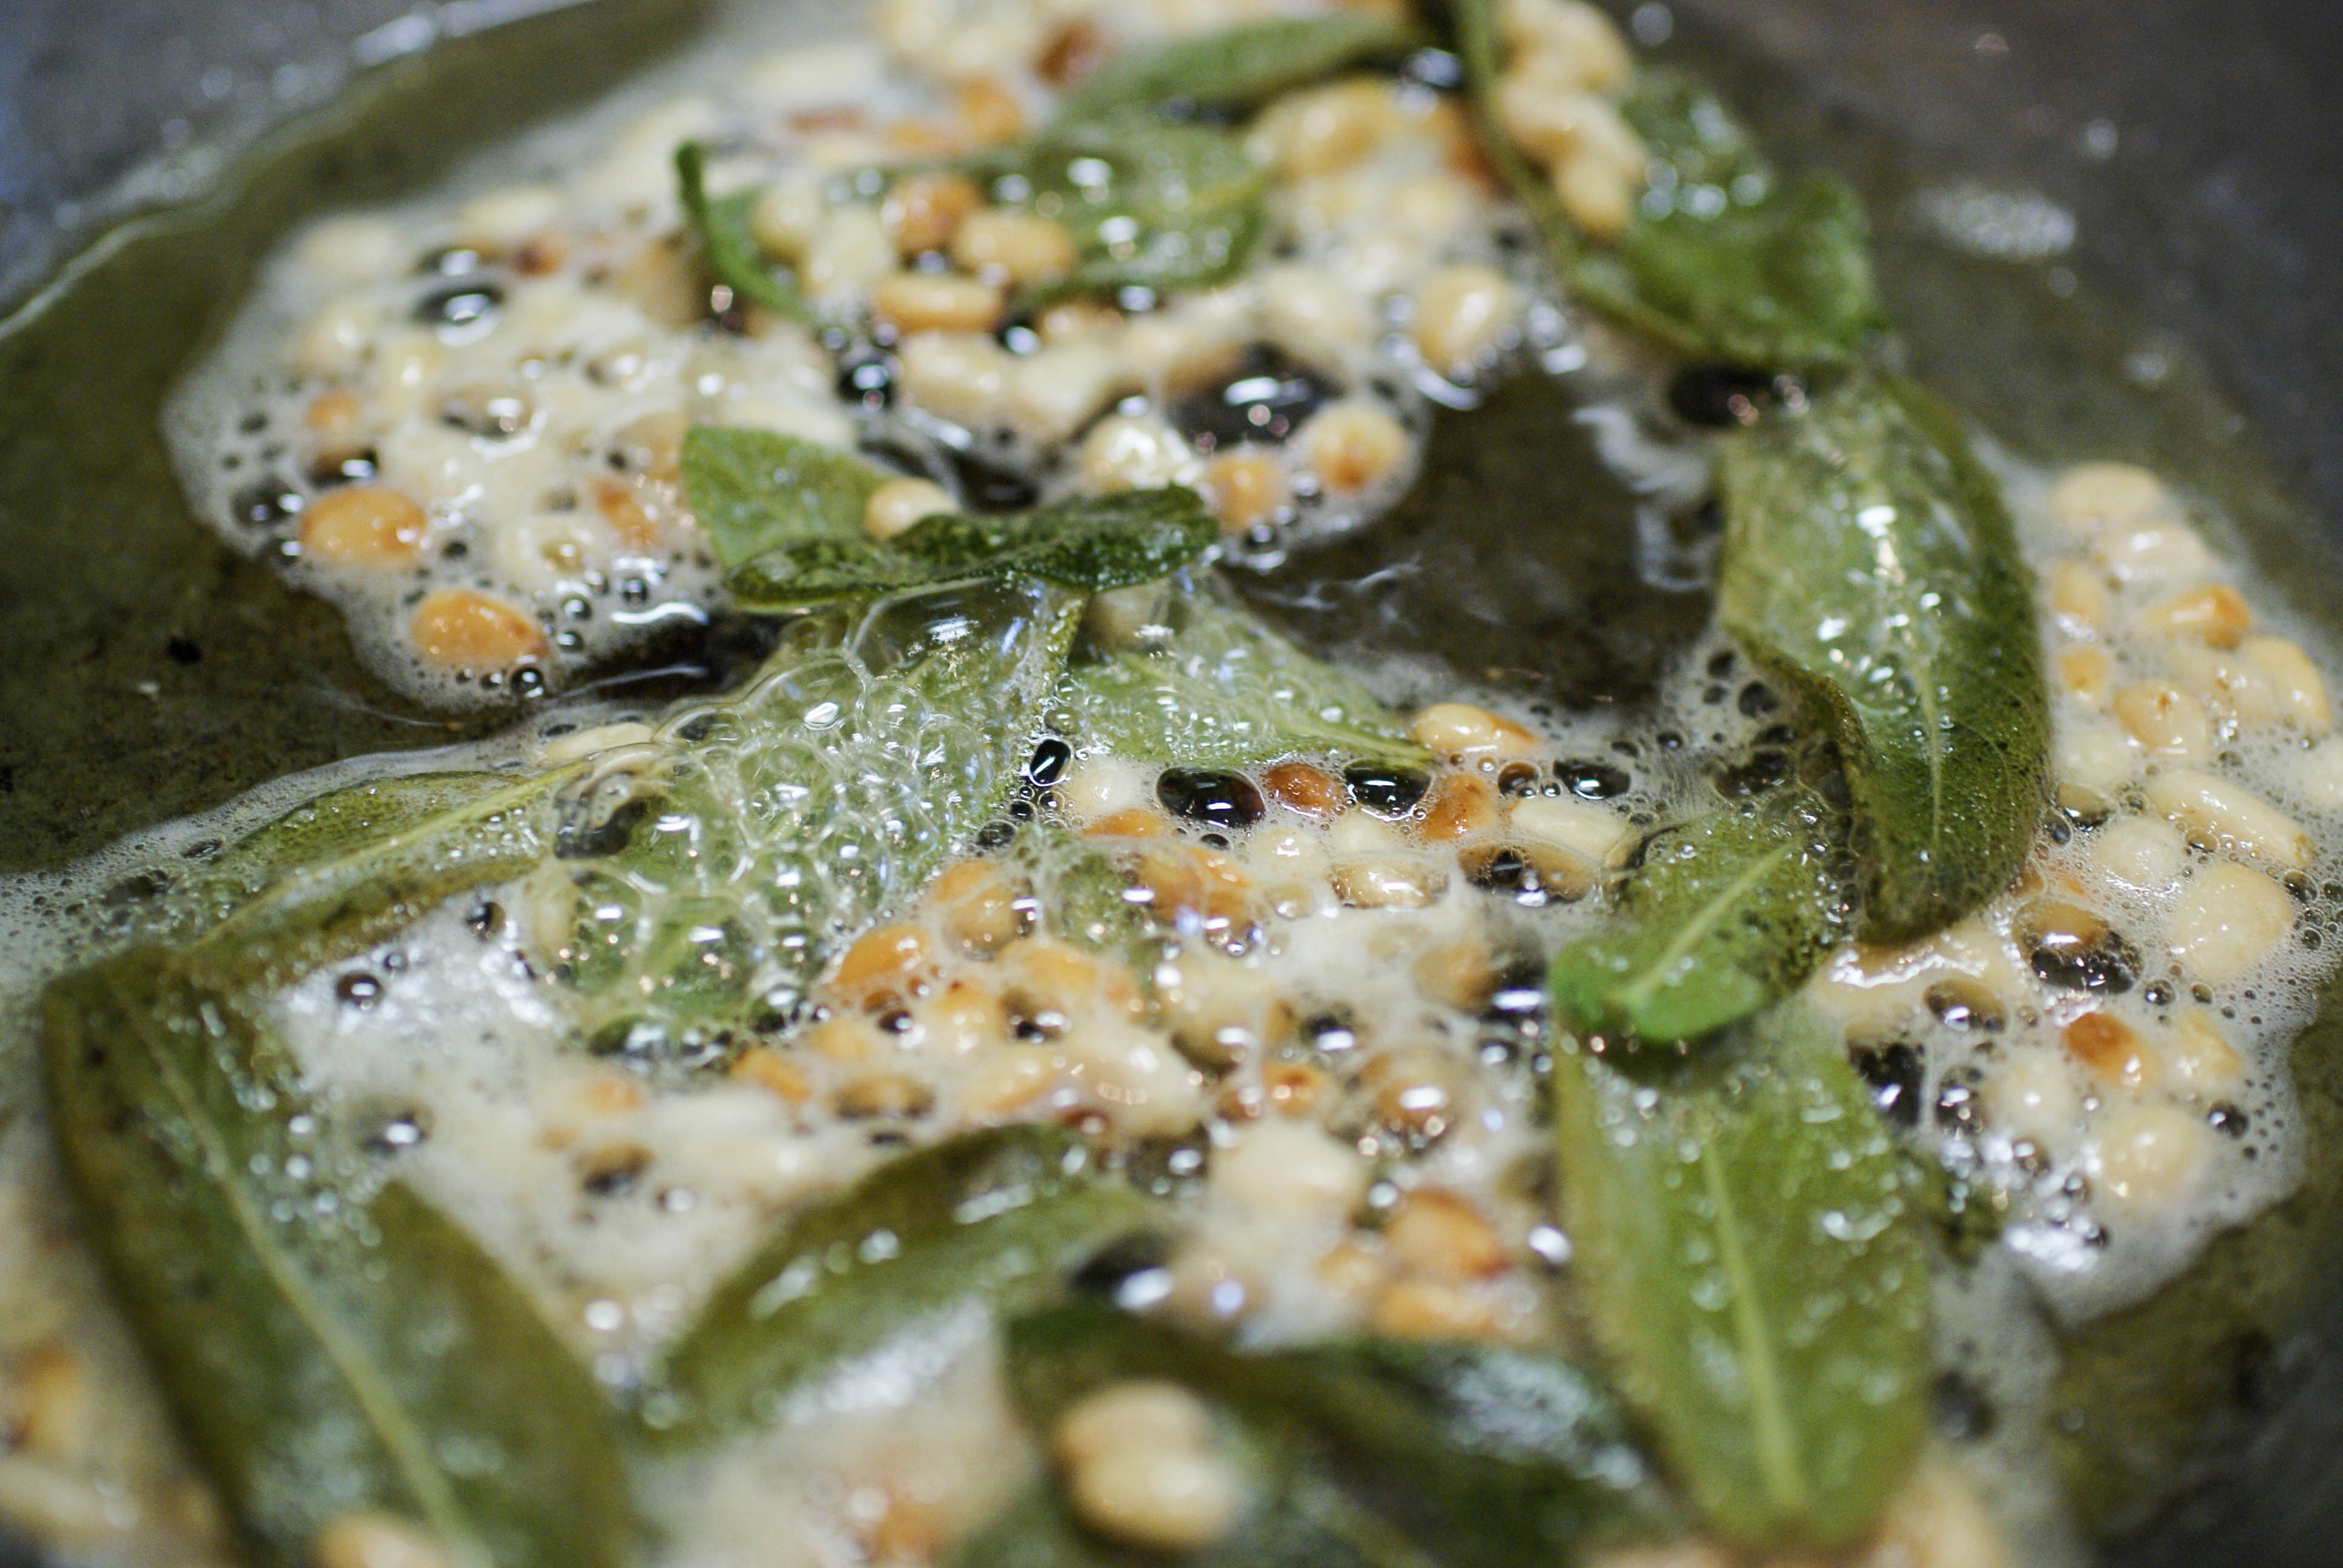
Roasted Walnut and Sage Pesto
I love pesto. The funny thing is, I never ate it pre-paleo as something to slather over pasta. We usually use it as a spread for meat (chicken or steak). I tend to vary the nuts I use or the herb combinations to come up with different flavors. We had loads of sage growing in our garden this past summer/fall and I really need to make use of it, so this time around, the main herb is sage.
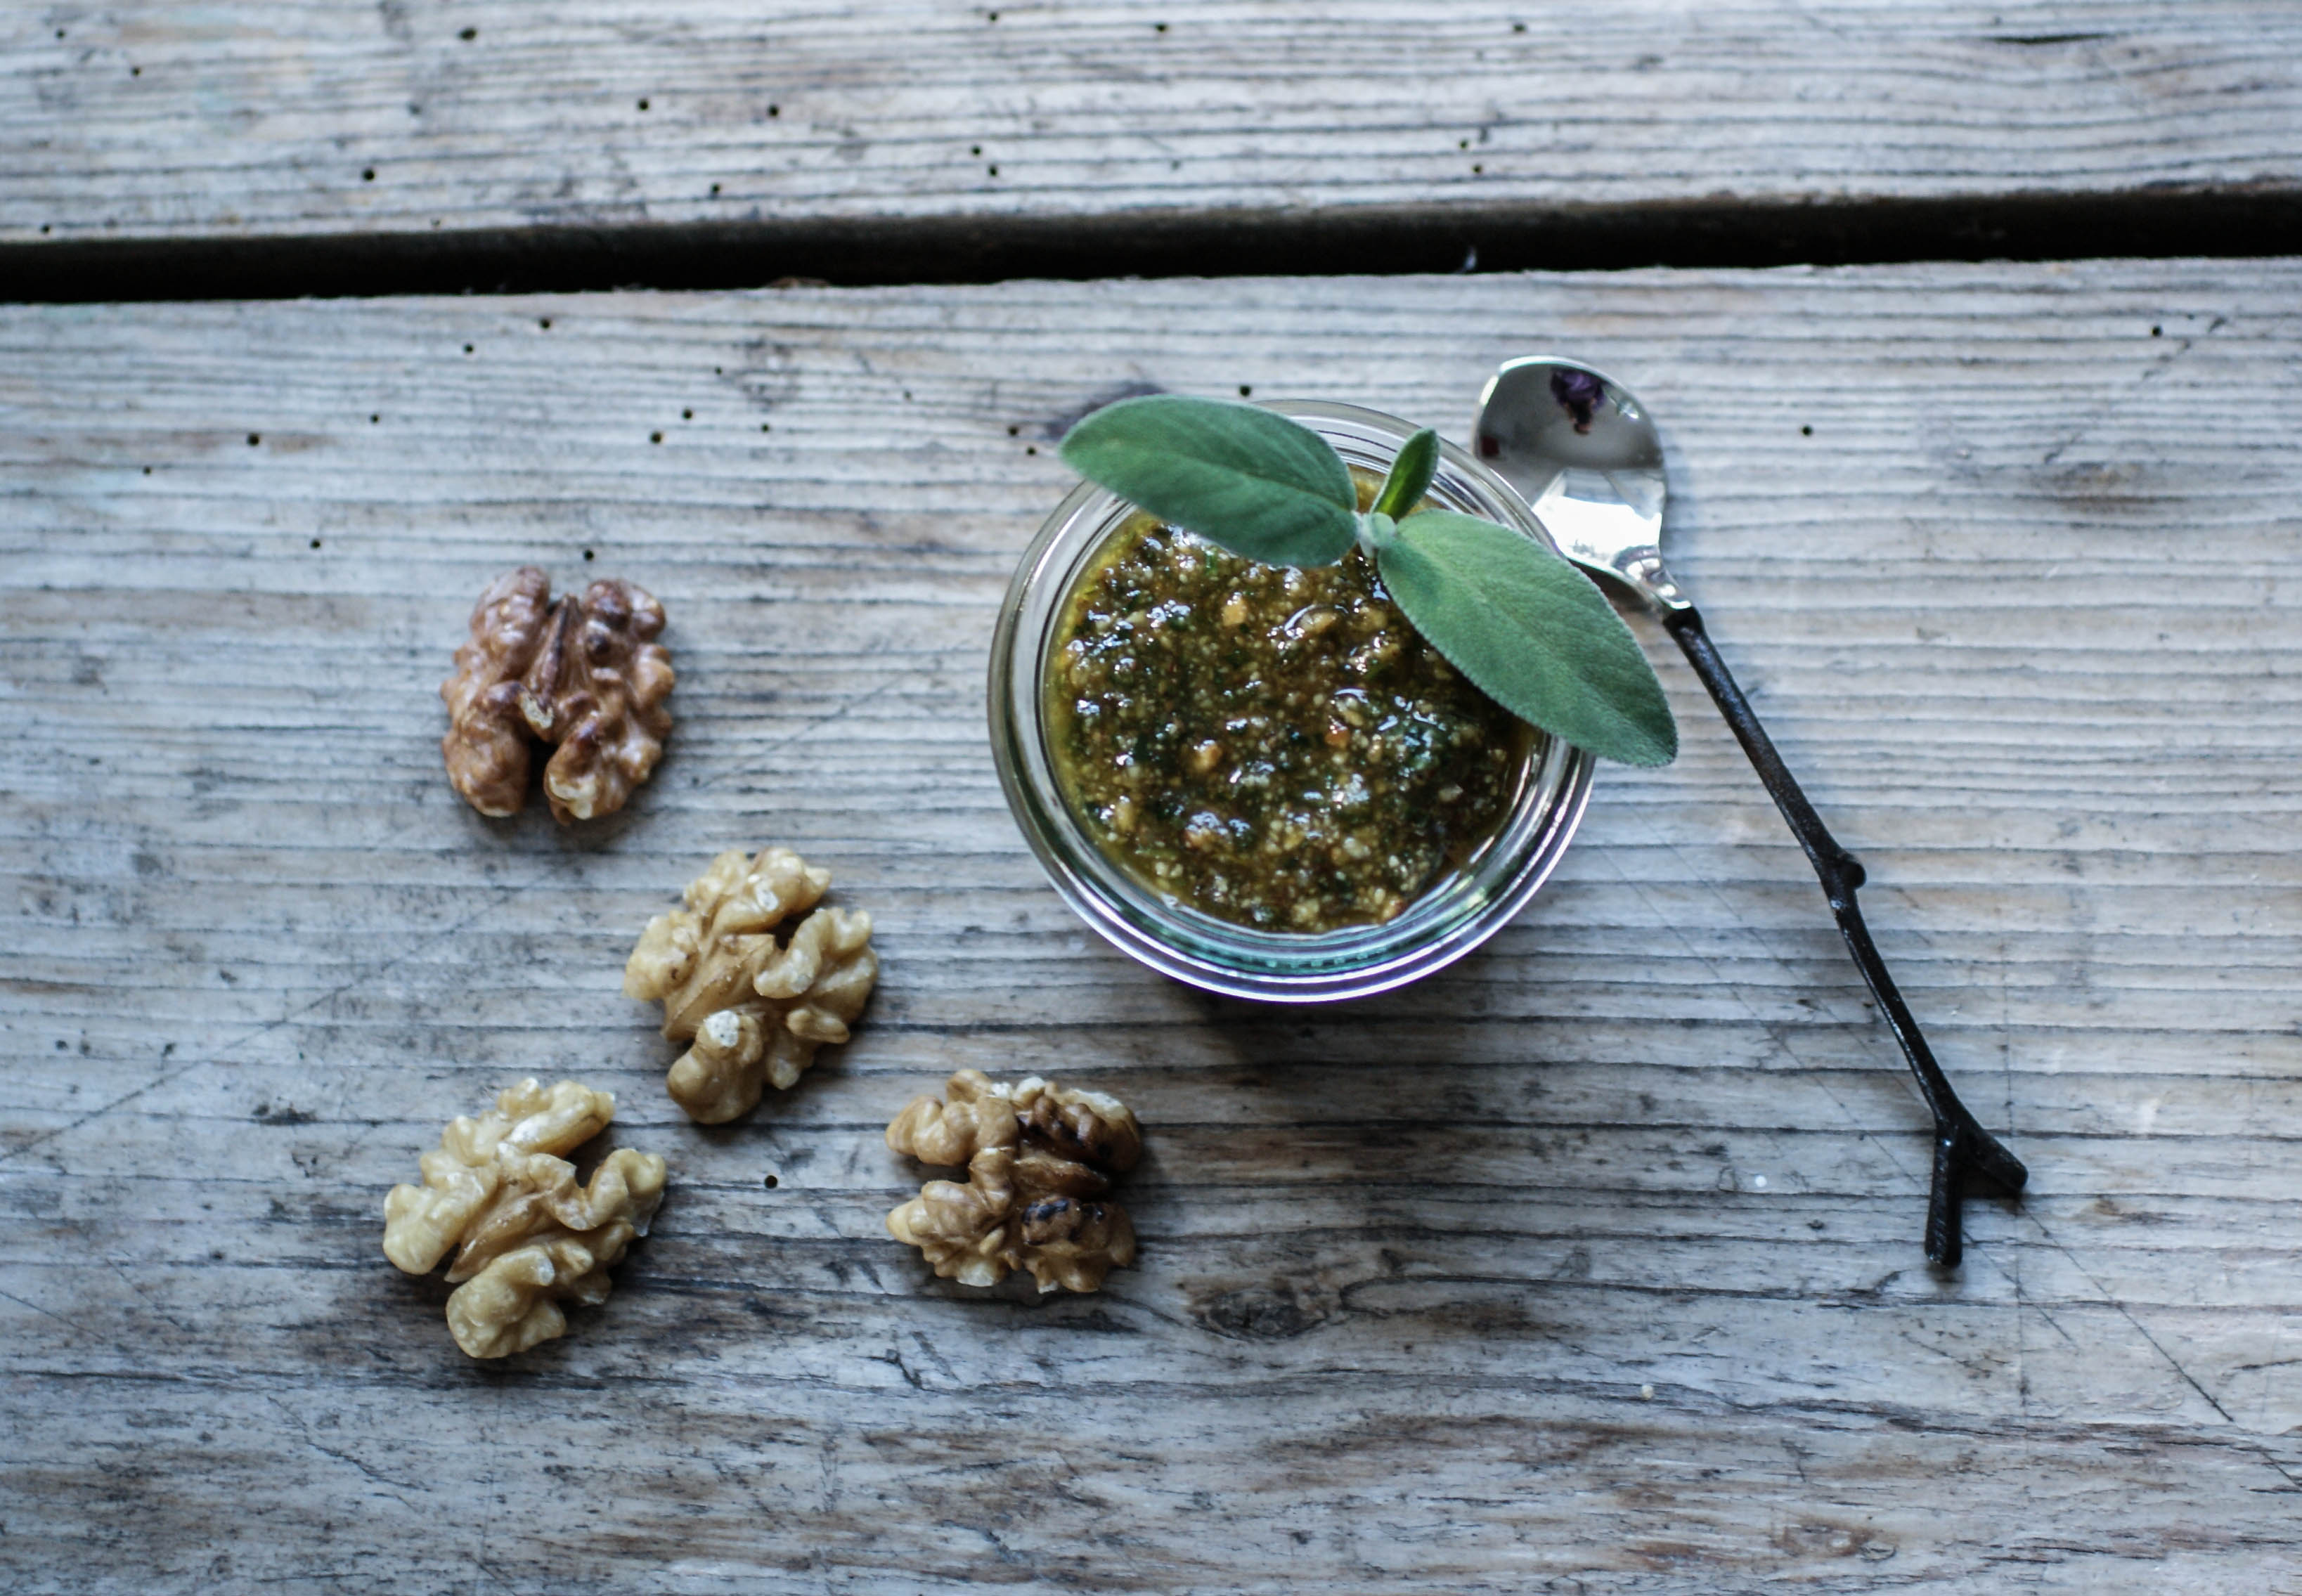
Roasted Walnut Sage Pesto
This turned out absolutely delicious. We served it over sweet potato gnocchi and also over grilled chicken. It also works well as a salad dressing over mixed greens.

Tastes great on anything
Ingredients
- 1/4 cup fresh sage leaves
- 2 Tablespoons of fresh flat leaf parsley
- 1 garlic clove
- 1/2 cup roasted walnuts (lightly dry roast in the oven for 10-15 minutes until lightly browned)
- 1 teaspoon fresh lemon zest
- 1/3 cup olive oil
- Salt and pepper to taste
Instructions
- Put everything but the oil in a food processor and whiz well to blend.
So easy to make
- As it starts to form a fine crumb like texture, slowly drizzle the oil in while the processor is still on and blending.
- Scrape down the sides once or twice during blending.
- Add salt and pepper to taste.

Enjoy!

Ingredients
- 1/4 cup fresh sage leaves
- 2 Tablespoons of fresh flat leaf parsley
- 1 garlic clove
- 1/2 cup roasted walnuts (lightly dry roast in the oven for 10-15 minutes until lightly browned)
- 1 teaspoon fresh lemon zest
- 1/3 cup olive oil
- Salt and pepper to taste
Instructions
- Put everything but the oil in a food processor and whiz well to blend.
- As it starts to form a fine crumb like texture, slowly drizzle the oil in while the processor is still on and blending.
- Scrape down the sides once or twice during blending.
- Add salt and pepper to taste.
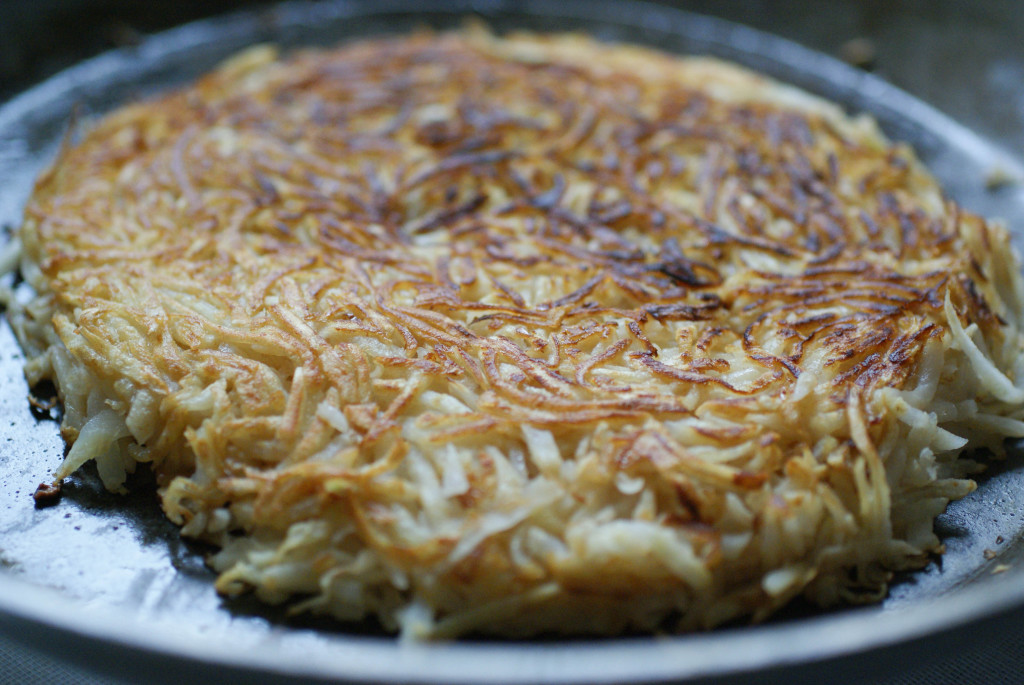
Celery Root Rösti (hash browns)
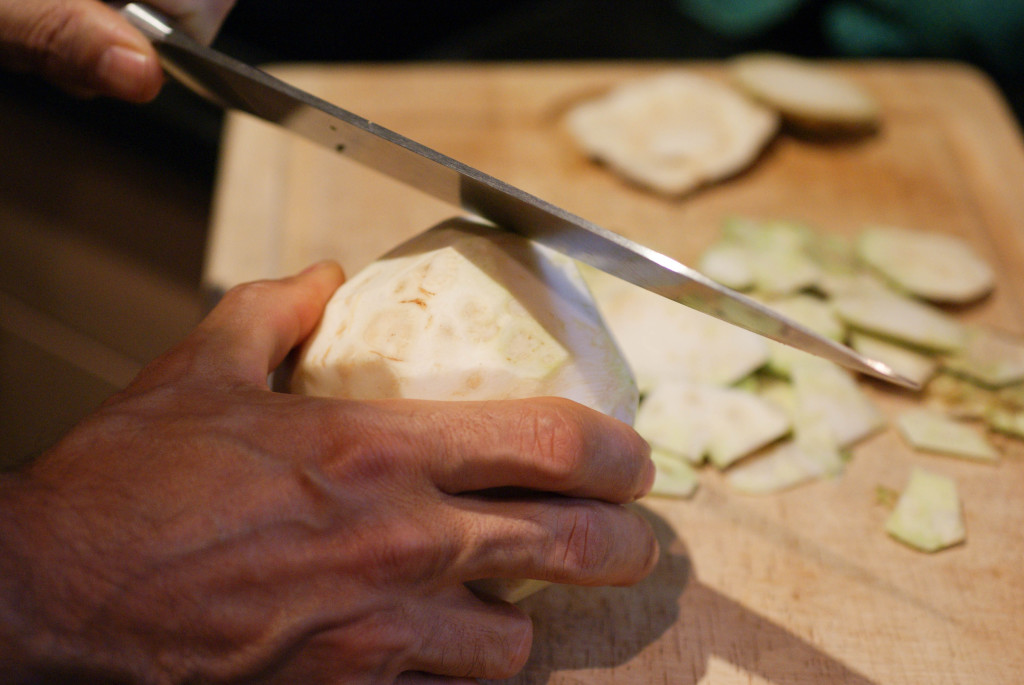
Celery roots are a staple in the Swiss grocery stores. I’ve never really done much with them before, other than chop them up and add them to soups and stews.

Celeriac Root
Celery root (celeriac) is a root vegetable, but unlike most other tubers, it has a very low starch content (very low carb). What I love about root vegetables and winter squash, is that you can buy them and let them sit around for weeks until you feel ready to do something with them. They aren’t going to go bad or spoil.
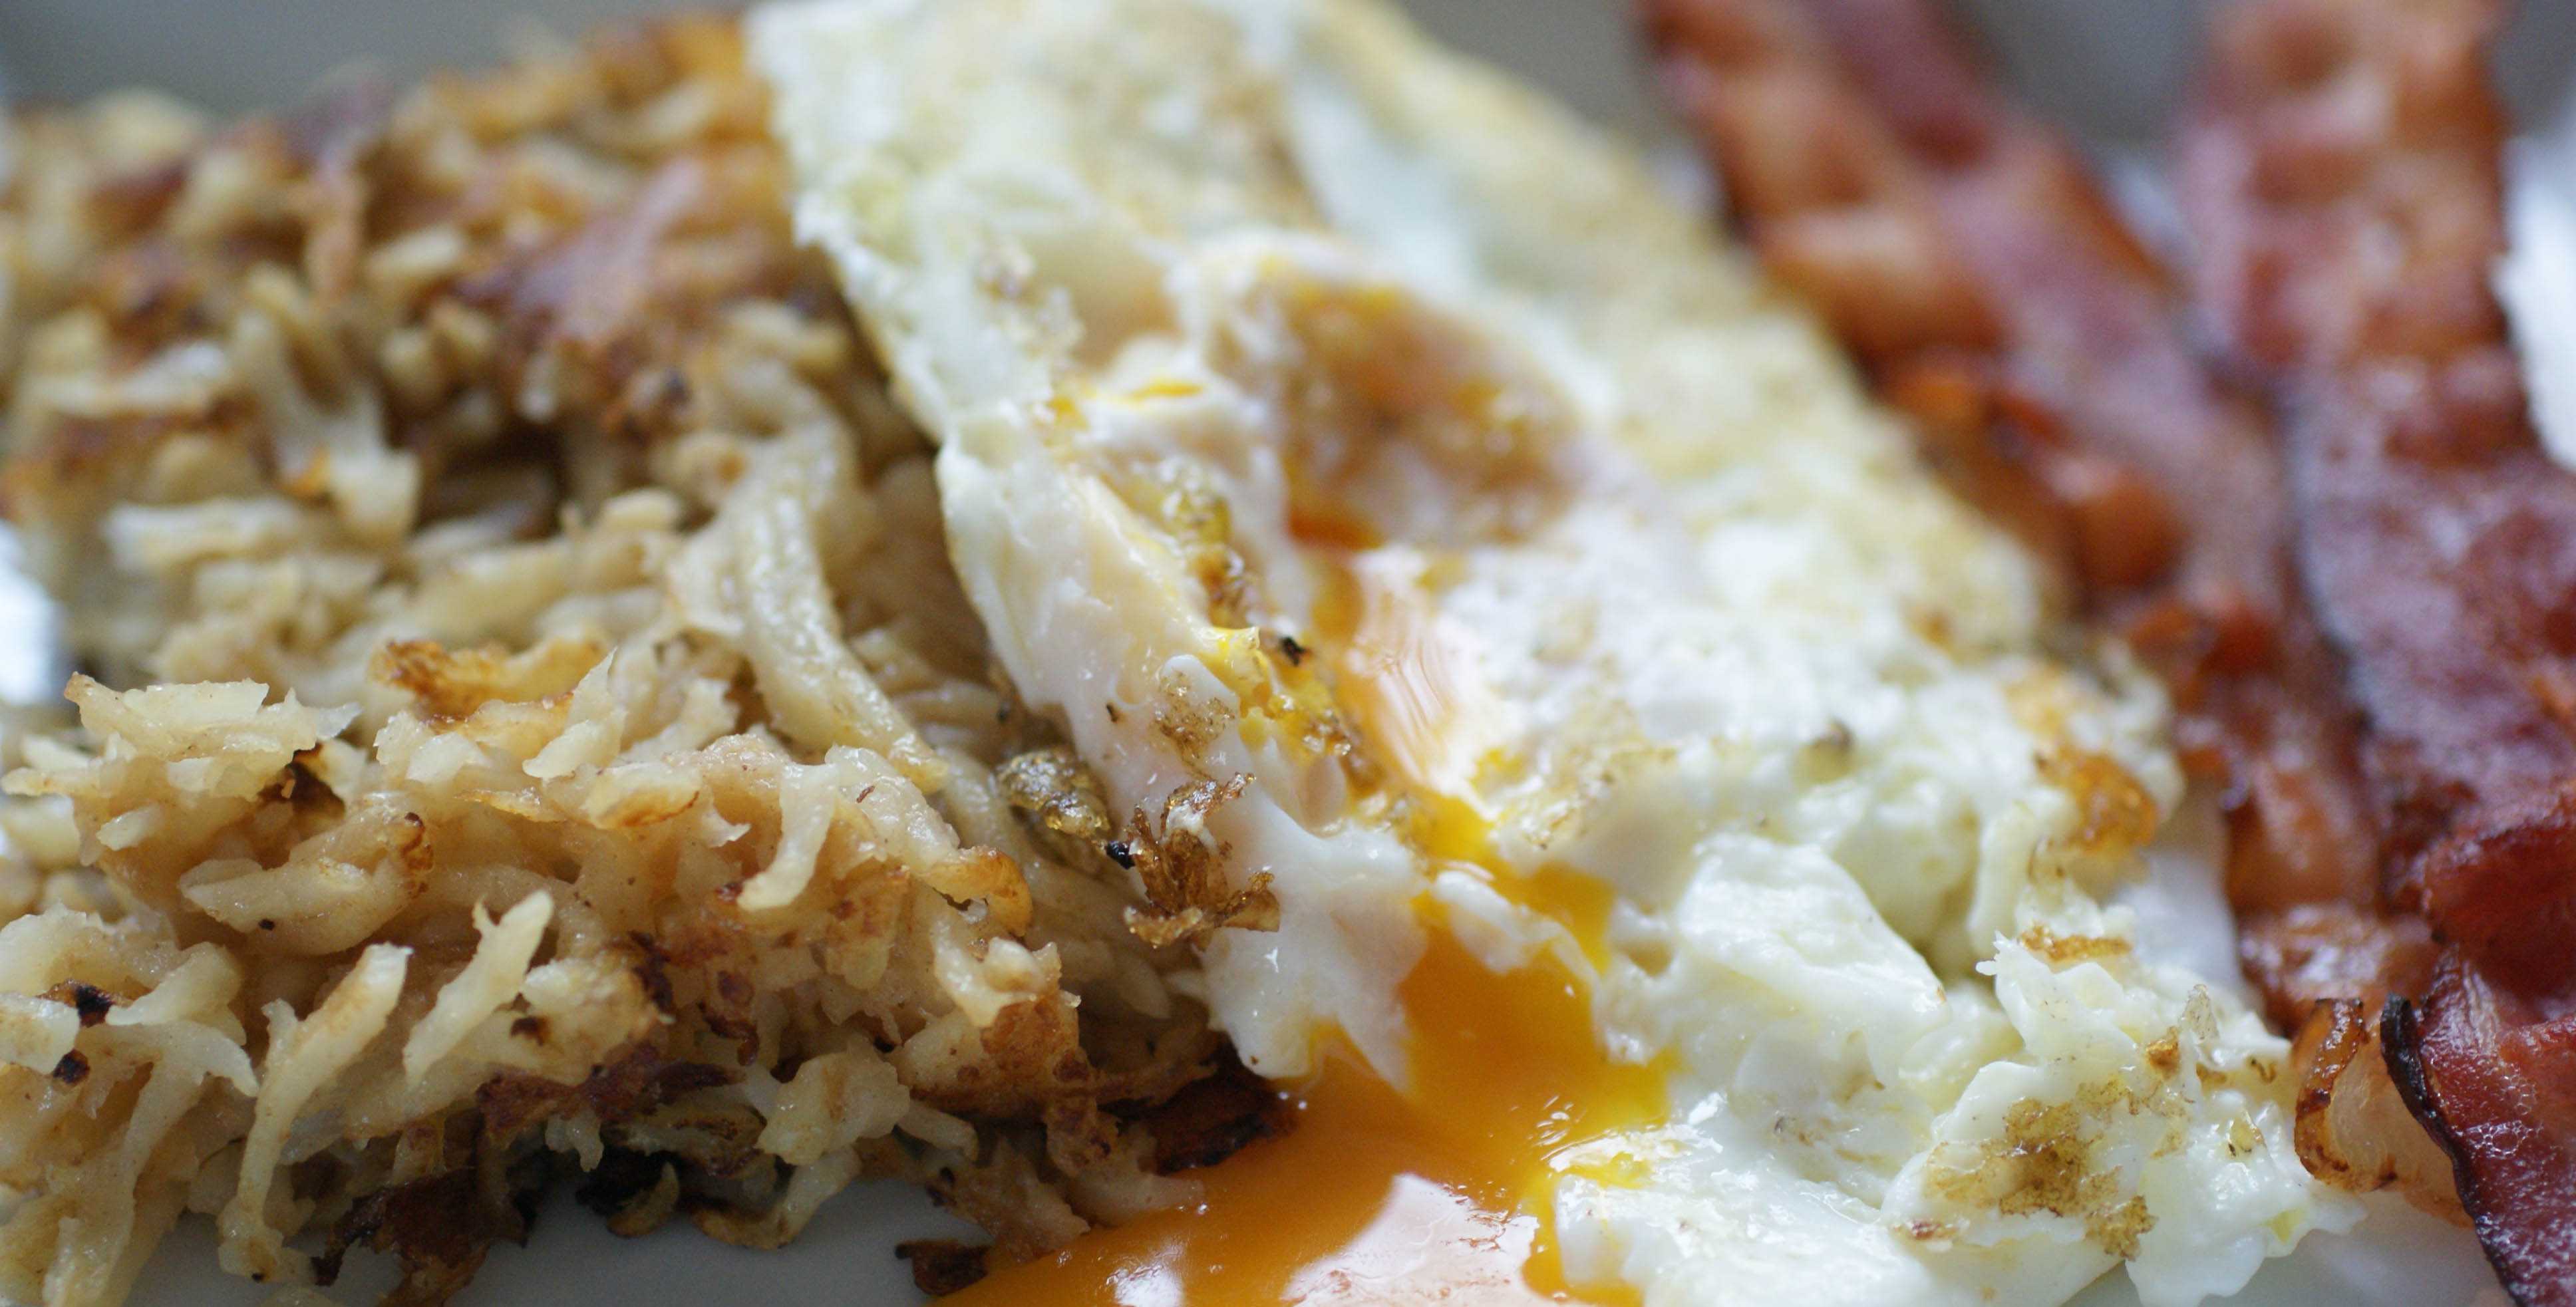
One of our favorite Swiss meals has always been Rösti. Rösti is like a giant hash brown made from potatoes. You can get it topped with all sorts of things, and it’s served as a main meal (not just for breakfast). One of our favorite places to eat Rösti is The Johanniter in old town Zürich. I’ve always loved mine topped with a fried egg, bacon and melted cheese. Yum….

Perfect low carb Rösti
I really wasn’t very optimistic about this dish and Mr. Swiss Paleo was downright skeptical. We were both proven wrong and we thought celery hash browns were delicious. They have a creamy sweet taste and not an over powering celery taste. If I didn’t know it was celery root, I would never be able to guess.
Breakfast
Ingredients
- 1 or 2 celery roots, depending on how much you want to make
- coconut oil, ghee or lard for pan frying (we used lard)
- salt and pepper to taste
- topping of choice
Instructions
- Peel the celery root with a paring knife or vegetable peeler.
Peel your roots
- Chop it into chunks and grate it with a hand grater or in a food processor (I used my food processor).
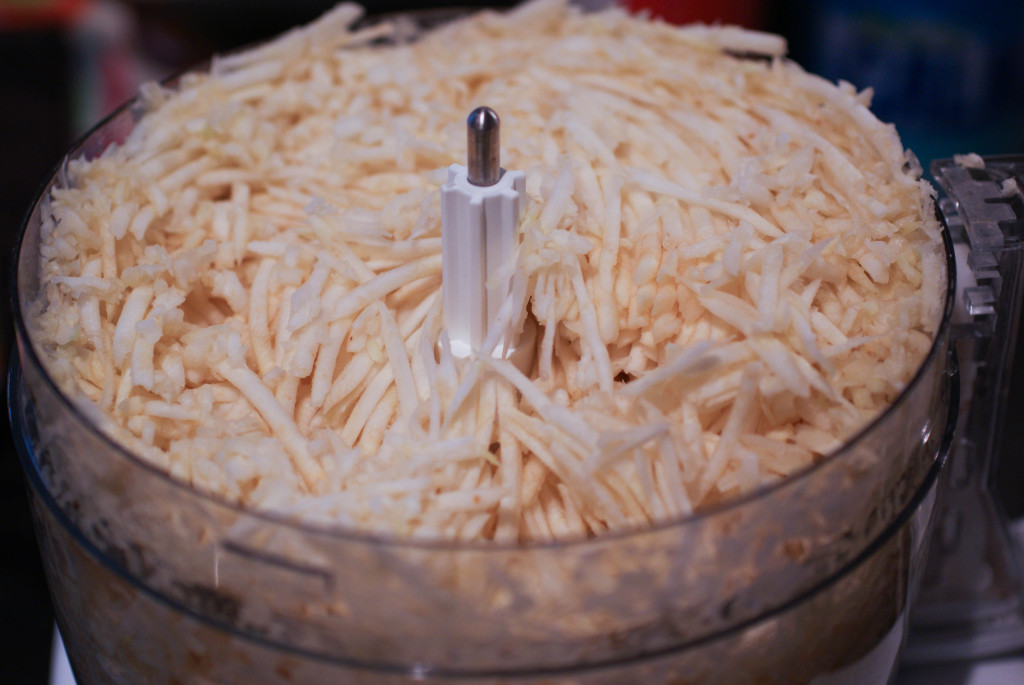
Grated
- Add salt and pepper to taste to the grated celery root.
- Heat the oil in a frying pan over medium high heat.
- You can either make individual smaller hash brown patties or you can fill your pan and make one large Rösti (which you then can cut into wedges for serving).
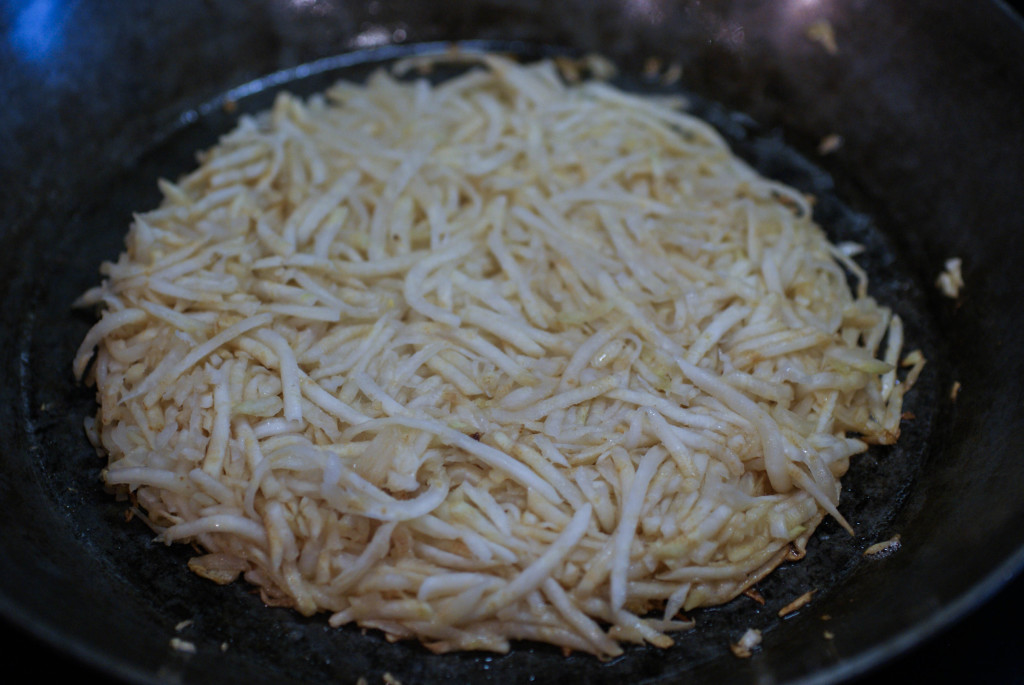
Before flipping
- Cook anywhere from 10-20 minutes before flipping. You don’t want to attempt flipping until it’s well browned on the bottom. If you have filled your pan for a large Rösti, it’s easiest to to flip it by inverting it onto a plate and then sliding it back into the pan.
- Cook a further 10- 15 minutes until browned again.
- Serve with scrambled or fried eggs, bacon, tomato salsa, roasted vegetables….whatever you like!
Perfectly browned


Ingredients
- 1 or 2 celery roots, depending on how much you want to make
- coconut oil, ghee or lard for pan frying (we used lard)
- salt and pepper to taste
- topping of choice
Instructions
- Peel the celery root with a paring knife or vegetable peeler.
- Chop it into chunks and grate it with a hand grater or in a food processor (I used my food processor).
- Add salt and pepper to taste to the grated celery root.
- Heat the oil in a frying pan over medium high heat.
- You can either make individual smaller hash brown patties or you can fill your pan and make one large Rösti (which you then can cut into wedges for serving).
- Cook anywhere from 10-20 minutes before flipping. You don't want to attempt flipping until it's well browned on the bottom. If you have filled your pan for a large Rösti, it's easiest to to flip it by inverting it onto a plate and then sliding it back into the pan.
- Cook a further 10- 15 minutes until browned again.
- Serve with scrambled or fried eggs, bacon, tomato salsa, roasted vegetables....whatever you like!
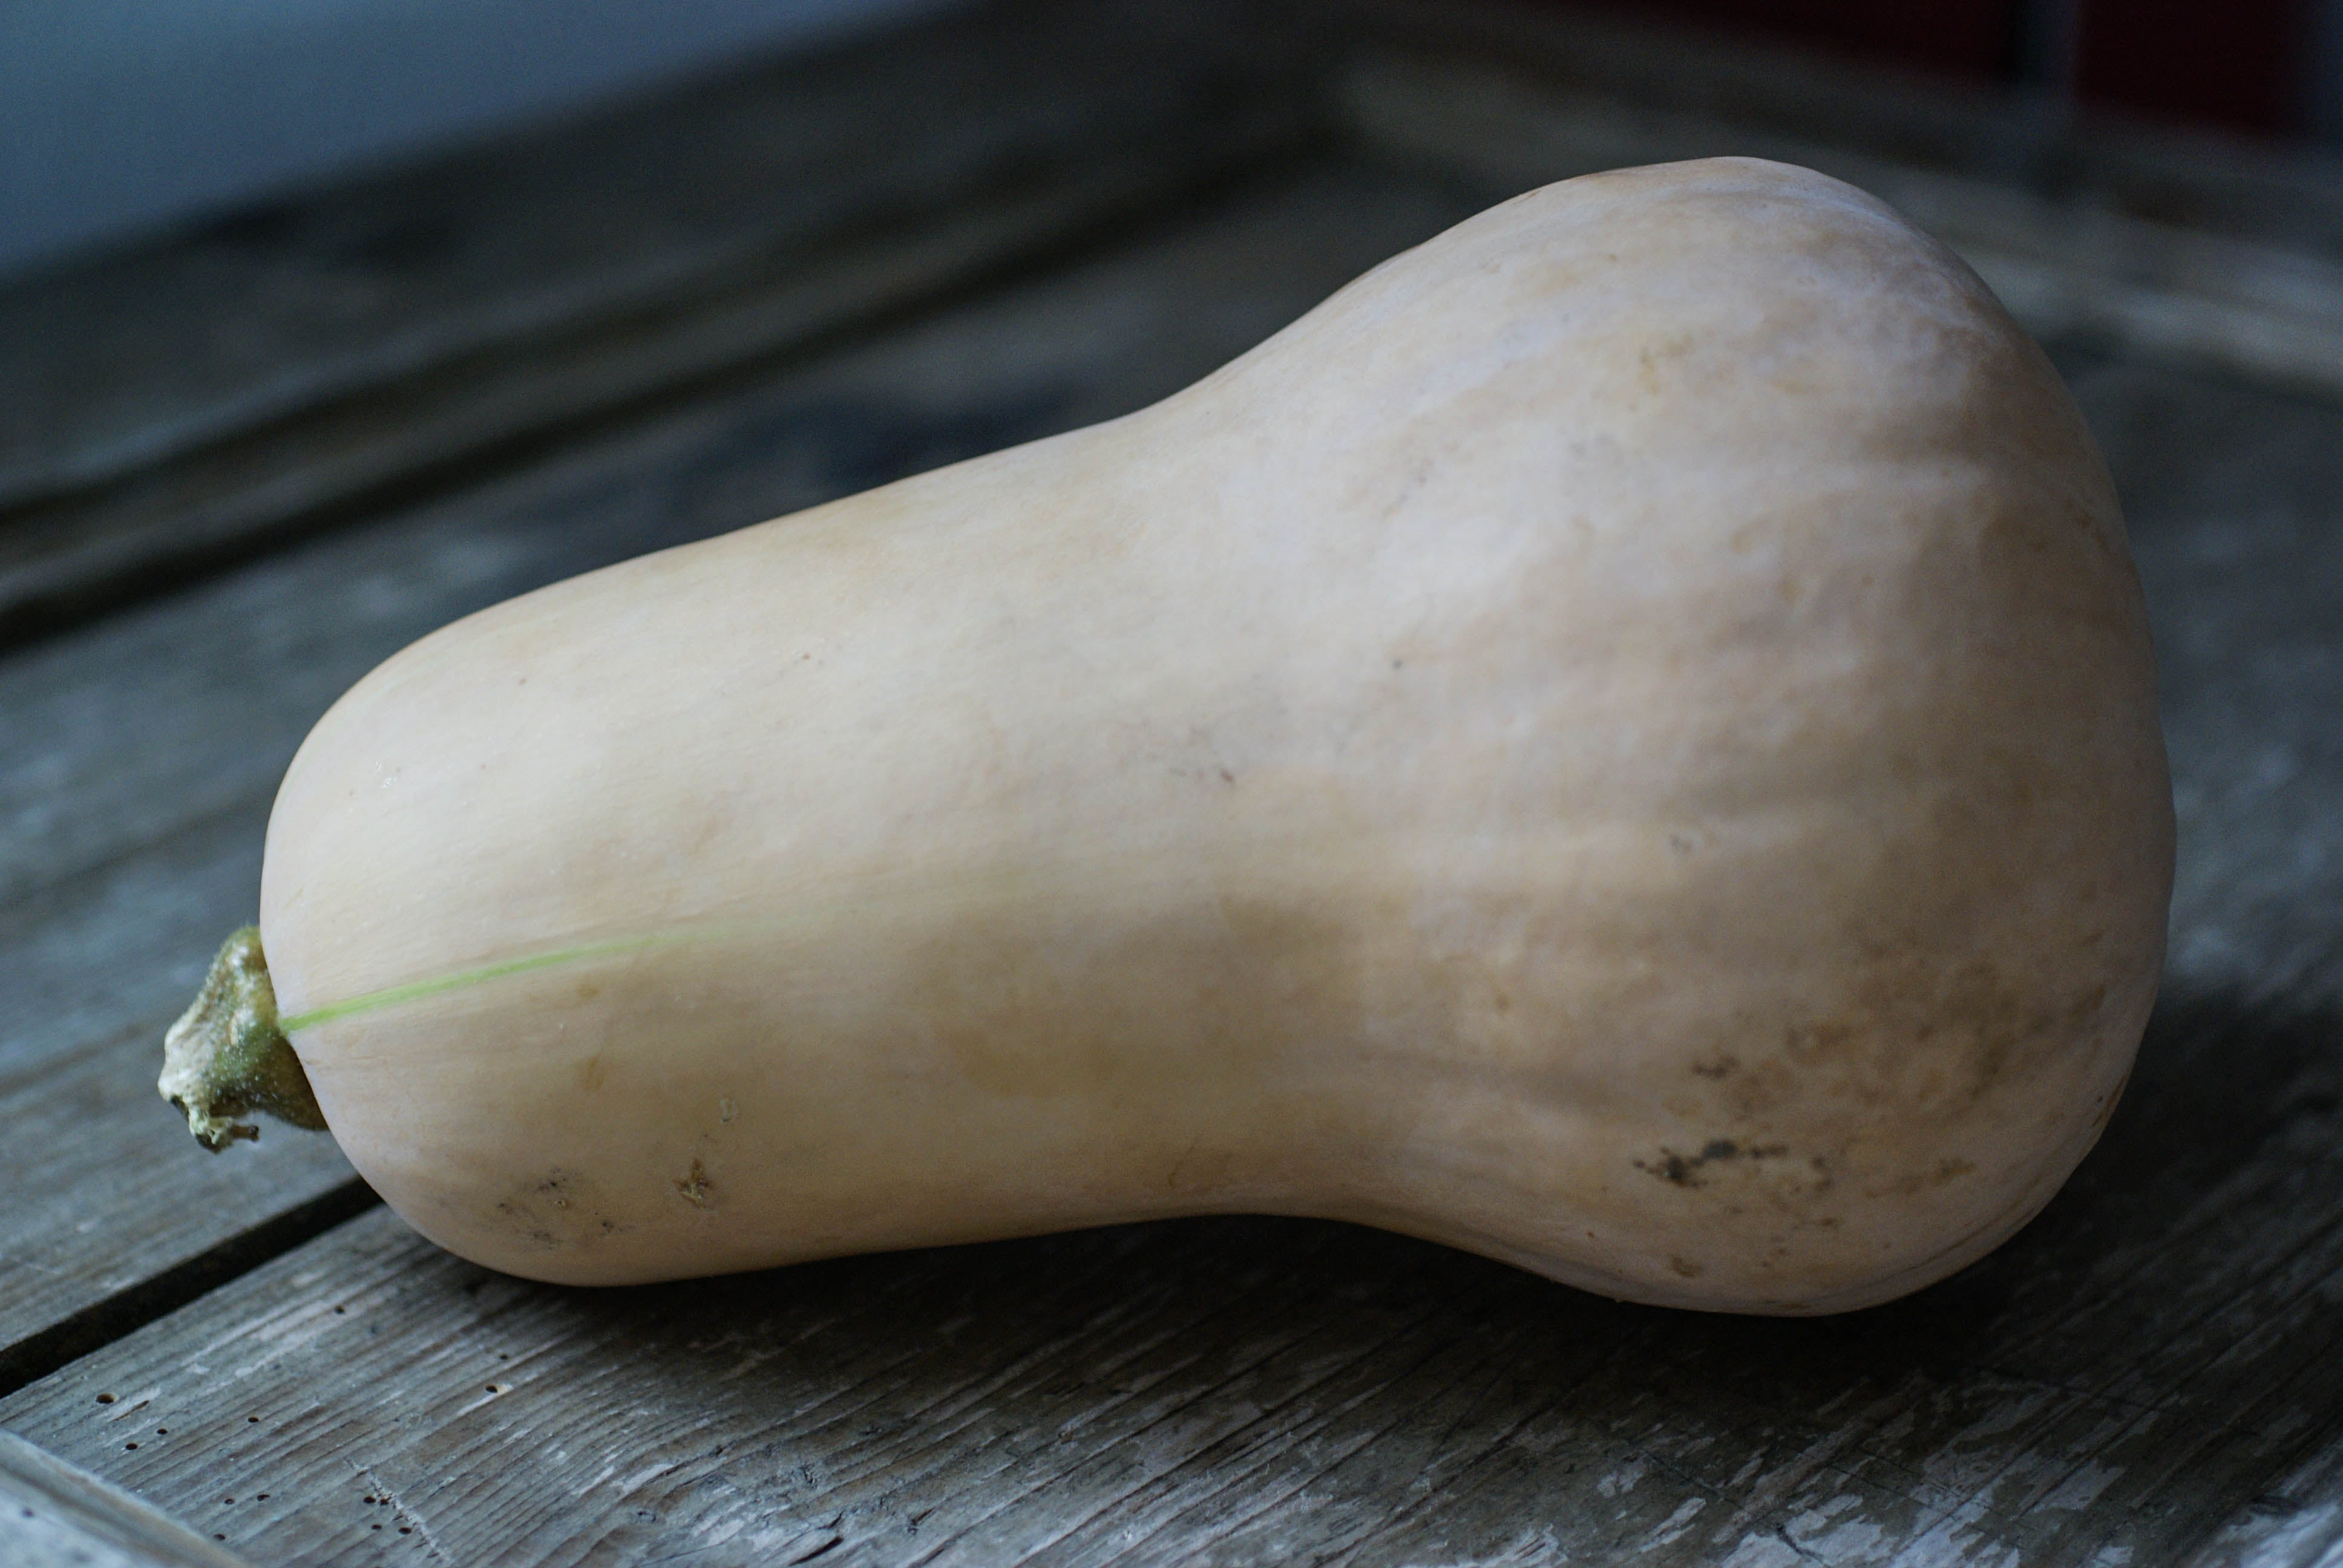
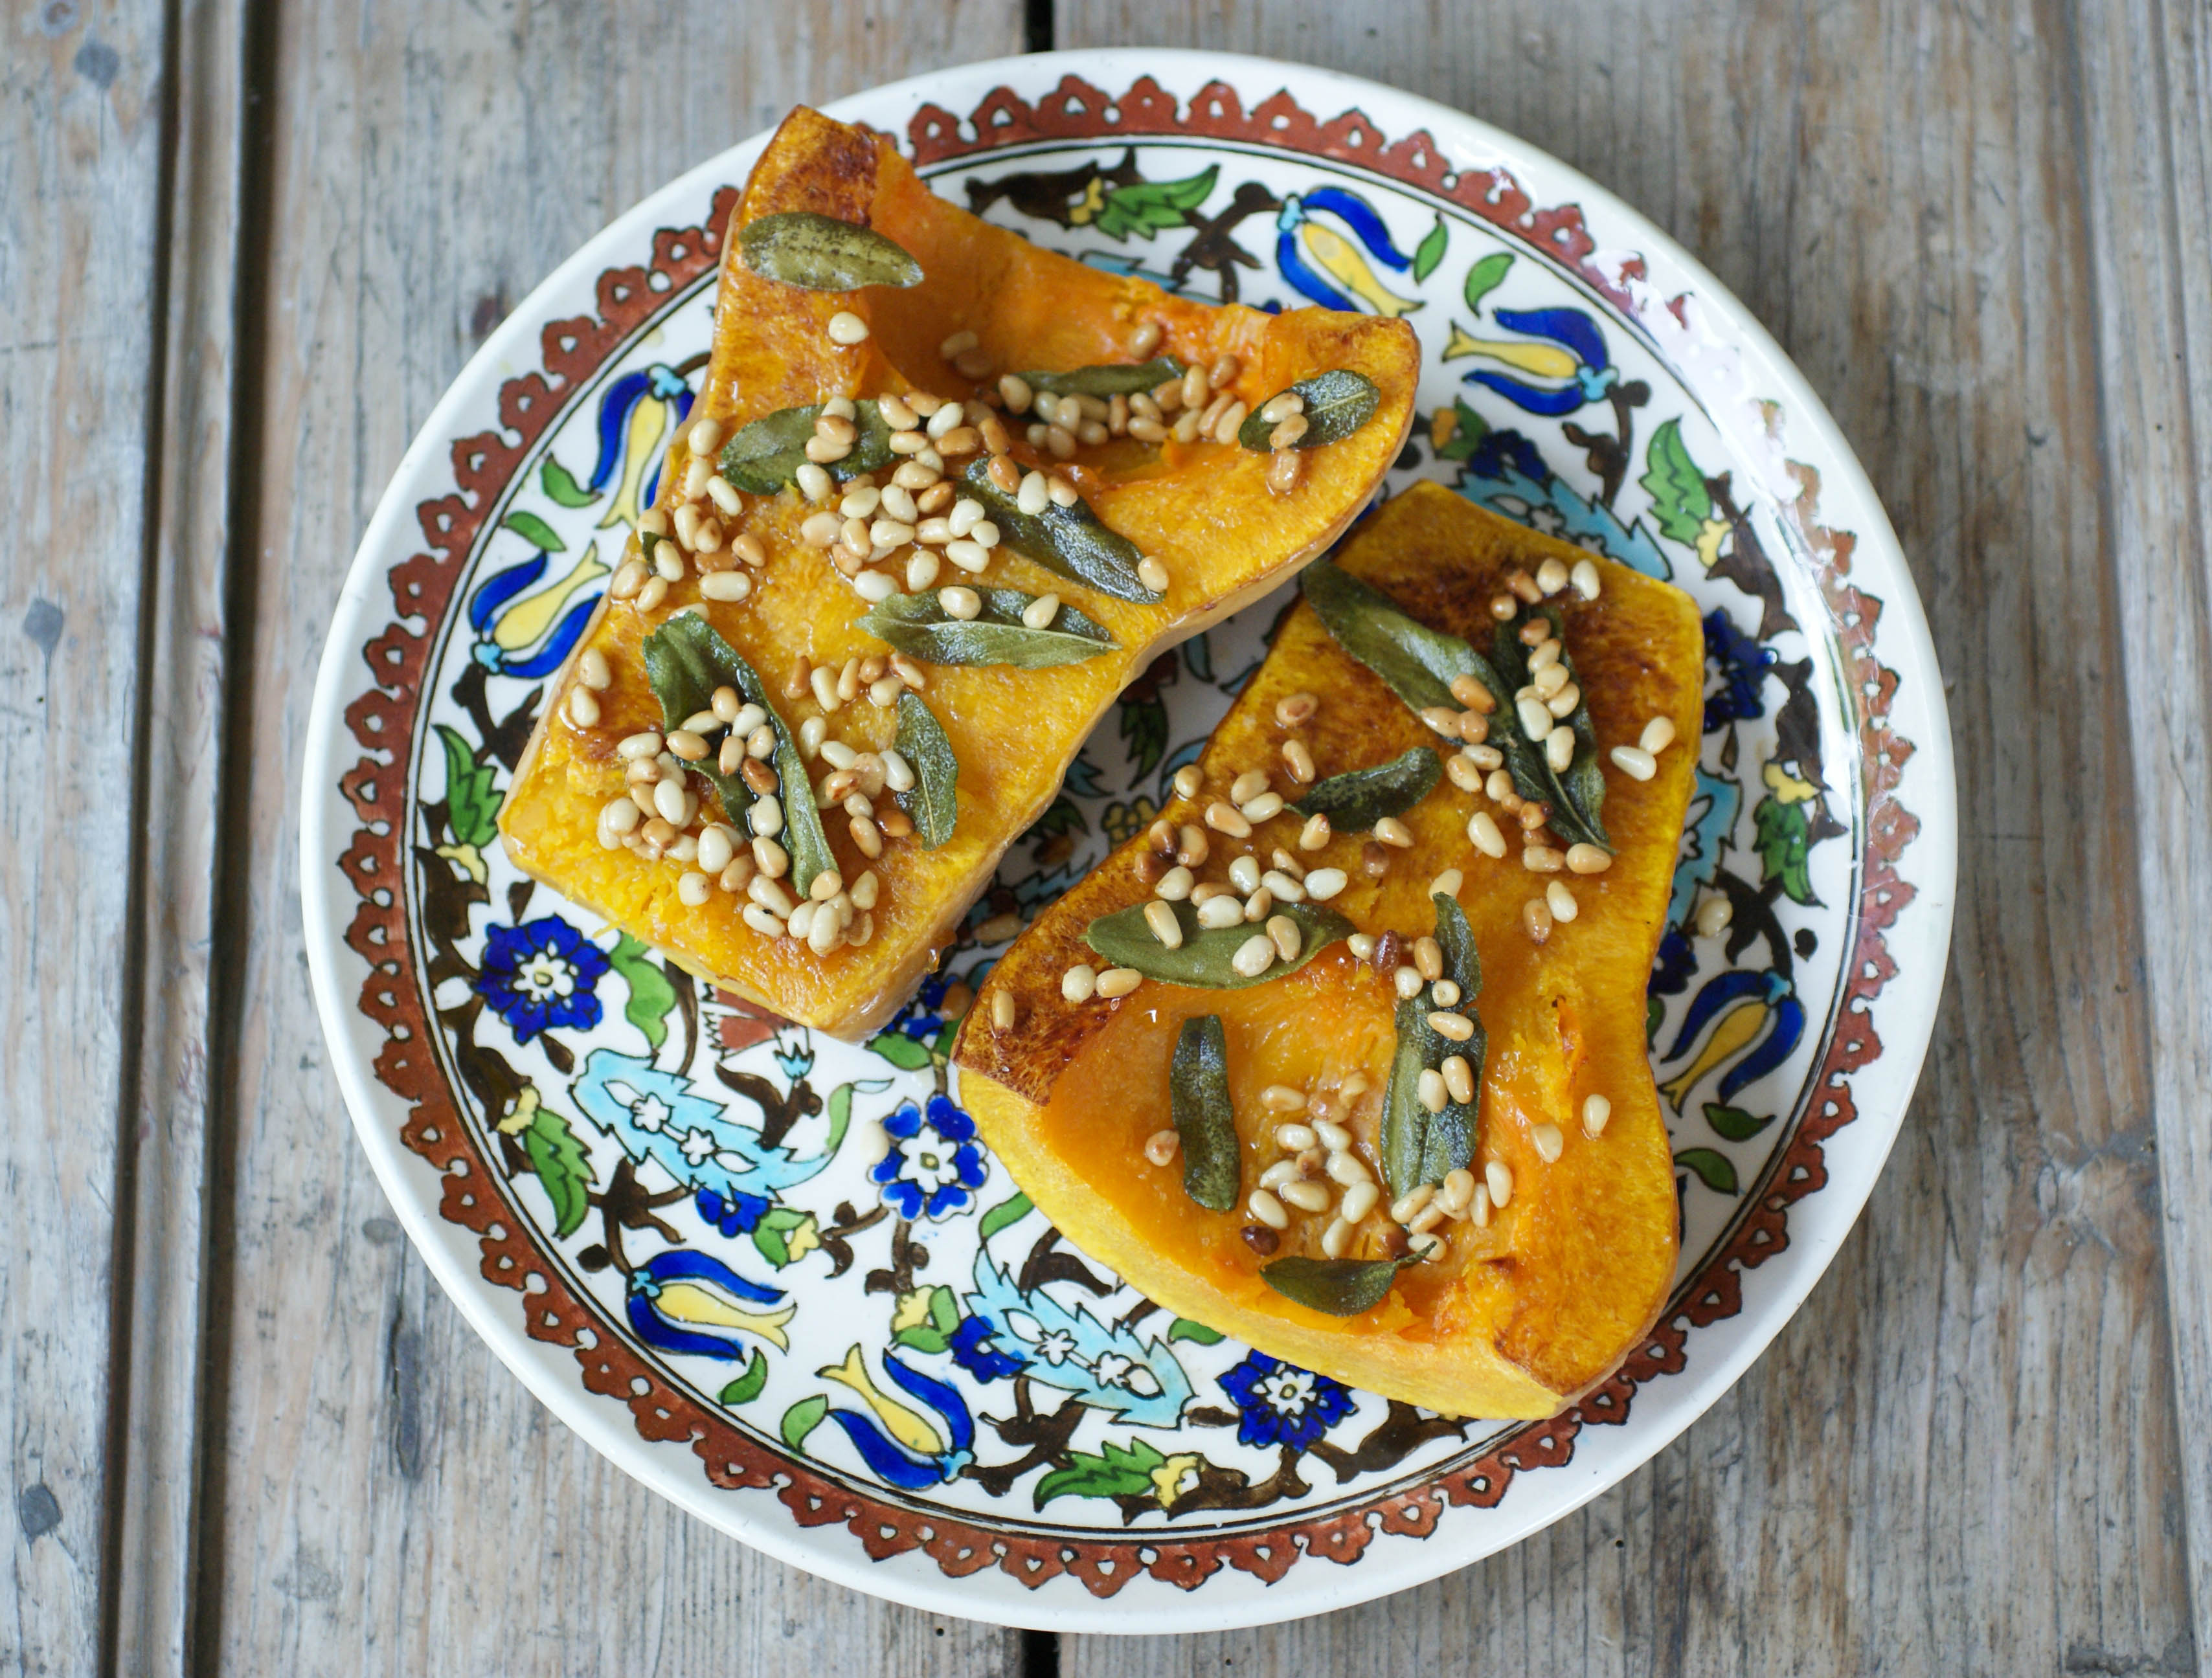
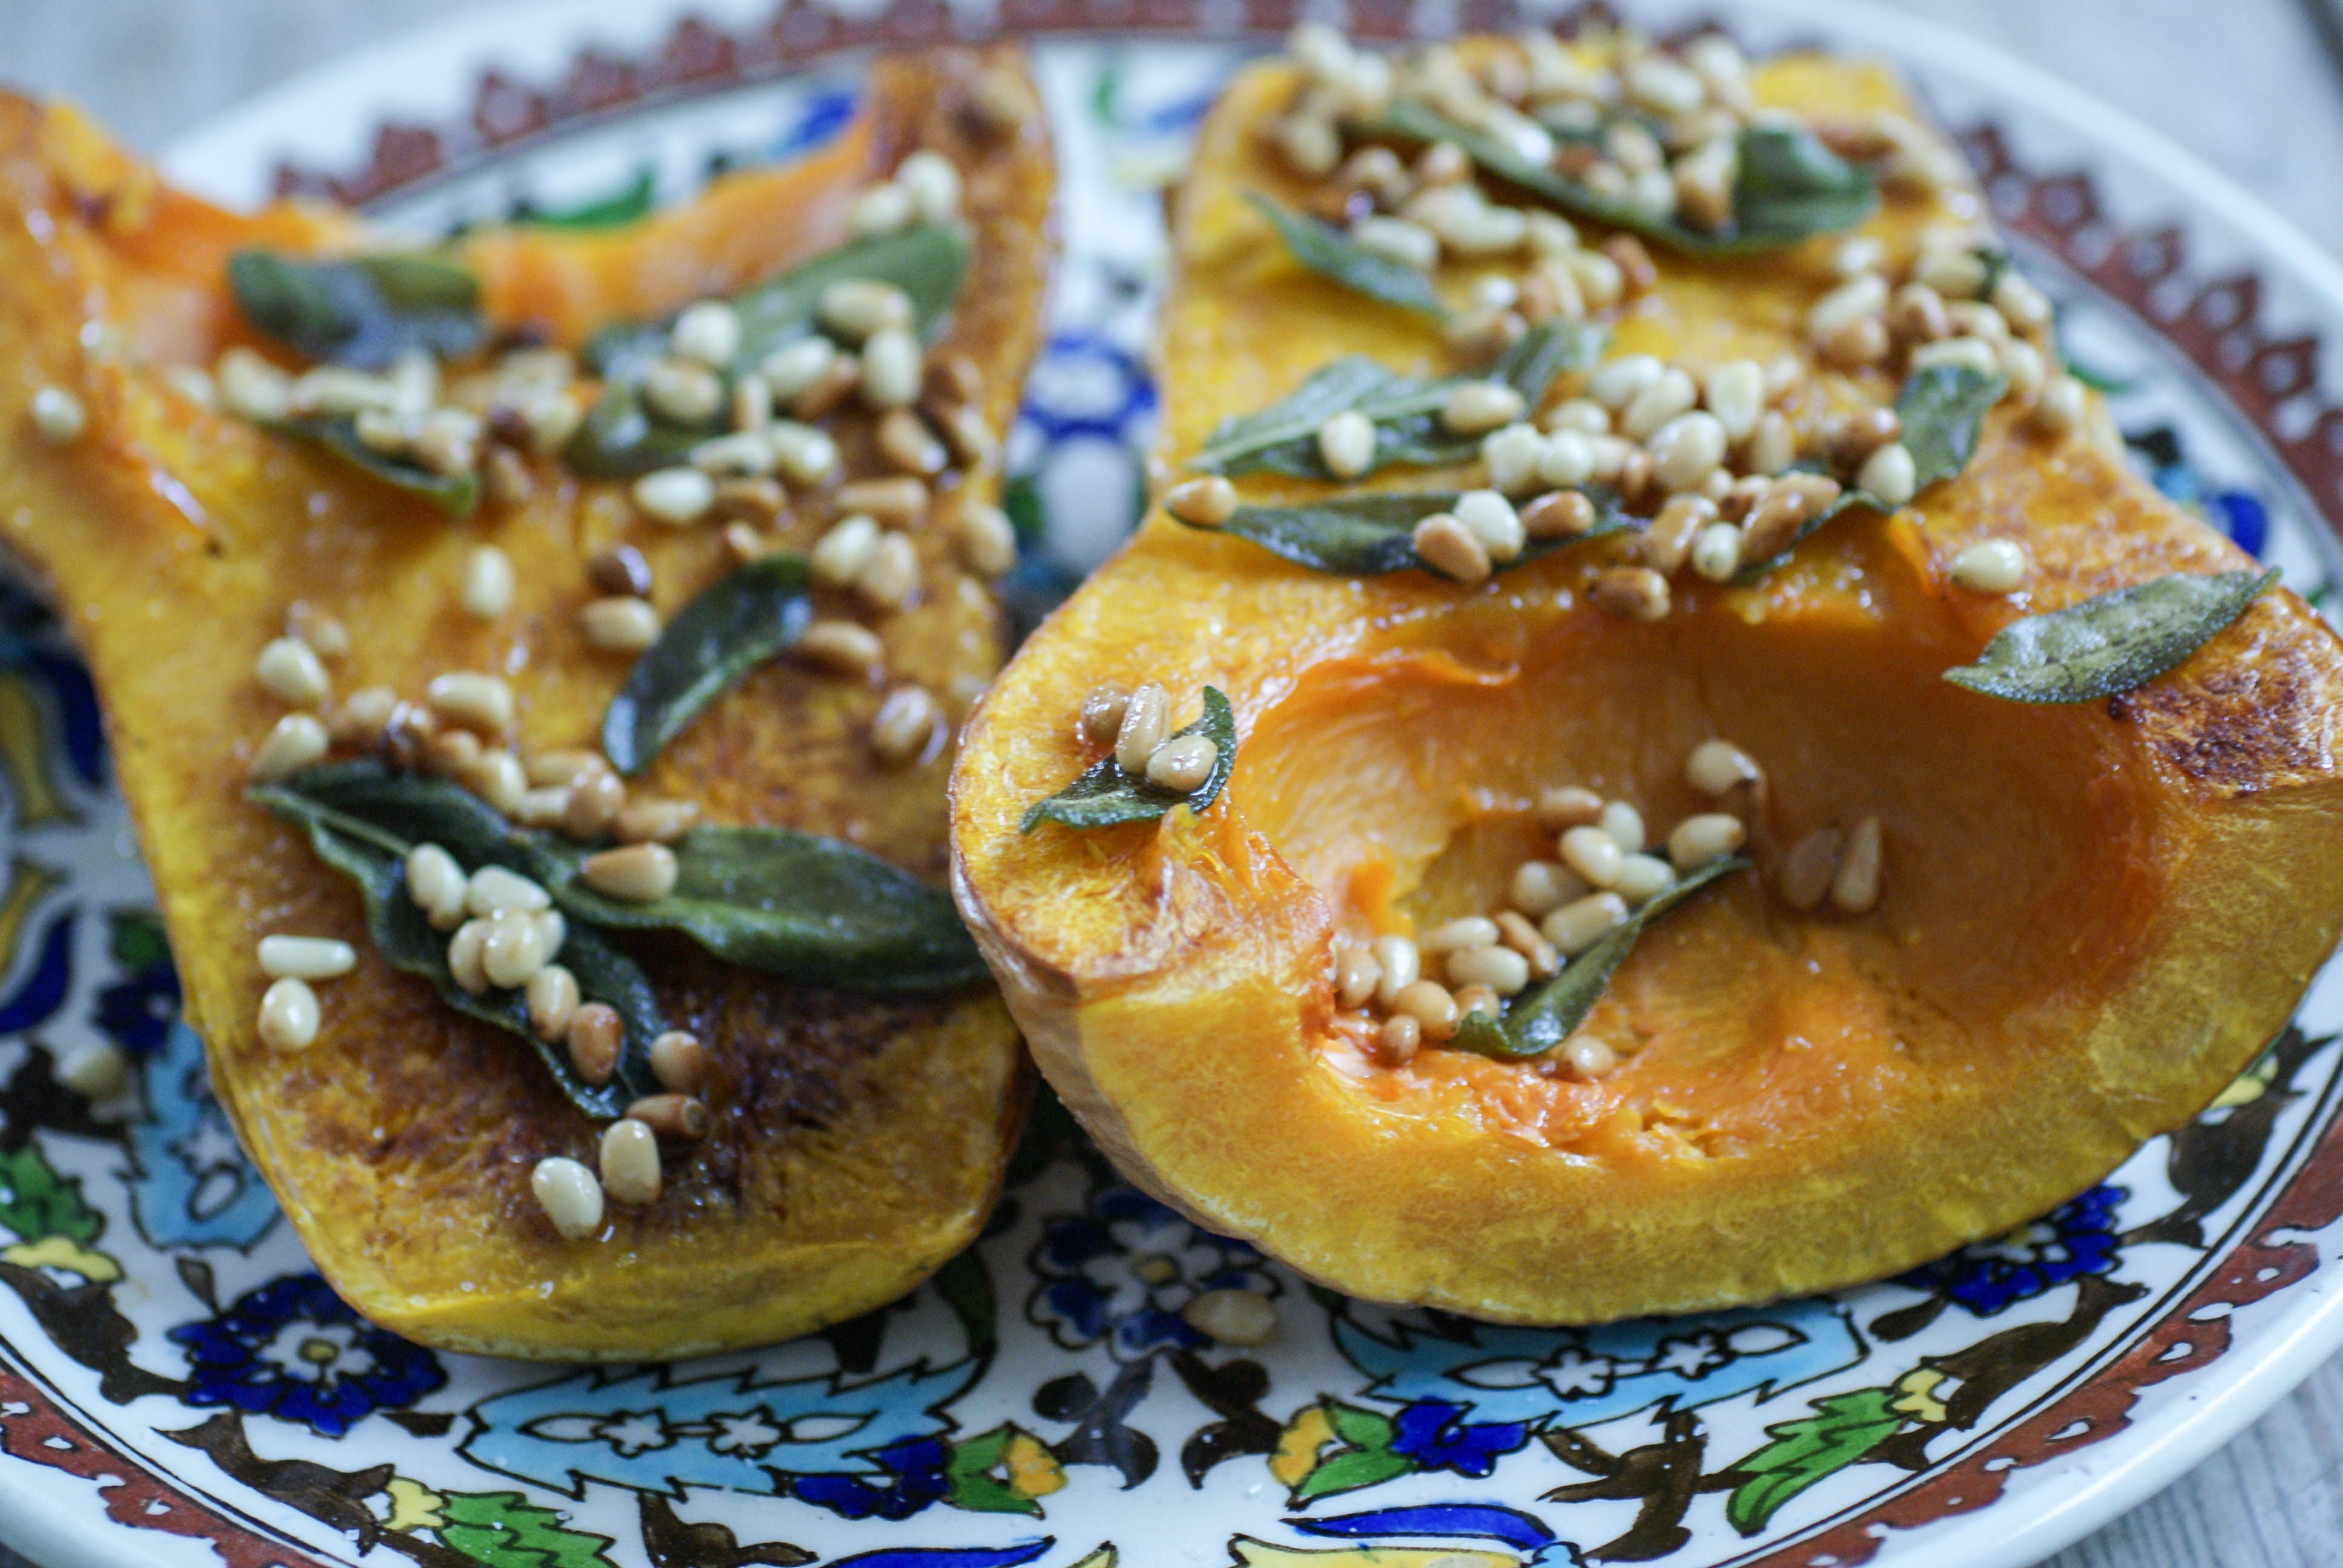
Butternut Squash with Sage and Roasted Pine Nuts

I’m so happy it’s squash season here again.
Butternut squash
Fruits and vegetables are very seasonal (in terms of availability) here in Switzerland. If you want Brussels sprouts, squash or kale in the spring or summer….well, that’s just too bad. You have to wait. We headed out to one of our favorite farms last week and picked up several varieties of squash. We got 4 spaghetti squash because we can never find them in stores here, and we also picked up a few butternut squash.
It’s even pretty
We had the butternut squash last night served with lamb chops and it was so delicious. I ate the leftovers cold out of the fridge today as my post workout meal. Yum!
Butternut Squash
Ingredients
- 1 butternut squash
- 1-2 Tablespoons olive oil
- Salt to taste
- Fresh sage leaves (about a handful)
- 1-2 Tablespoons ghee or grass fed butter
- 2 Tablespoons pine nuts
Instructions
- Cut the ends of your squash off. Hopefully you have better knife skills than I do. I have a heck of time cutting straight!
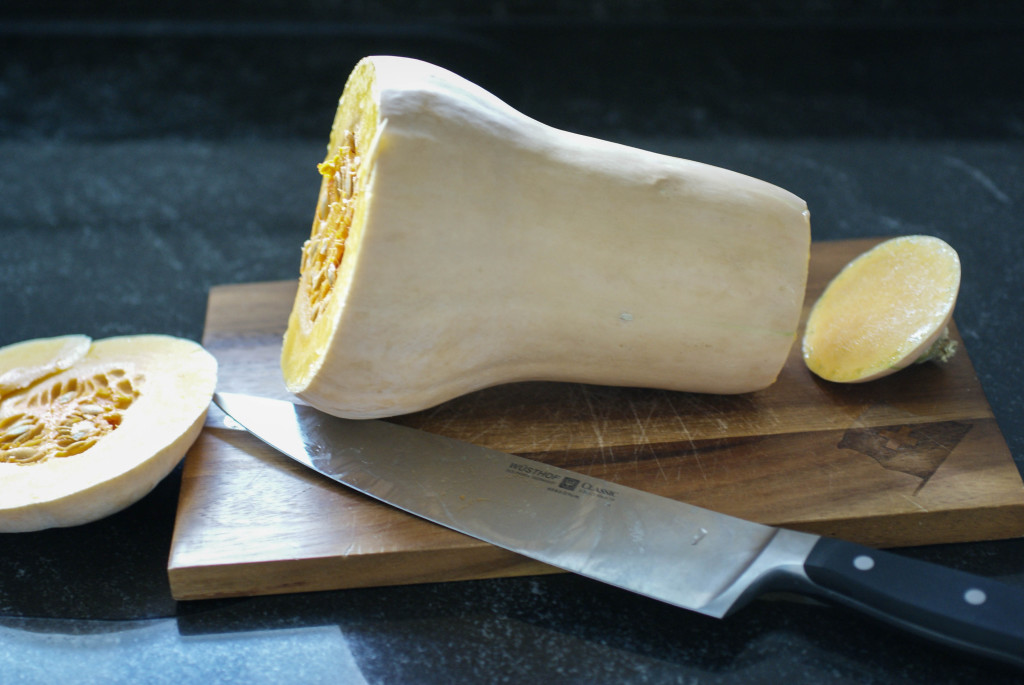
Requires some knife skills
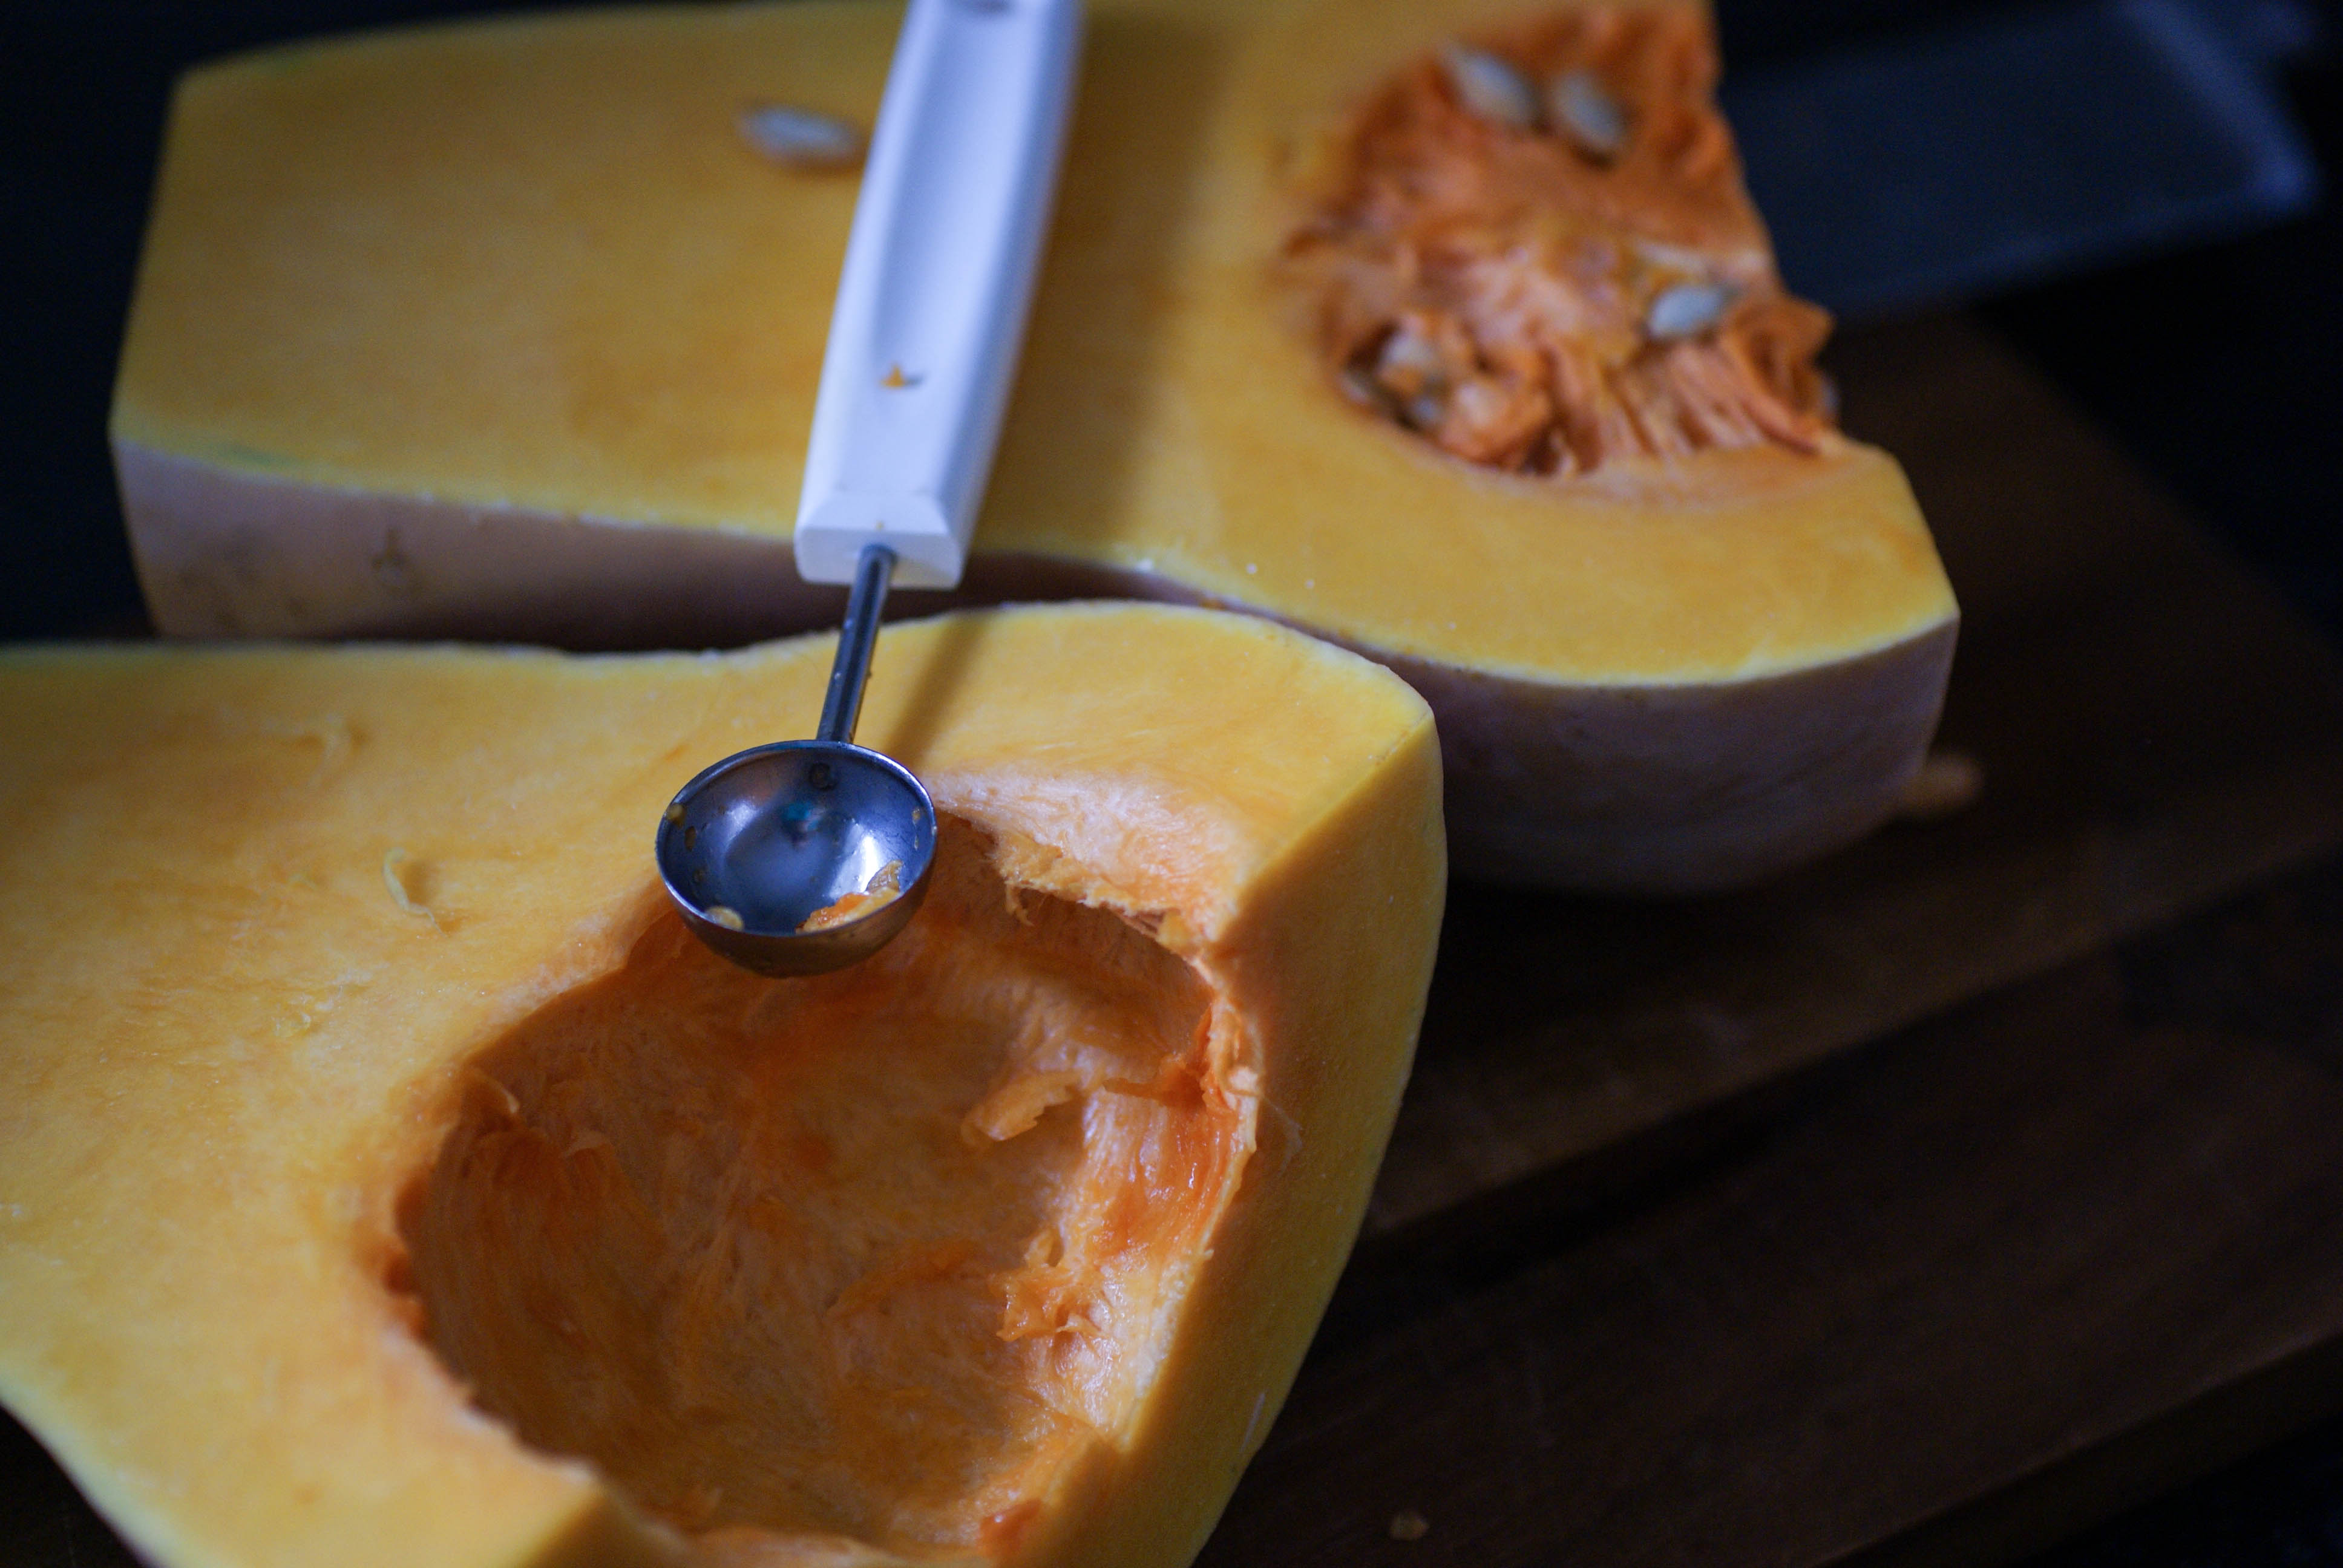
- Scoop out the seeds with a melon baller or a spoon. You can roast them like pumpkin seeds if you want.

You can roast the seeds
- Apply olive oil with a brush (or your hands) to all of the exposed squash and then salt to taste. Place the squash on a baking tray flesh side down.
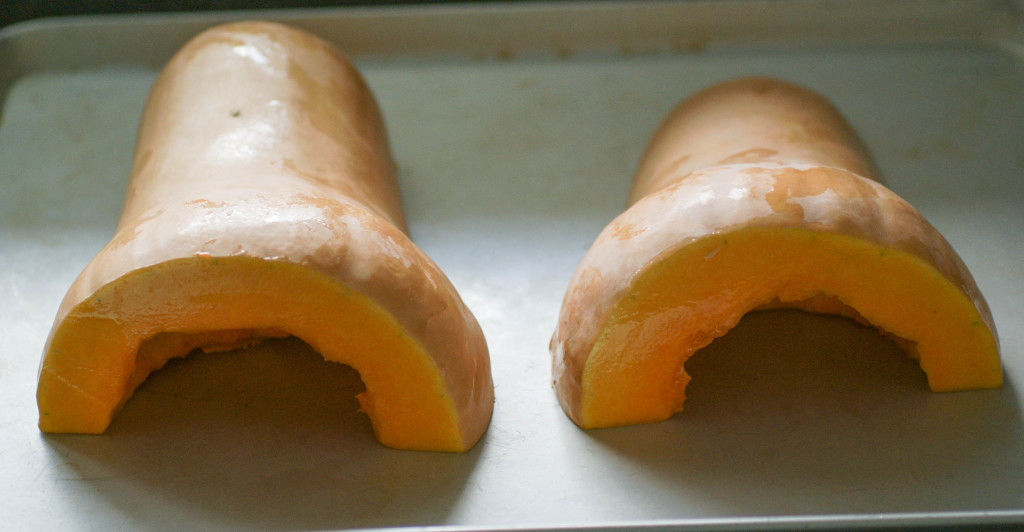
Skin side up
- Bake the squash in a pre-heated 350 F (175 C) oven for 1 hour. Start checking for doneness at about 45 minutes. It’s done when the skin is browned and starting to look a little blistery and the flesh is soft all the way through when poked with a fork.
- While the squash is baking, heat the ghee or butter in a small pan and add in the fresh sage leaves and pine nuts.
- Toss until the sage gets crispy and the pine nuts start to brown.

My favorite part
- Once the squash comes out of the oven, pour the sage/butter/pine nuts over the top and serve.
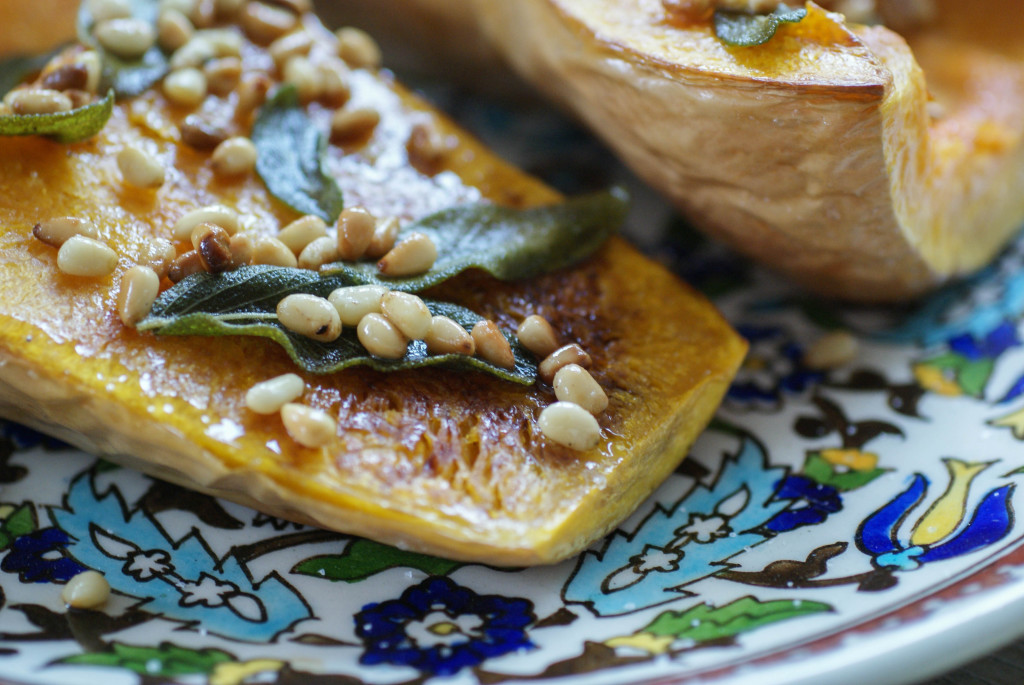
So good


Ingredients
- 1 butternut squash
- 1-2 Tablespoons olive oil
- Salt to taste
- Fresh sage leaves (about a handful)
- 1-2 Tablespoons ghee or grass fed butter
- 2 Tablespoons pine nuts
Instructions
- Cut the ends of your squash off. Hopefully you have better knife skills than I do. I have a heck of time cutting straight!
- Scoop out the seeds with a melon baller or a spoon. You can roast them like pumpkin seeds if you want.
- Apply olive oil with a brush (or your hands) to all of the exposed squash and then salt to taste. Place the squash on a baking tray flesh side down.
- Bake the squash in a pre-heated 350 F (175 C) oven for 1 hour. Start checking for doneness at about 45 minutes. It's done when the skin is browned and starting to look a little blistery and the flesh is soft all the way through when poked with a fork.
- While the squash is baking, heat the ghee or butter in a small pan and add in the fresh sage leaves and pine nuts.
- Toss until the sage gets crispy and the pine nuts start to brown.
- Once the squash comes out of the oven, pour the sage/butter/pine nuts over the top and serve.
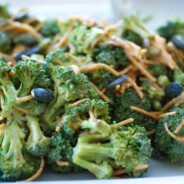
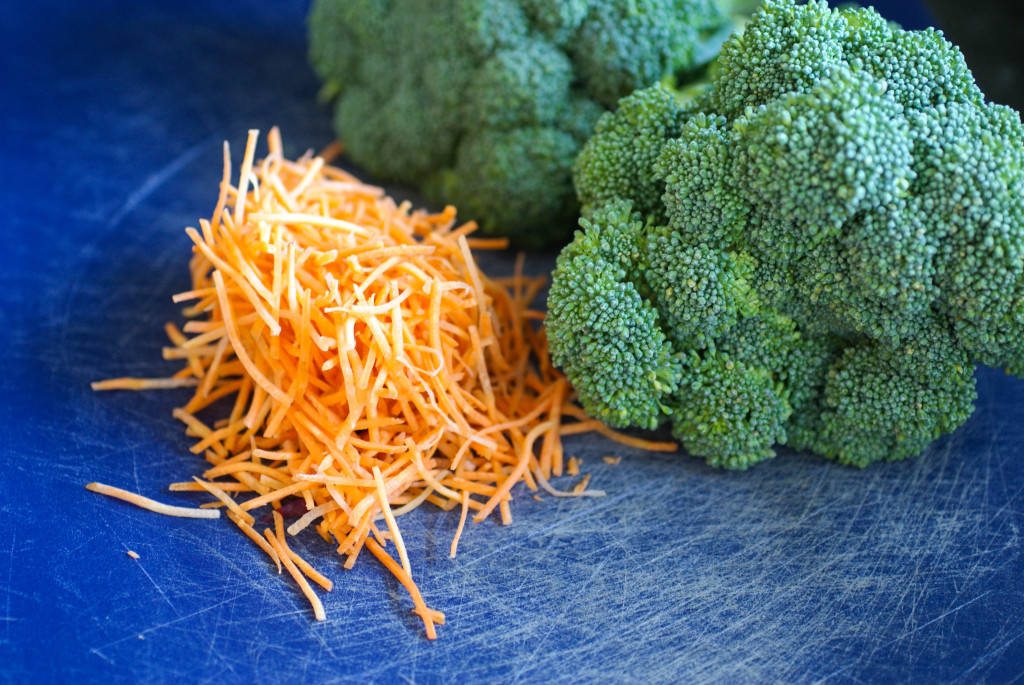
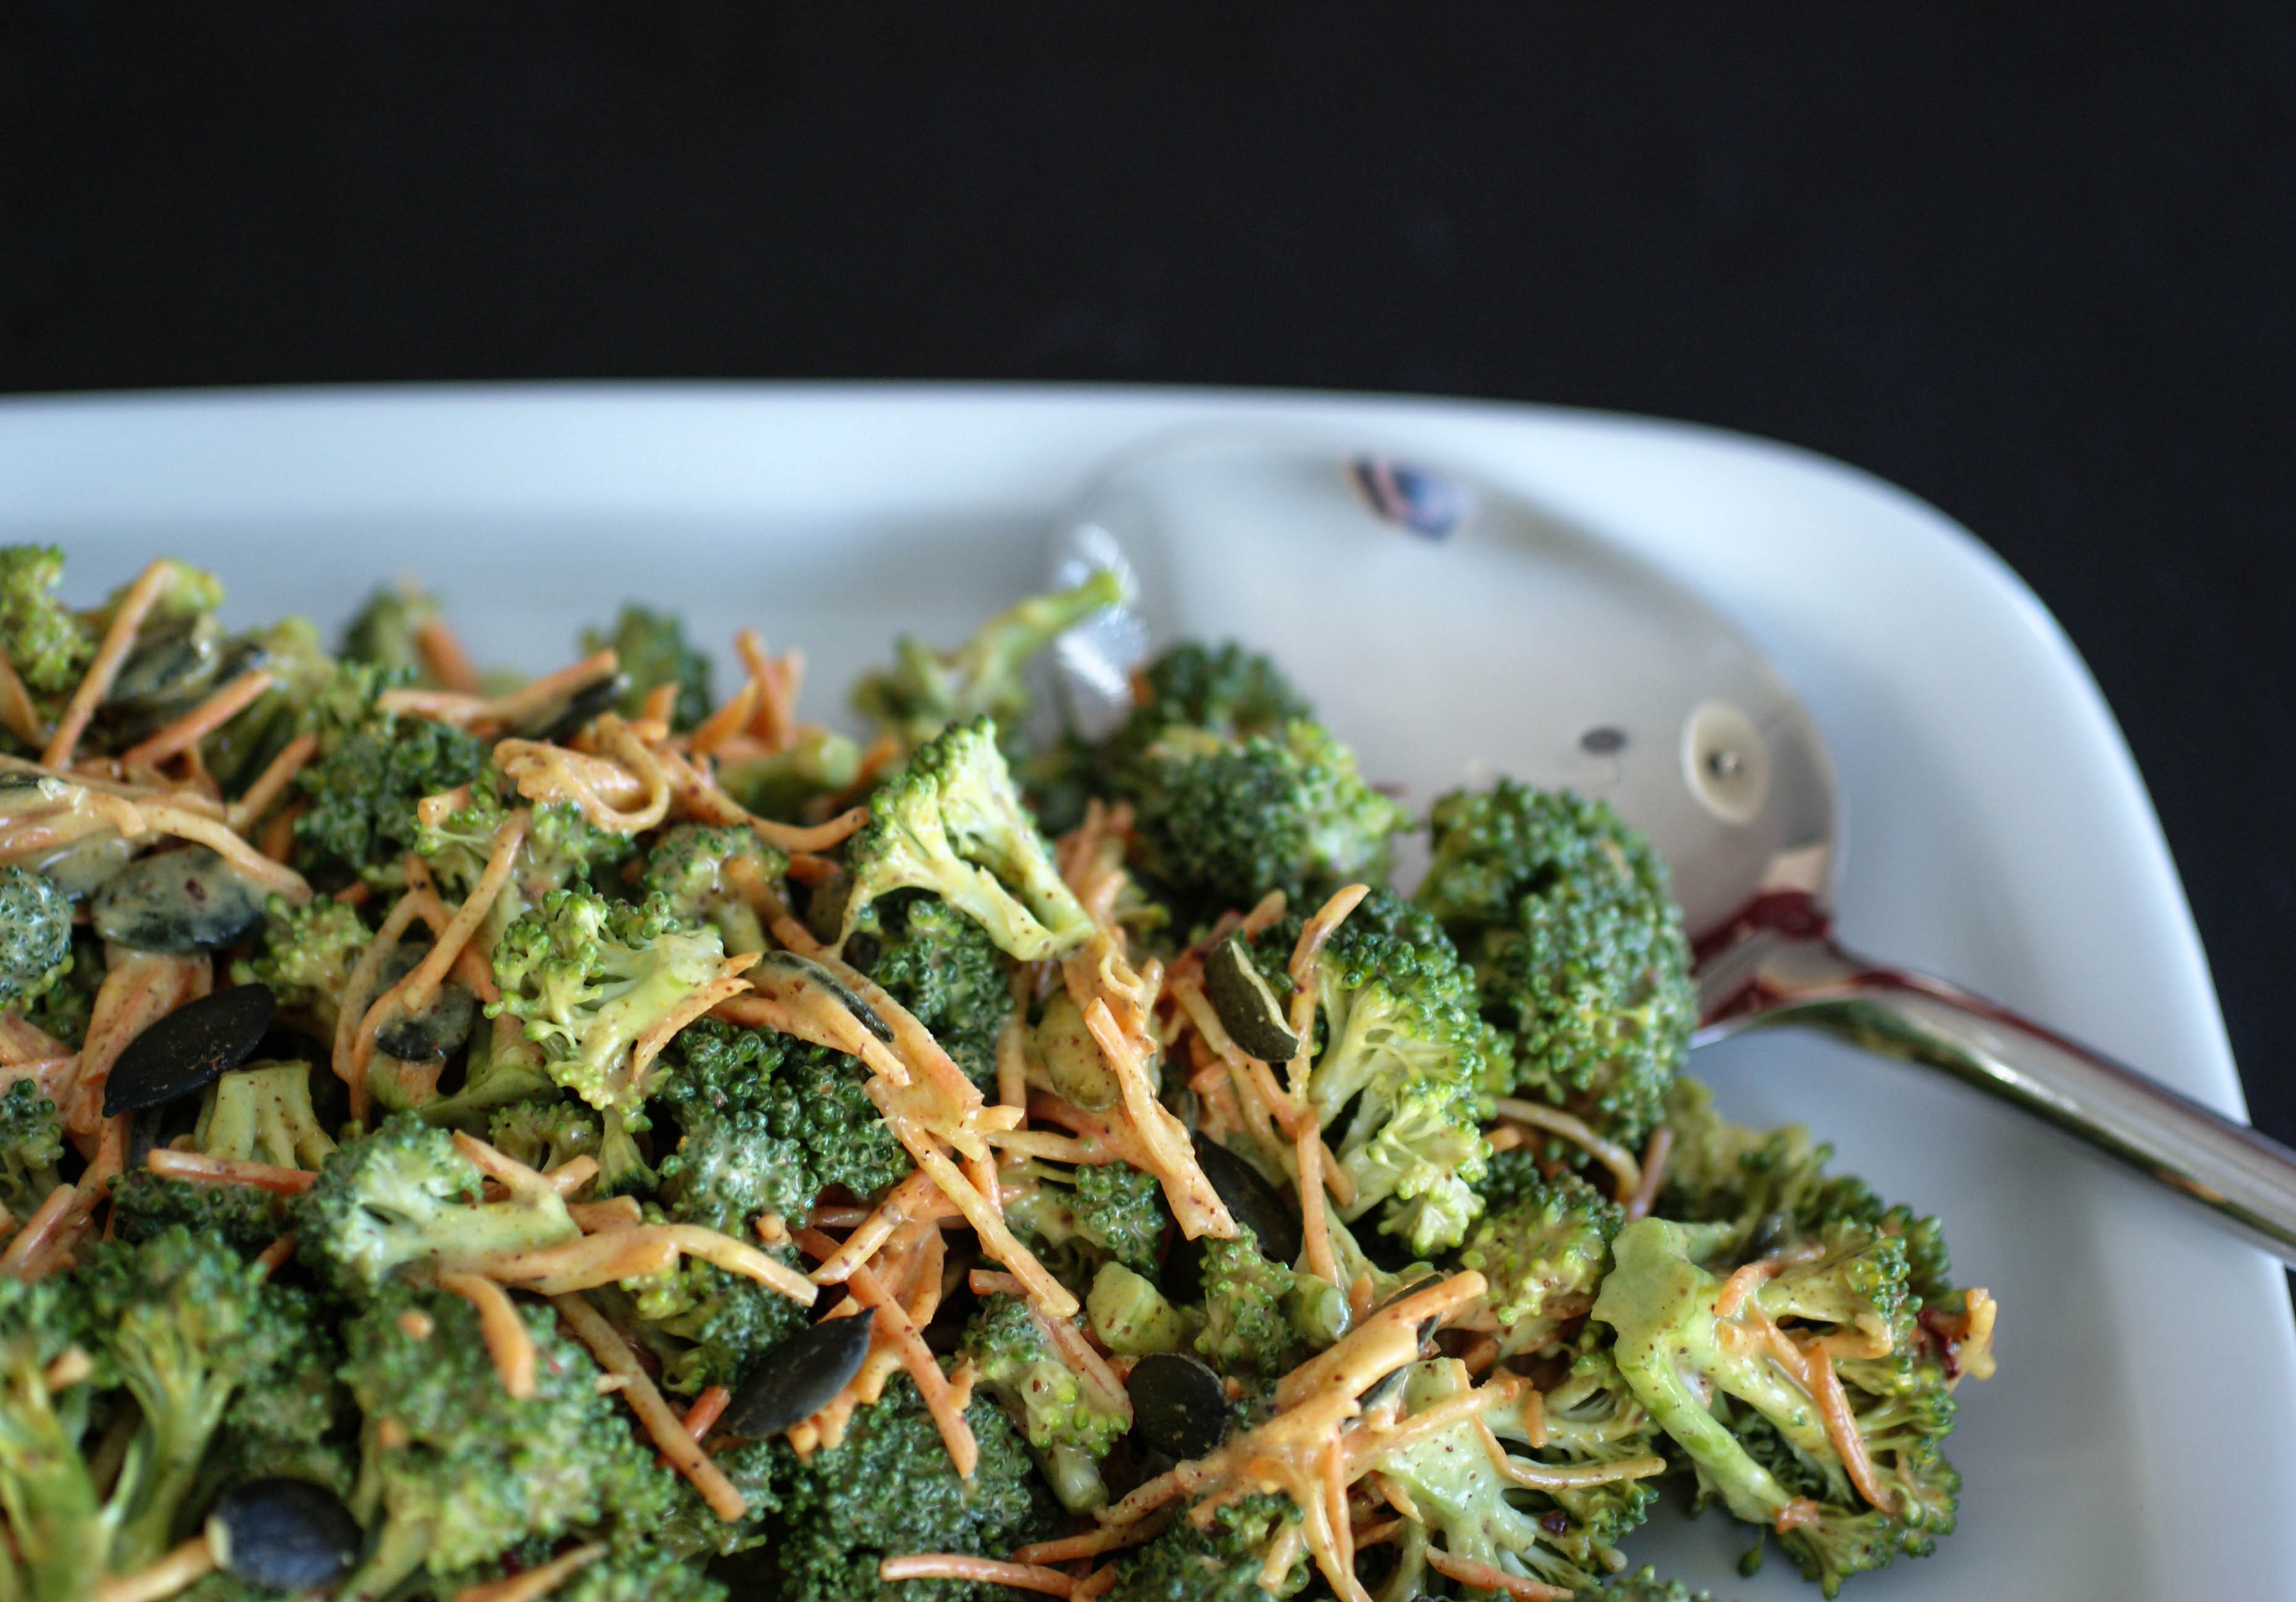
Curried Broccoli Salad
My husband said I should call this ‘Satay Salad’ because the sauce tastes like the peanut satay sauce that goes with chicken. I’m pretty sure I’ll tweek it in a few days to make satay because now that he mentioned it, I’m craving it. This is super adaptable and you could add in anything you wanted. I tossed in some pumpkin seeds, but it would also be delicious with cashew nuts. I think it would be really good with a handful of raisins thrown in, which I probably would have done if I had had any on hand. I almost ran out to get some raisins, but then I would have had a bunch of leftover raisins after making the salad. Leftover, lonely raisins means I would have had to make cookies. And then I would have to eat those cookies. Nope, buying raisins is not a good idea 🙂

Easy nutrient dense salad
Ingredients
- 1 medium to large head of raw broccoli, chopped
- 1/4-1/2 cup grated carrots
- 1/4 cup seeds/nuts of your choice (I used pumpkin seeds)
Simple ingredients

For the Sauce
- 1/4 cup almond butter (or nut/seed butter of your choice)
- 1 teaspoon apple cider vinegar
- 1 Tablespoon honey
- 1 Tablespoon mild yellow curry powder
- 1/4 cup coconut milk
- 1 teaspoon olive oil
- 1/4 teaspoon salt
Putting it together
- Mix all ingredients for the sauce together in a bowl until smooth. It should be a thick sauce (not too runny) but you can adjust the thickness by adjusting the amount of coconut milk you add in.
- Throw the chopped broccoli, grated carrots and any nuts and raisins (optional add-in) in a bowl together.
- Pour sauce over the broccoli and toss to coat.
- Refrigerate for awhile before serving.

Goes with anything
Ingredients
- 1 medium to large head of raw broccoli, chopped
- 1/4-1/2 cup grated carrots
- 1/4 cup seeds/nuts of your choice (I used pumpkin seeds)
- 1/4 cup almond butter (or nut/seed butter of your choice)
- 1 teaspoon apple cider vinegar
- 1 Tablespoon honey
- 1 Tablespoon mild yellow curry powder
- 1/4 cup coconut milk
- 1 teaspoon olive oil
- 1/4 teaspoon salt
Instructions
- Mix all ingredients for the sauce together in a bowl until smooth. It should be a thick sauce (not too runny) but you can adjust the thickness by adjusting the amount of coconut milk you add in.
- Throw the chopped broccoli, grated carrots and any nuts and raisins (optional add-in) in a bowl together.
- Pour sauce over the broccoli and toss to coat.
- Refrigerate for awhile before serving.
Notes
You could substitute the pumpkin seeds with any nut or seed you like. It would be delicious to add in a handful of raisins.