
Blog
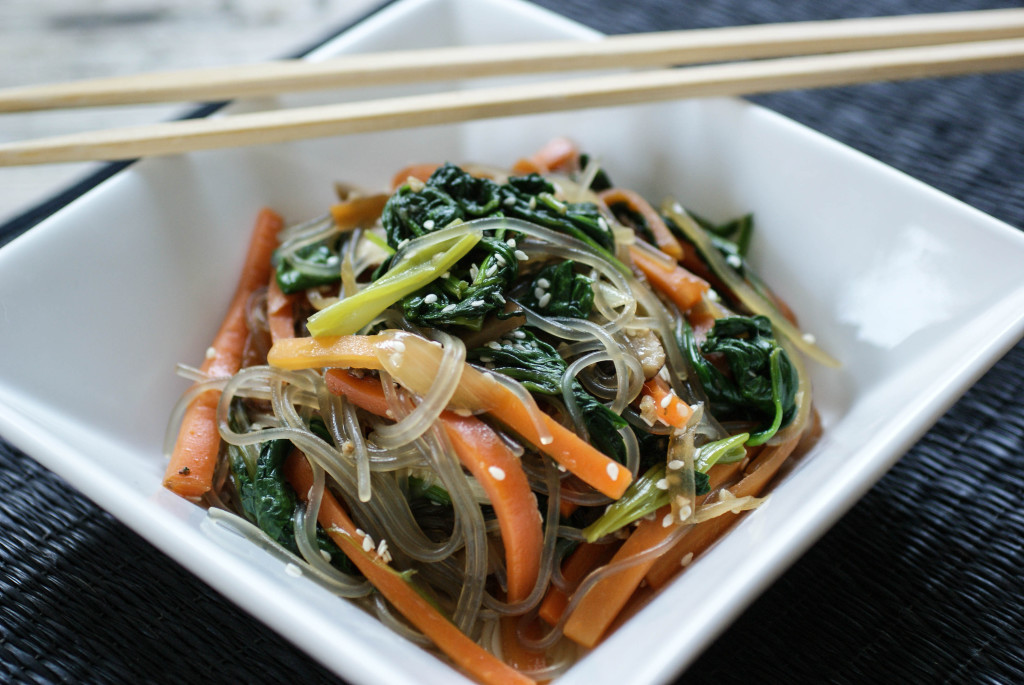
Korean Sweet Potato Glass Noodles (Jap Chae)
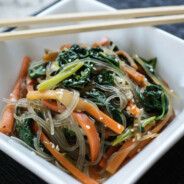
My friend Julie was at a local Vietnamese shop recently and she picked me up some sweet potato glass noodles.
The only ingredient is sweet potato starch. I’d never used them before so I googled for recipes and decided on this one from Steamy Kitchen. I changed a few things (oil, sweetener, adding some protein) and was happy with how it turned out. It seems like I end up cooking the same things over and over, so it was nice to make something different for a change.
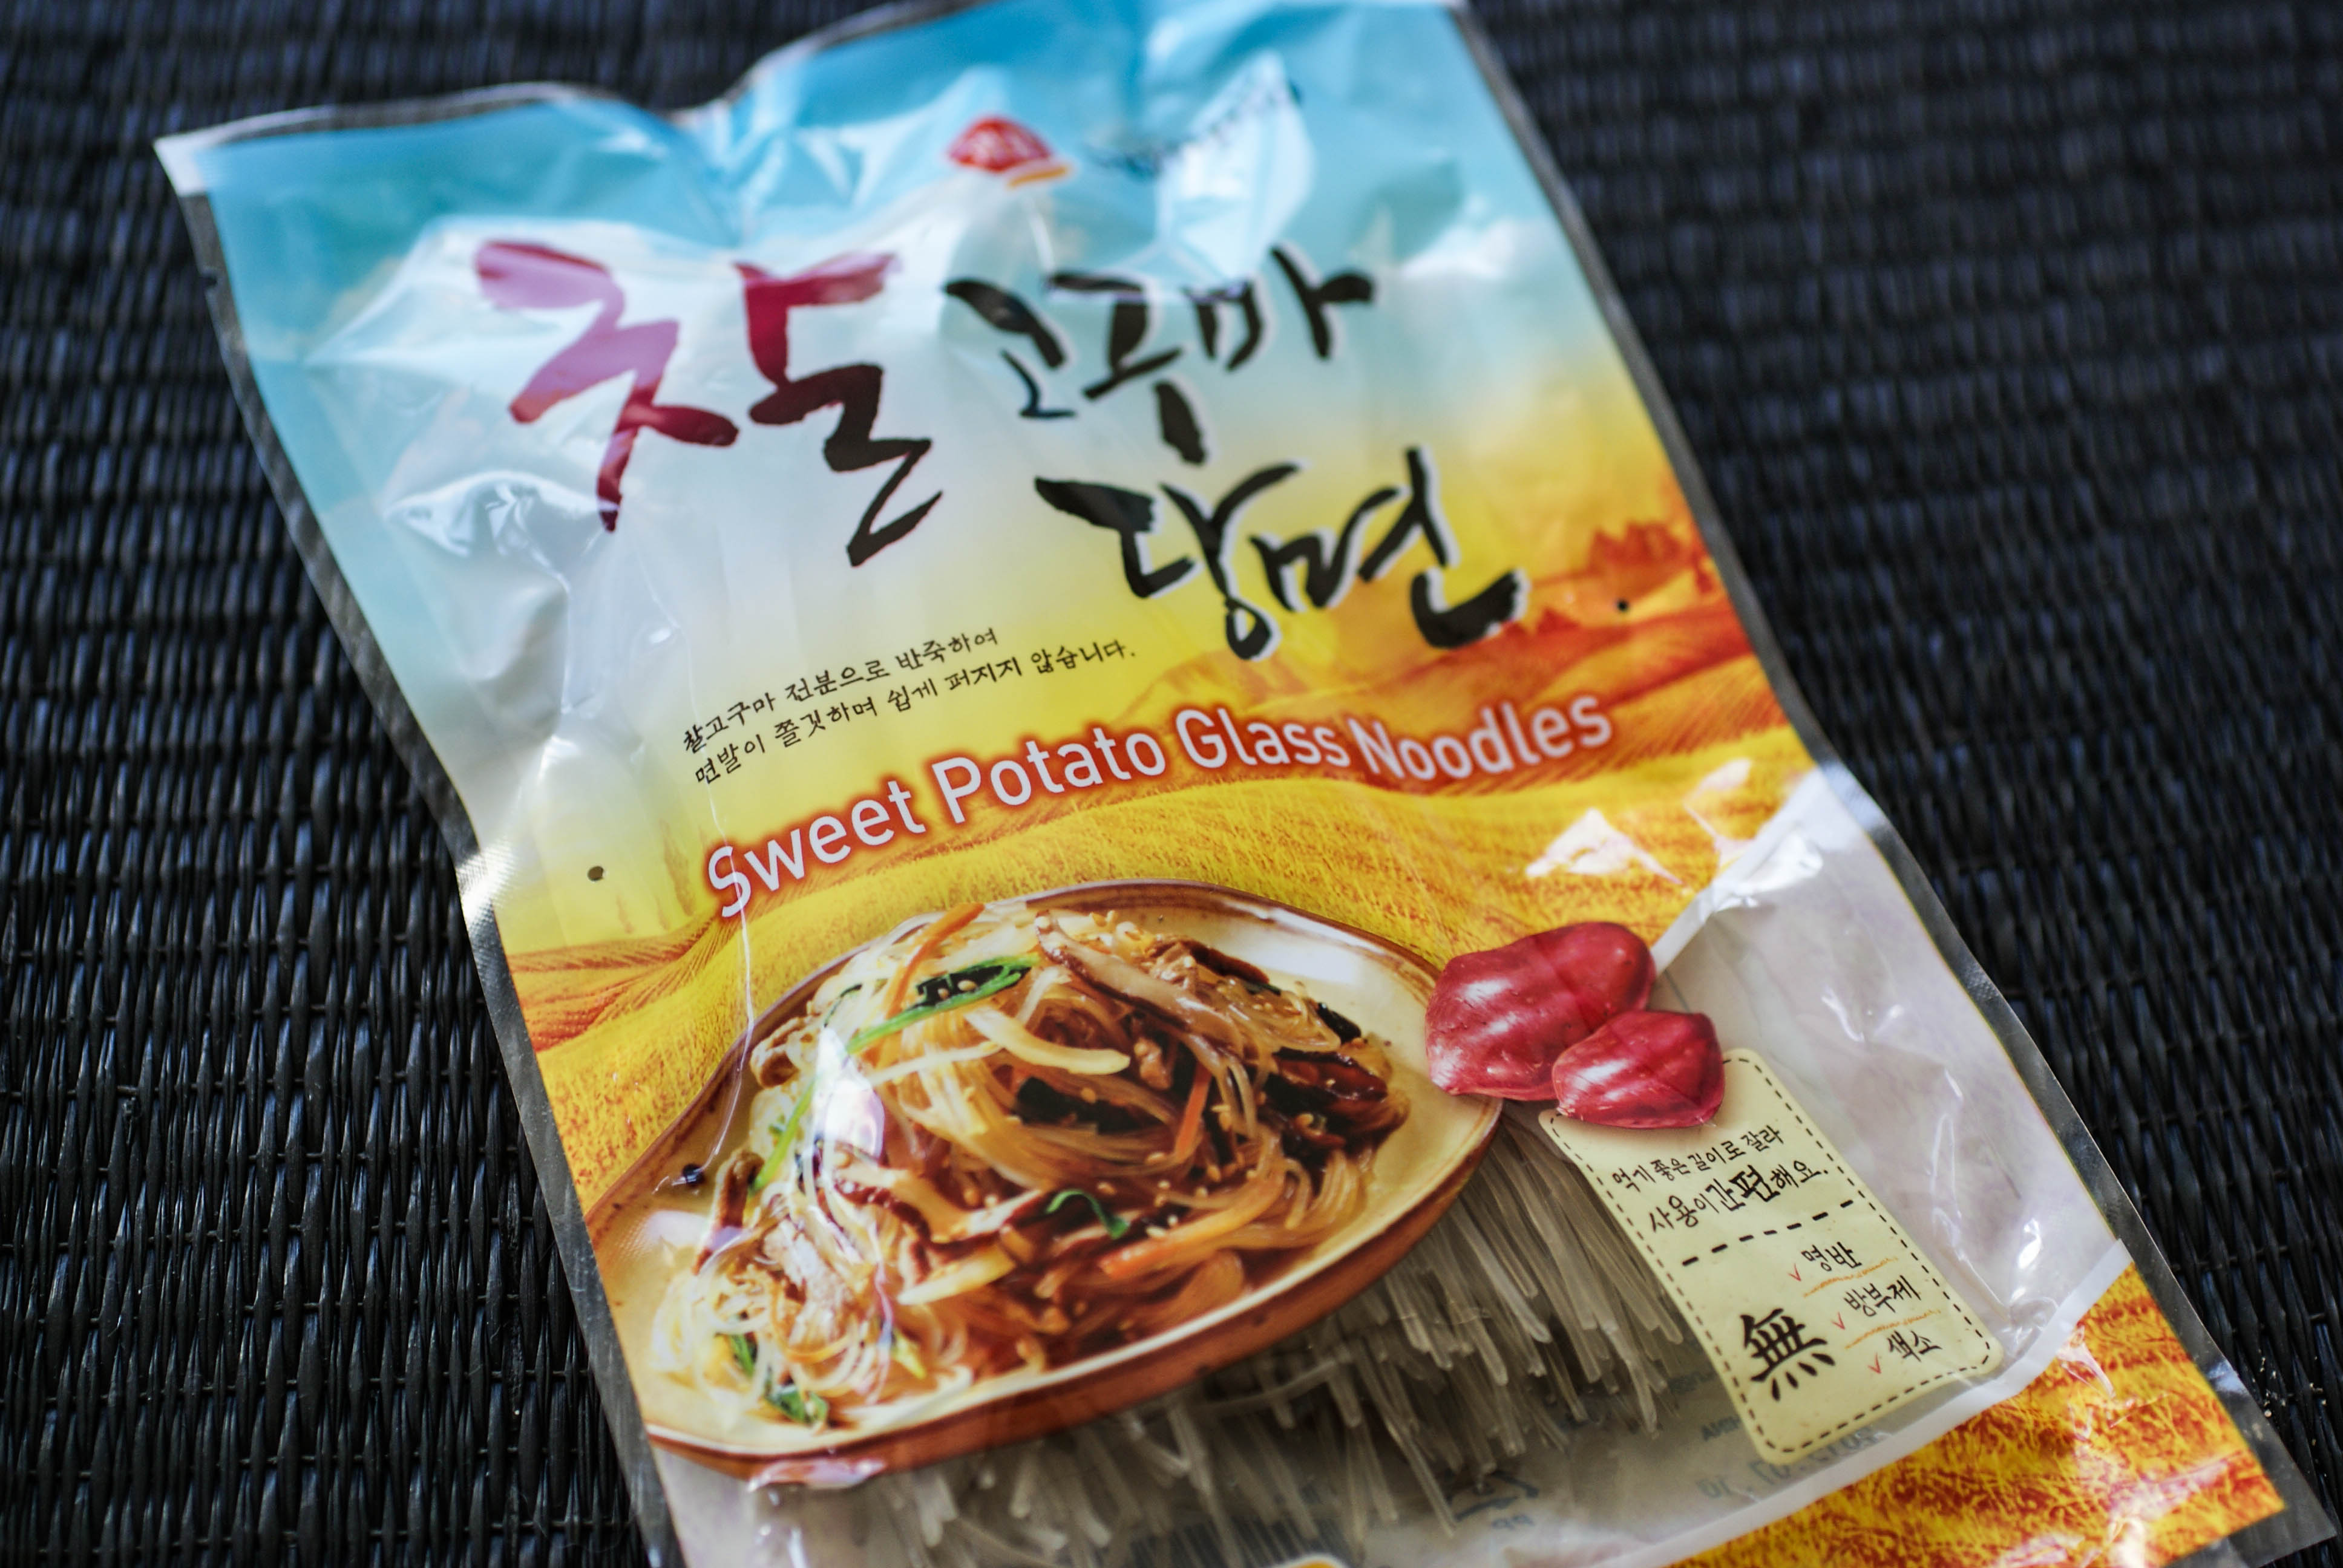
New ingredient to try
You could totally use whatever vegetables you have on hand and use any type of protein you like.
Ingredients
- 1 package of sweet potato glass noodles (3.5 oz/100 grams)
- 2 carrots, cut into match stick size
- 1/2 onion, sliced thin
- 5 medium size button mushrooms, sliced thin
- 2 green onions (spring onion) cut into inch long pieces
- 250 grams (around 4-5 cups) fresh baby spinach
- 1 1/2 Tablespoons oil (I used coconut oil)
- 2 cloves of garlic, finely chopped
- 2 Tablespoons coconut aminos or gluten free tamari sauce
- 1 teaspoon honey
- 1 Tablespoon sesame seeds
- 2 chicken breasts, cooked and diced
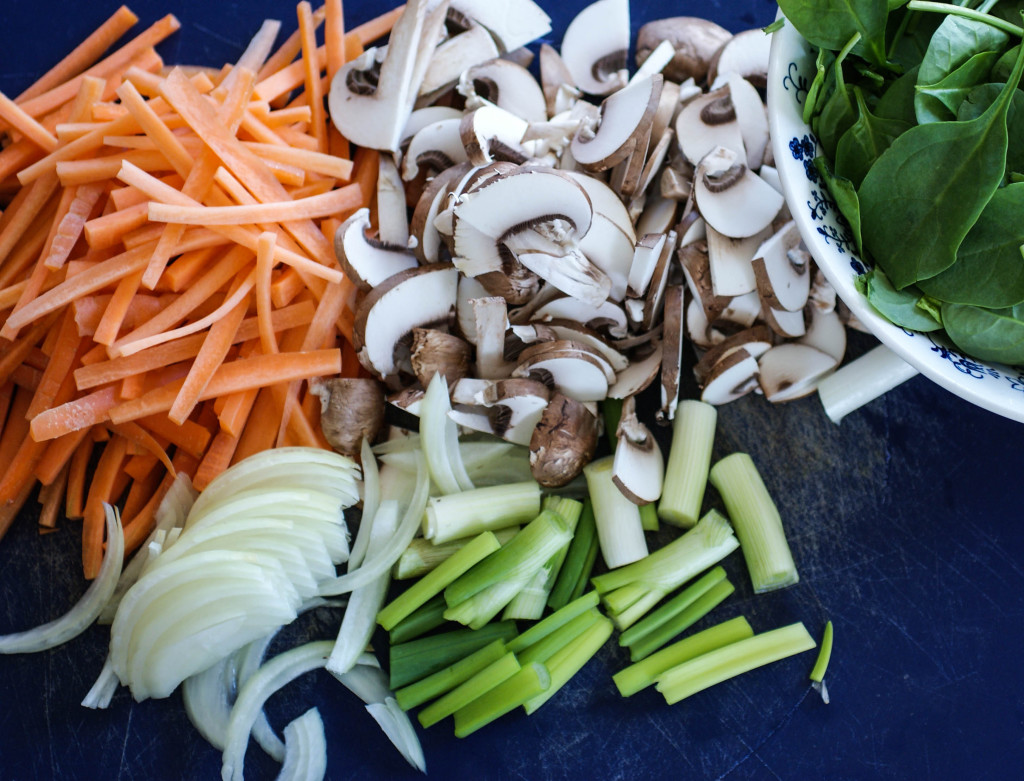
You could use whatever variety of veggies you like

Instructions
- To prepare the noodles, bring a pot of water to the boil and add in the noodles. Cook for 3-5 minutes (I cooked mine for 4) and drain immediately and rinse with cold water. Add a drizzle of oil and mix. Set aside.
- Melt the coconut oil (or oil of your choice) in a large skillet or wok (I used a large cast iron wok).
- When the oil is nice and hot, toss in the carrots and sliced onion. Cook about a minute.
- Now add in the mushrooms, green onion pieces and garlic and cook for another minute.
- Then add the coconut aminos/tamari sauce, honey and spinach. Cook until spinach wilts.
- Add in the noodles and the sesame seeds and toss until well mixed.
- Either stir the diced cooked chicken in or serve it on top of the noodle and veggie dish.
Quick and easy dinner

Ingredients
- 1 package of sweet potato glass noodles (3.5 oz/100 grams)
- 2 carrots, cut into match stick size
- 1/2 onion, sliced thin
- 5 medium size button mushrooms, sliced thin
- 2 green onions (spring onion) cut into inch long pieces
- 250 grams (around 4-5 cups) fresh baby spinach
- 1 1/2 Tablespoons oil (I used coconut oil)
- 2 cloves of garlic, finely chopped
- 2 Tablespoons coconut aminos or gluten free tamari sauce
- 1 teaspoon honey
- 1 Tablespoon sesame seeds
- 2 chicken breasts, cooked and diced
Instructions
- To prepare the noodles, bring a pot of water to the boil and add in the noodles. Cook for 3-5 minutes (I cooked mine for 4) and drain immediately and rinse with cold water. Add a drizzle of oil and mix. Set aside.
- Melt the coconut oil (or oil of your choice in a large skillet or wok (I used a large cast iron wok).
- When the oil is nice and hot, toss in the carrots and sliced onion. Cook about a minute.
- Now add in the mushrooms, green onion pieces and garlic and cook for another minute.
- Then add the coconut aminos/tamari sauce, honey and spinach. Cook until spinach wilts.
- Add in the noodles and the sesame seeds and toss until well mixed.
- Either stir the diced cooked chicken in or serve it on top of the noodle and veggie dish.
Roasted Broccoli and Spinach Soup
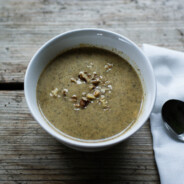
My daughter loves broccoli soup (good thing since our last name is actually Broccoli!). She asked me to make her some when she was home over the holidays. She said this recipe hit the spot perfectly. The roasted garlic and spinach really added some nice flavors. If you eat dairy, you could add some cheddar or some Parmesan cheese to really make it rich.

Roasted Broccoli and Spinach Soup
Ingredients
- 1 medium to large head of broccoli, cut into florets
- 120 grams fresh spinach
- 6 cloves of garlic
- 3 cups of bone broth
- 1/2 cup coconut milk or whole cream
- Salt and pepper to taste
- 1/4 teaspoon red chili flakes
Instructions
- Toss the broccoli florets with a bit of oil (about 1 Tablespoon oil of your choice) and lay out on a baking tray. Throw the 6 garlic cloves on the tray as well (unpeeled). Give it all a good salt.
- Roast the broccoli in a 200 C (400 F) oven until browned (about 20 minutes).
- When the broccoli is done, put it in a big soup pot.
- Squeeze the garlic out of the peels and add to the soup pot.
- Pour in the bone broth and cook over medium high heat.
- Once the soup is warmed through, add in the spinach and continue cooking.
- Once the spinach has wilted down, pour in the coconut milk or cream and the red pepper flakes.
- Use an immersion blender to blitz it all into a smooth and creamy consistency.
- Salt and pepper to taste.
- Garnish with toasted walnuts or hazelnuts.
Enjoy!

Ingredients
- 1 medium to large head of broccoli, cut into florets
- 120 grams fresh spinach
- 6 cloves of garlic
- 3 cups of bone broth
- 1/2 cup coconut milk or whole cream
- Salt and pepper to taste
- 1/4 teaspoon red chili flakes
Instructions
- Toss the broccoli florets with a bit of oil (about 1 Tablespoon oil of your choice) and lay out on a baking tray. Throw the 6 garlic cloves on the tray as well (unpeeled). Give it all a good salt.
- Roast the broccoli in a 200 C (400 F) oven until browned (about 20 minutes).
- When the broccoli is done, put it in a big soup pot.
- Squeeze the garlic out of the peels and add to the soup pot.
- Pour in the bone broth and cook over medium high heat.
- Once the soup is warmed through, add in the spinach and continue cooking.
- Once the spinach has wilted down, pour in the coconut milk or cream and the red pepper flakes.
- Use an immersion blender to blitz it all into a smooth and creamy consistency.
- Salt and pepper to taste.
- Garnish with toasted walnuts or hazelnuts.
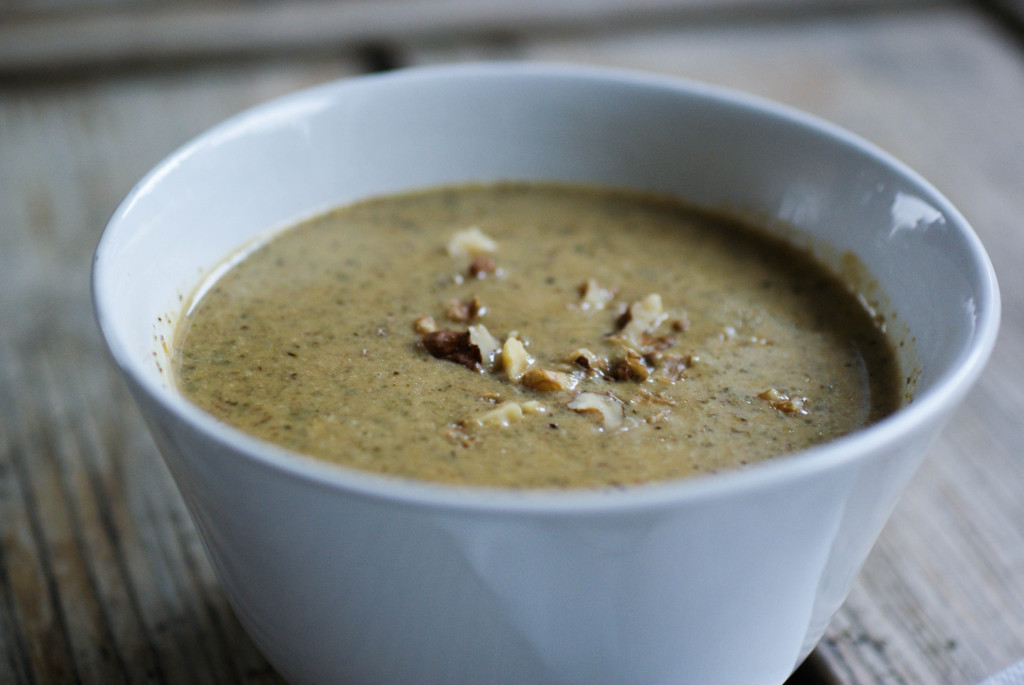
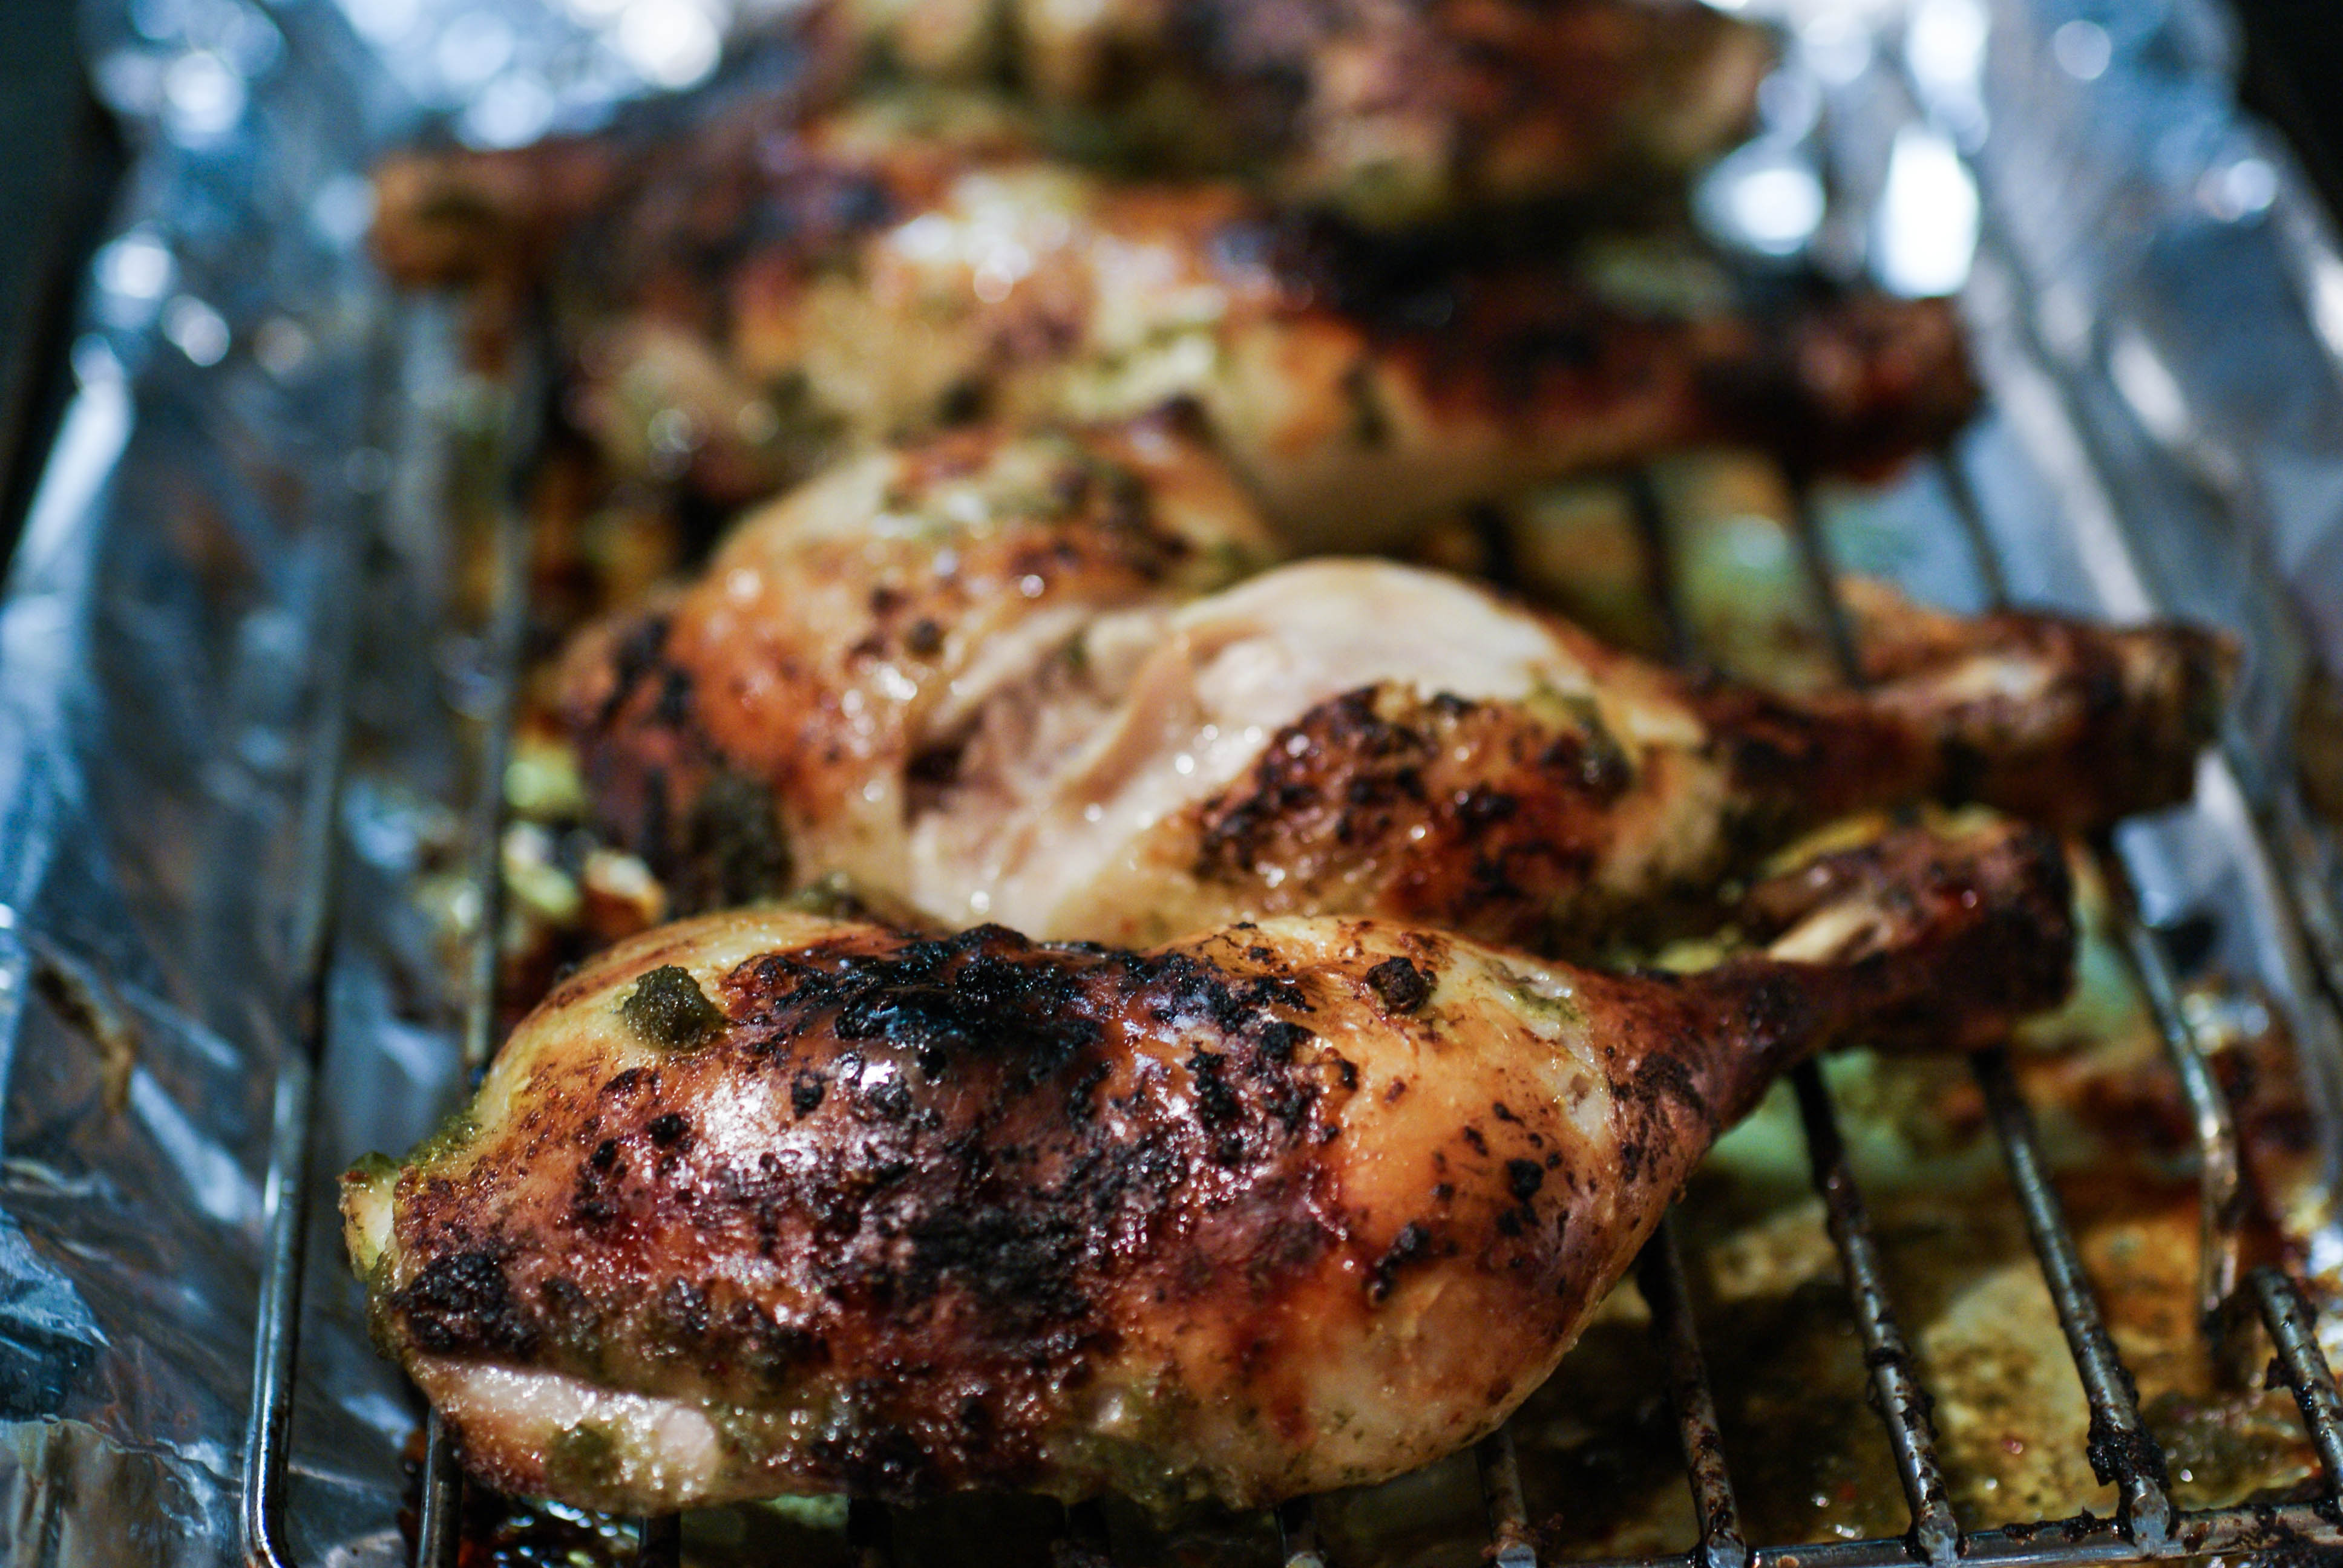
Crispy Cornell Chicken
I have a friend who is famous. And what’s she famous for? Her cooking, of course. Well, that and her awesome hair…I’ve always wanted her hair. She is a food writer (check out her contributions to mom.me here…she is hysterical) and she’s also a fabulous chef who has catered for the likes of John Stewart and The Daily Show. You can check out her blog (not currently blogging, but still lots of great recipes there) or maybe you’ll be able to catch one of her cooking segments on CNBC Charlotte Today. Needless to say, when she says a recipe is good, I take note and listen (and then run to my kitchen to make it). She mentioned making something called “Cornell Chicken” the other day on facebook, so I thought I’d give it a try.
I let my fingers do the googling and found out that this chicken was invented by a professor of food science at Cornell University way back in the day. Professor Bob Baker also invented things like chicken nuggets, turkey ham and poultry hot dogs. You can view his original recipe here, but I think I’ll pass on the turkey ham. I like my ham to be a ham and my turkey to be a turkey 😉
Ideally, this recipe is intended for whole or quartered chicken and it is traditionally cooked on the BBQ grill. However, I was far too lazy to be bothered with quartering and chopping up a whole chicken (regular readers won’t be at all surprised 😉 ). It also happened to be raining and I didn’t feel like trying to fire up the grill in the rain (again, too lazy), so I browned this up on the stove top before finishing it off in the oven. I can’t wait until BBQ weather so that I can try it out on the grill.

Crispy delicious skin
The Verdict: Yep, pretty darn good. The skin gets super crispy, and I can imagine that it gets even more crisp if you do it up on the grill. Really nice flavors in the chicken, but nothing overpowering (in other words, it would pair well with anything). So, thanks for the inspiration Jenny! Now, if you would just let me in on the secret to great hair…
Ingredients
- 8 skin on chicken thighs
- 1/2 cup olive oil
- 1 egg
- 1 cup apple cider vinegar
- 1/2 teaspoon paprika
- 1 1/2 Tablespoons rotisserie (poultry) seasoning*
- Pepper to taste
* Make your own poultry seasoning blend
- 3 Tablespoons dry sage
- 1 Tablespoon thyme
- 1 Tablespoon marjoram
- 1 Tablespoon rosemary
- 2 teaspoons salt
- 1 Tablespoon black pepper
- 1/4 teaspoon ground cloves
- Grind it all together to make a fine spice powder blend. You’ll have some left over!
Instructions
- Whisk the oil and egg together.
- Add in the vinegar and spices and mix well (I used an immersion blender).
- Put the chicken in a large zip lock bag and pour the marinade in with it.

Marinating chicken
- Now smoosh it all together and put it in the fridge for a minimum of 2 hours.
- Either grill the chicken on the BBQ or you can quickly brown it on the stove top and finish it in a 425 F (220 C) oven for about 20-30 minutes (baste a few times during the cooking time) or until the juices run clear.
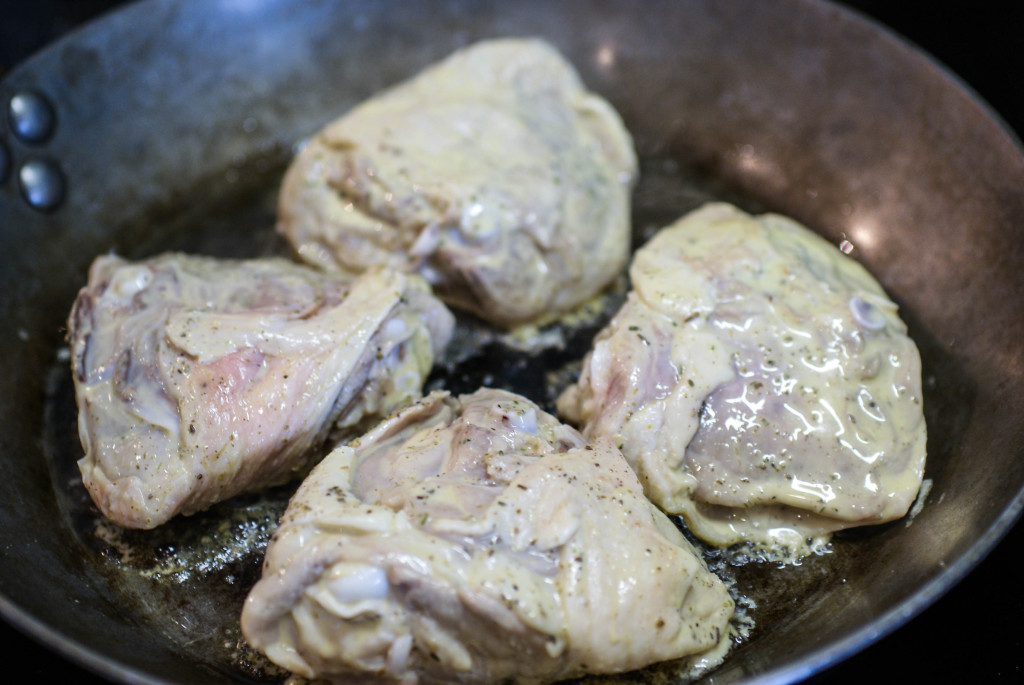
Brown it on the stove top first
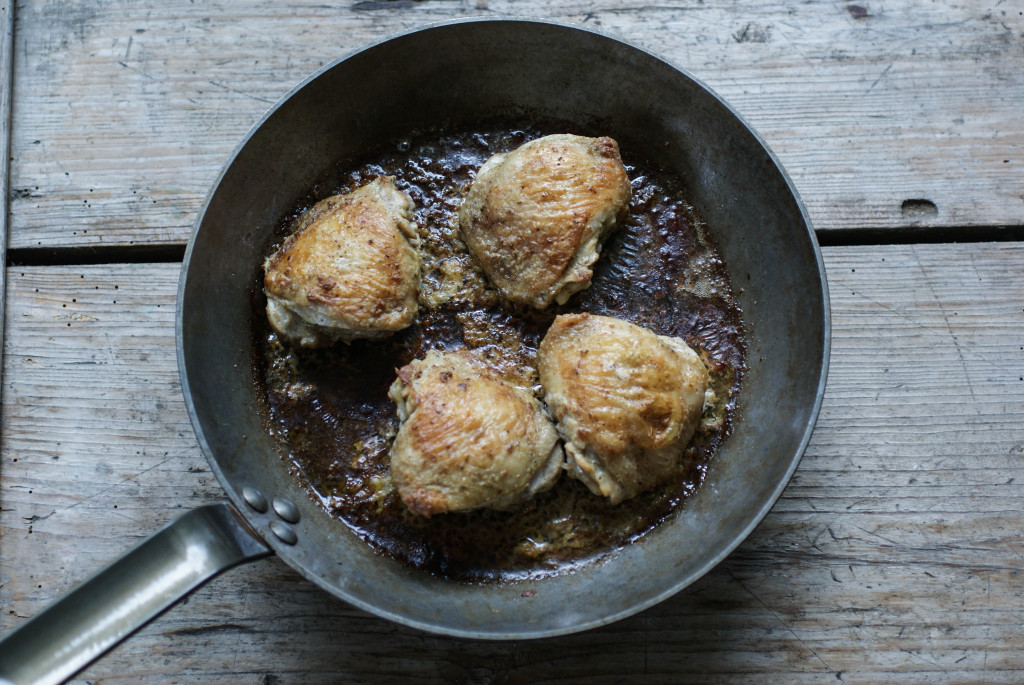
The finished chicken


Ingredients
- 8 skin on chicken thighs
- 1/2 cup olive oil
- 1 egg
- 1 cup apple cider vinegar
- 1/2 teaspoon paprika
- 1 Tablespoon rotisserie (poultry) seasoning*
- 1/2 Tablespoon salt
- Pepper to taste
- 3 Tablespoons dry sage
- 1 Tablespoon thyme
- 1 Tablespoon marjoram
- 1 Tablespoon rosemary
- 2 teaspoons salt
- 1 Tablespoon black pepper
- 1/4 teaspoon ground cloves
- Grind it all together to make a fine spice powder blend. You'll have some left over!
Instructions
- Whisk the oil and egg together.
- Add in the vinegar and spices and mix well ( I used an immersion blender).
- Put the chicken in a large zip lock bag and pour the marinade in with it.
- Now smoosh it all together and put it in the fridge for a minimum of 2 hours.
- Either grill the chicken on the BBQ or you can quickly brown it on the stove top and finish it in a 400 F (200 C) oven for about 20-30 minutes (baste a few times during the cooking time) or until the juices run clear.
The Paleo Book Shelf: Nom Nom Paleo’s Food for Humans
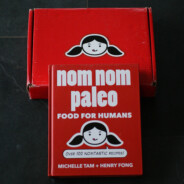
I am a huge fan of Michelle Tam. Like, major girl-crush fan. I mentioned her as my blogging inspiration in my first ever post, and gushed even more after meeting her in person and sharing a meal with her and her husband. I visit loads of blogs, but hers is one of the few that I read regularly. And it’s not just about the food. She is witty and funny and real. She also has two adorable little boys and she shares a peek into her daily life as a full time working mom. Needless to say, I was thrilled when she decided to publish a cookbook.
Nom Nom Paleo: Food for Humans is way more than just another cookbook. The whole first section is all about her and her family. You finish this section feeling like you’ve just made a new friend. Then your new friend takes you on a tour of her kitchen and gives you all sorts of cooking tips and tells you how to stock your pantry and which tools you need to get started.
Next up, is the recipe section. Michelle’s recipes are uncomplicated and everything I’ve tried has always turned out delicious. She shares over 100 recipes, and I didn’t find any that I wouldn’t want to make. The recipe instructions are clear and easy to follow and will turn a kitchen newbie into a foodie chef. The recipes are also just a lot of fun to read…like I said, she is witty and funny.
I love the layout of this book and it’s made to a very high standard. It’s a hard cover, it’s just the right size, it has one of those ribbons in it to help you hold your place, the paper is really high quality and it’s filled with amazing photography. The pictures really bring the recipes to life and help to give you an idea of what the finished product will look like, as well as what it looks like during the prep and cooking stages. Michelle’s husband, Henry, is an amazing photographer. He’s also one heck of a talented graphic artist. There’s a lot of comic strip style art and graphics throughout the book. How can one family be so talented?
I cooked up her recipe for Green Chicken and it was incredibly flavorful. But then again, her recipes always are.
Forget Green Eggs and Ham…give me some Green Chicken!
Yes, this is a book you need. If you already have her iPad app or read her award winning blog, then you already knew that. Besides, this cookbook has butt jokes in it. I told you it wasn’t just another cookbook 😉
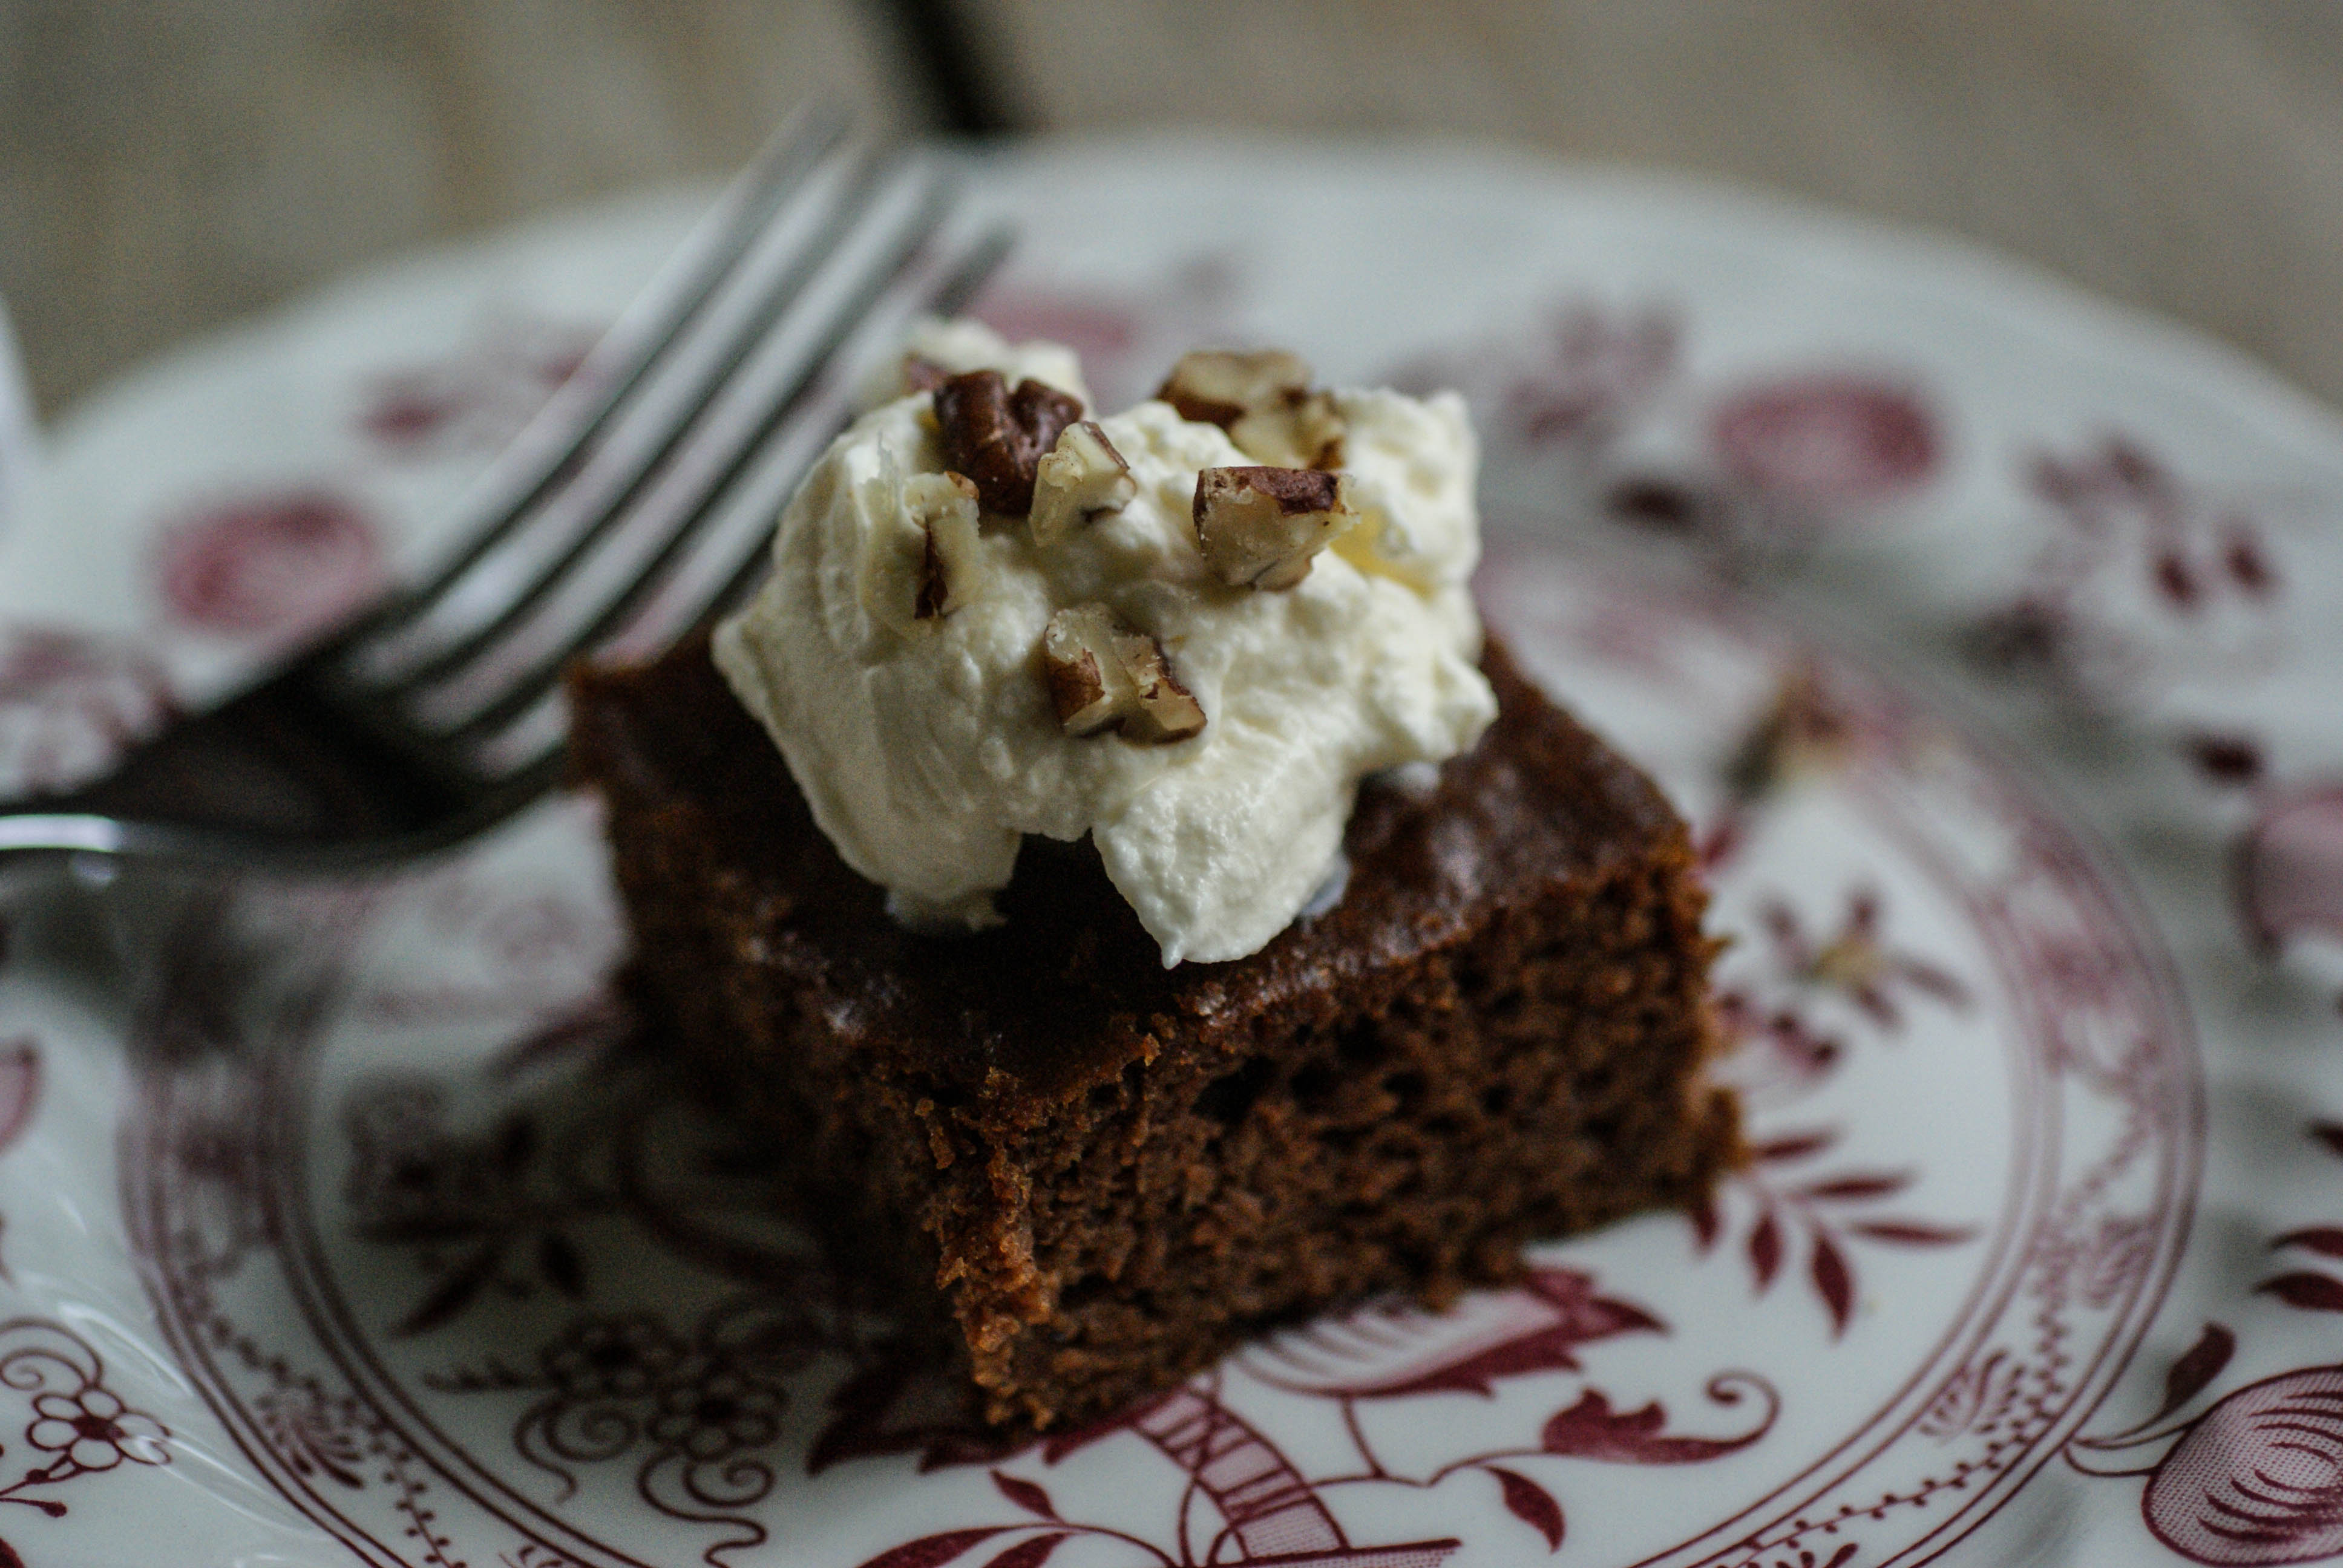
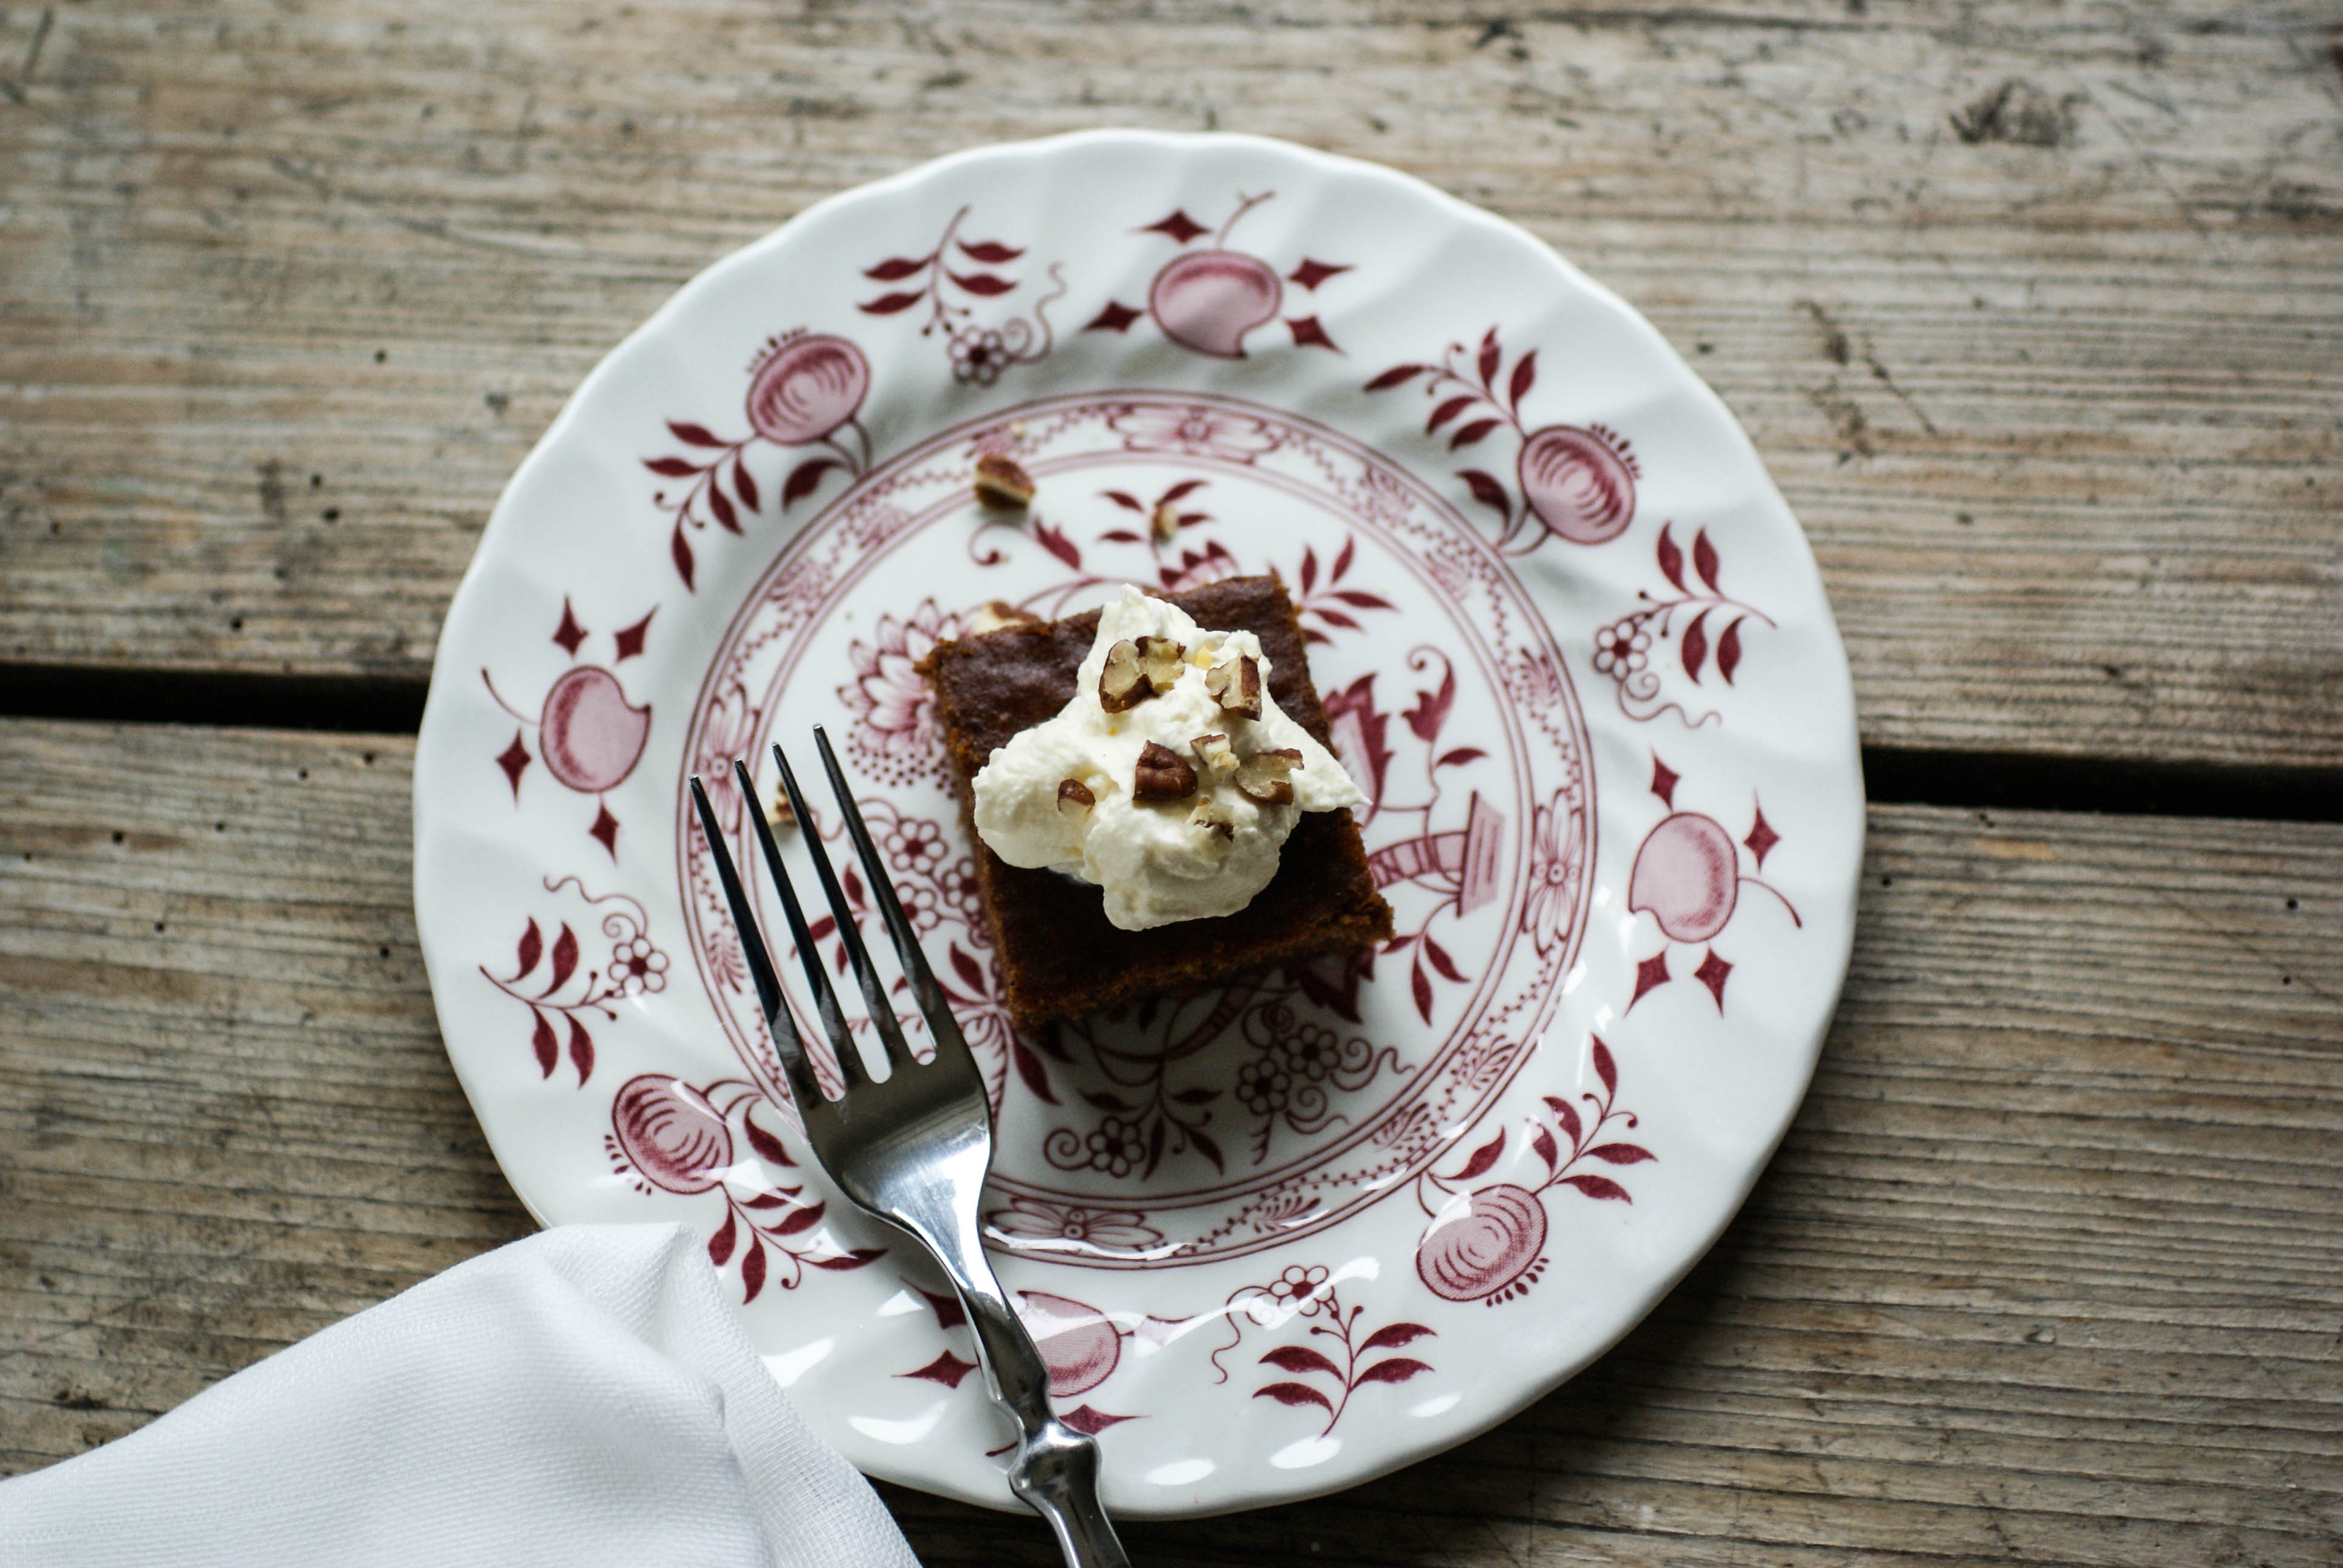
Orange Cake
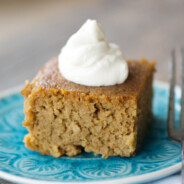
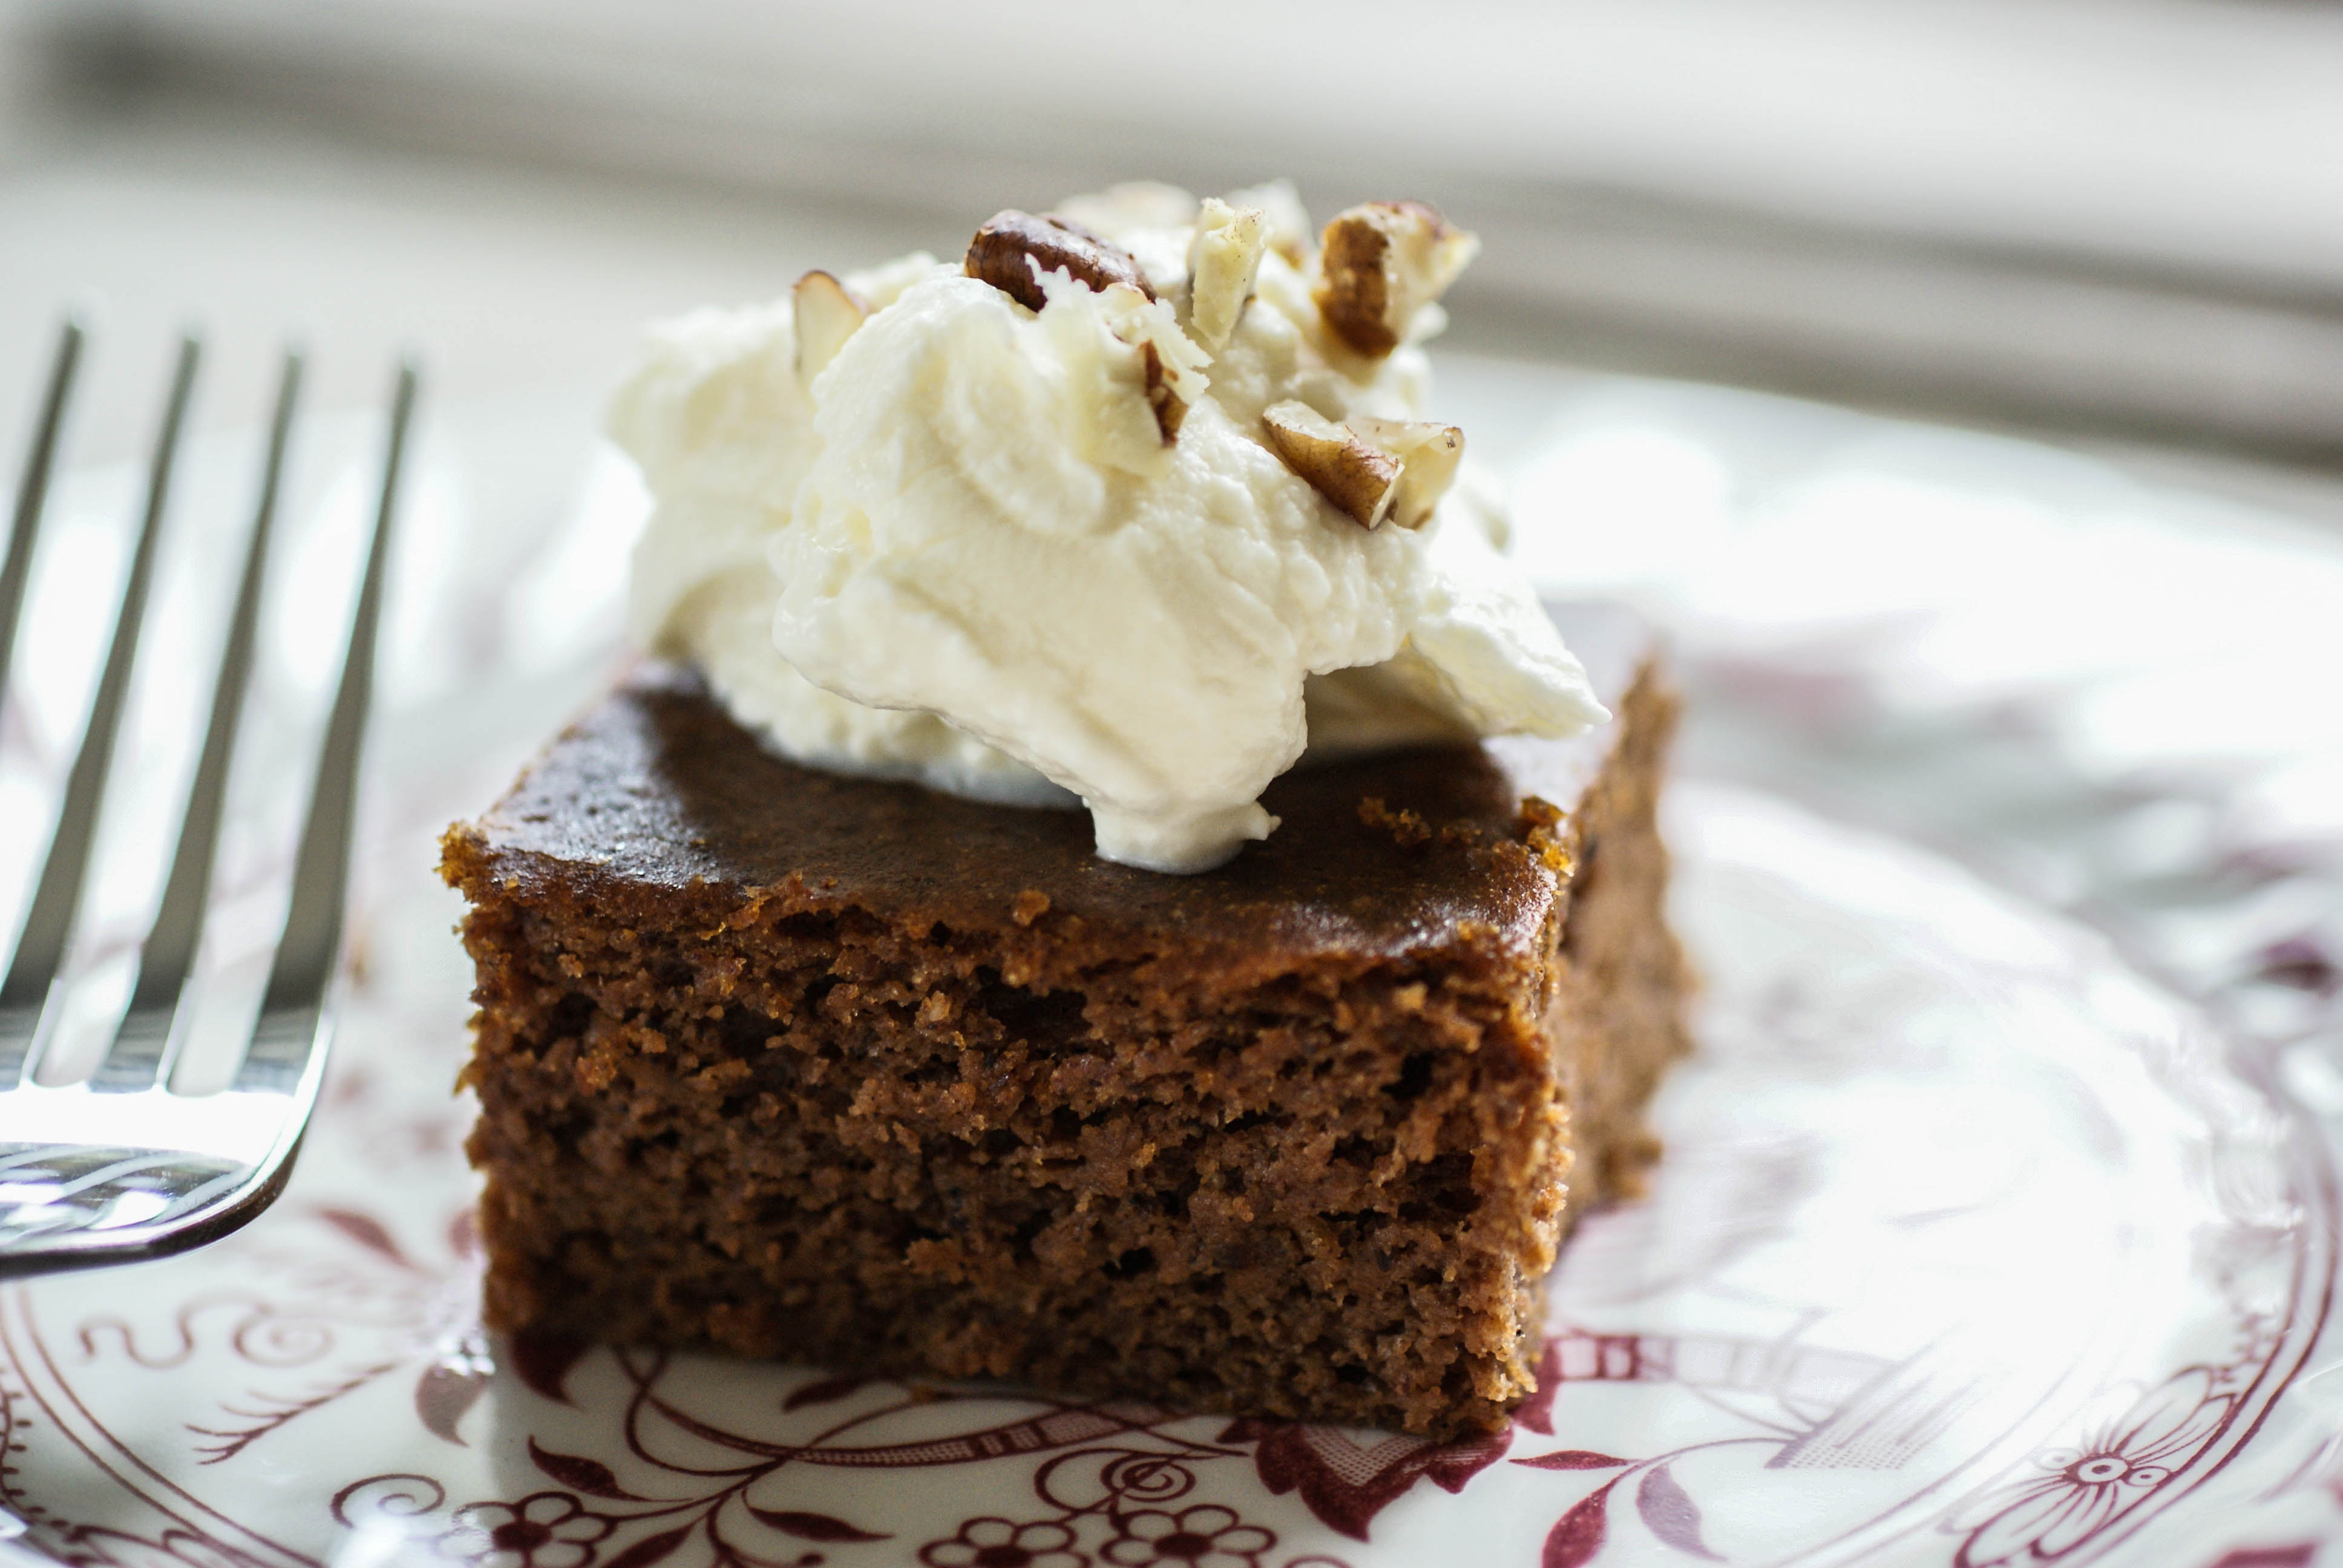
I saw this recipe on a holiday baking show and decided to give it a try as our Christmas dinner dessert. When you read the recipe, I know you will think it sounds really strange. Yes, you use whole oranges….peel and all. I am not a big cake fan, but this is more like brownie consistency than dry yucky cake. My daughter decided that this was the best cake she had ever had.
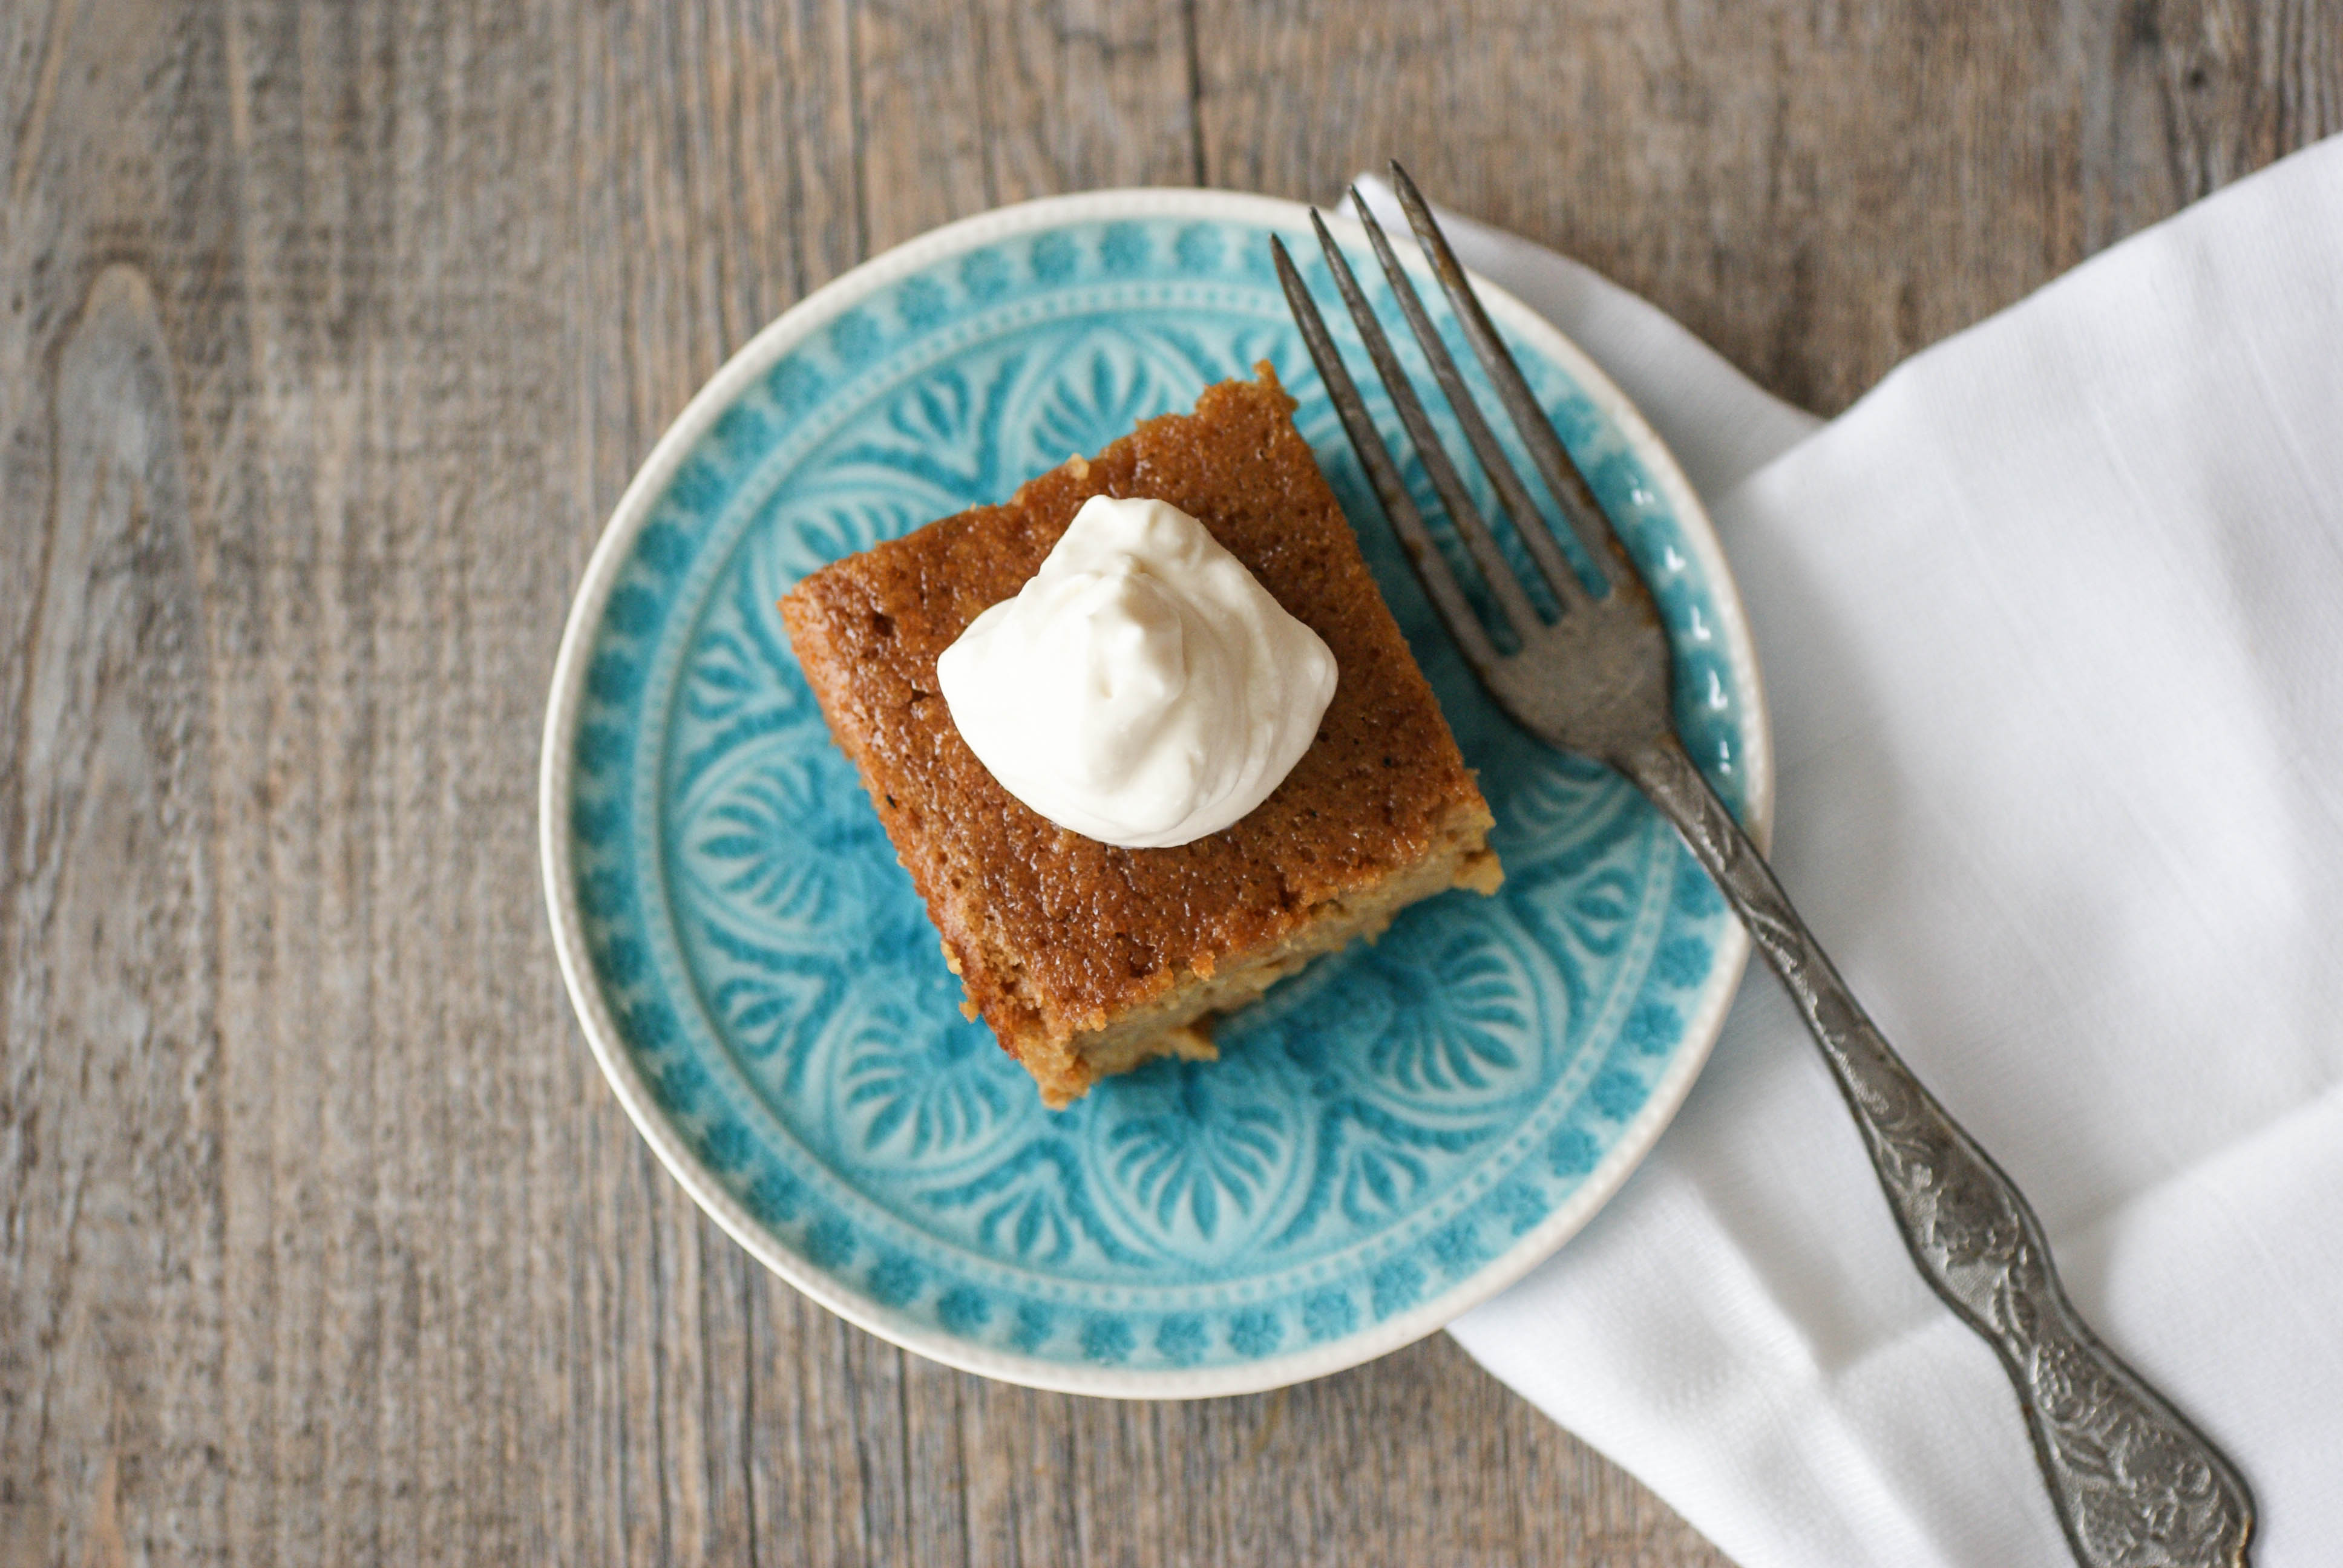
Sam’s new favorite cake
Ingredients
- 3 oranges
- 300 grams (3 cups) of ground almonds (almond meal)
- 300 grams (1.5 cups) of coconut sugar
- 2 teaspoons of baking powder
- 1 teaspoon ginger
- 1 teaspoon cinnamon
- 7 eggs
Instructions
- Put the whole, unpeeled oranges in a large pot and cover with cold water.
- Bring to a boil and then reduce to a simmer and cook for 11/2 to 2 hours.
- Drain the oranges and let them cool enough so that you can handle them.
- Quarter the oranges and remove any seeds (mine didn’t have seeds).
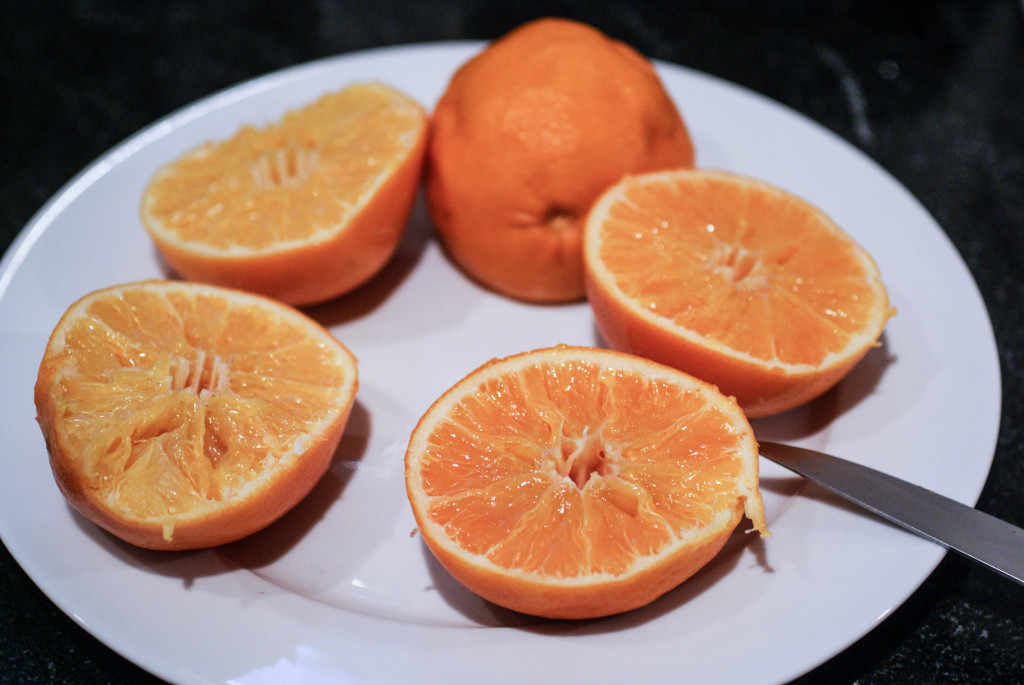
Boiled oranges
- Put the pieces or orange(yes, peel and all)into a food processor (a blender would probably also work) and pulse until you get a consistency similar to applesauce.
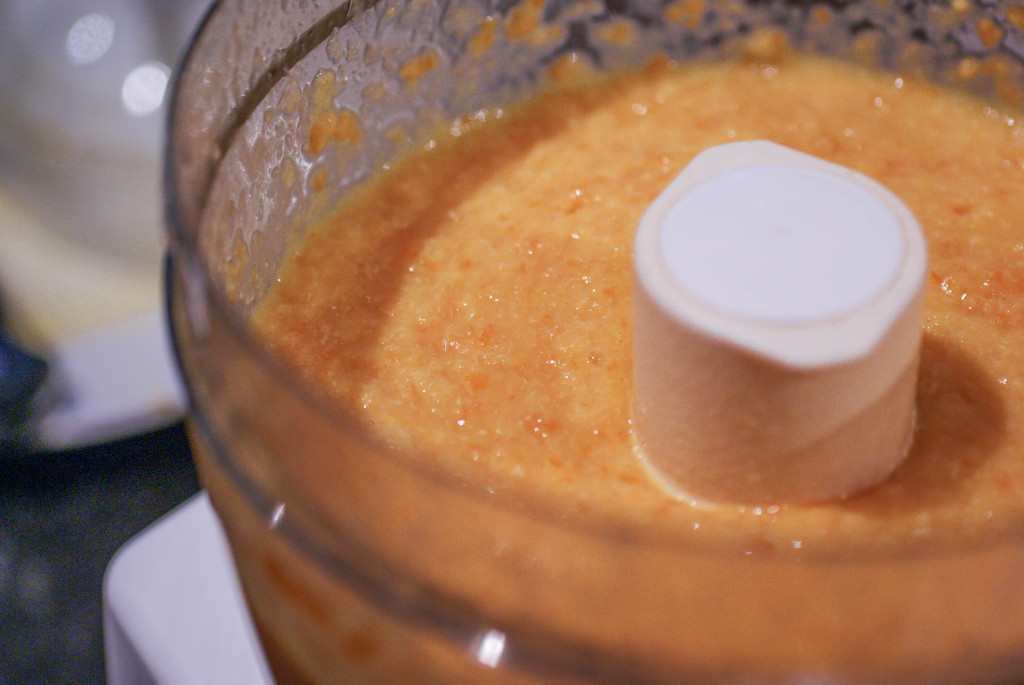
Peels and all
- Weigh out 450 grams of the orange sauce (about a pound) for use in the cake and discard the rest (or use it in a smoothie).
- Return the 450 grams of orange sauce to the food processor and add eggs one at a time while pulsing the food processor.
- Mix all of the dry ingredients together in a large mixing bowl.
- Add the orange and egg mixture into the large bowl of dry ingredients and mix well.
- Pour batter into a well greased and/or parchment lined 8×12 cake pan.
- Bake in a pre-heated 160C (325F) oven for 60 to 80 minutes. Cover with foil after about 40 minutes if it is getting brown. It’s done when it doesn’t jiggle and the center is firm.
- Serve with a dollop of whipped whole cream or coconut milk.
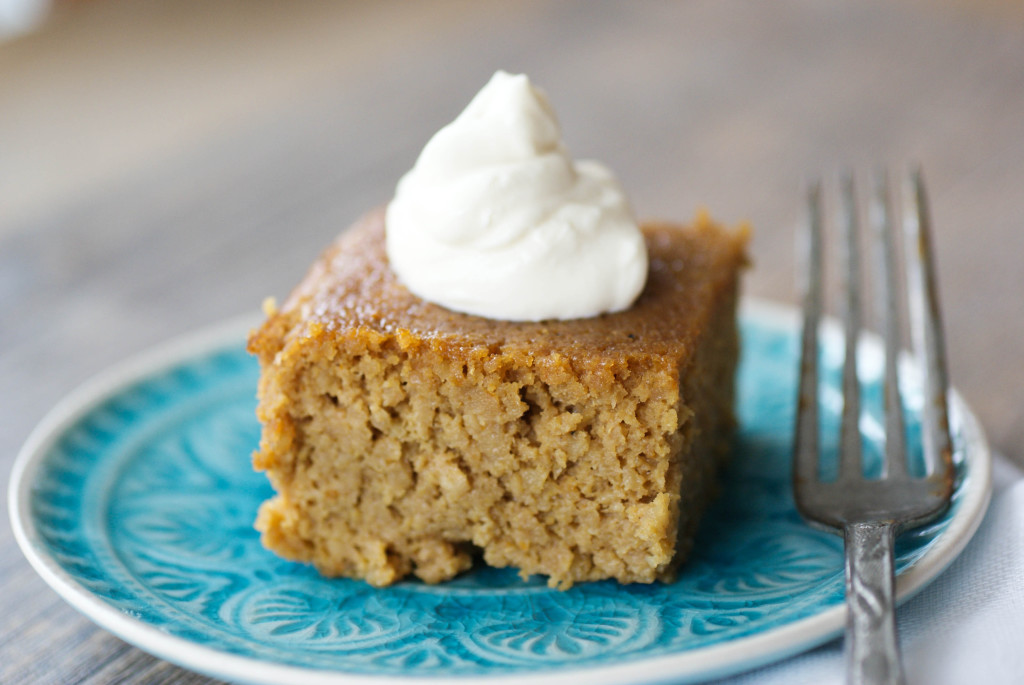
Super moist and delicious


Ingredients
- 3 oranges
- 300 grams (3 cups) of ground almonds (almond meal)
- 300 grams (1.5 cups) of coconut sugar
- 2 teaspoons of baking powder
- 1 teaspoon ginger
- 1 teaspoon cinnamon
- 7 eggs
Instructions
- Put the whole, unpeeled oranges in a large pot and cover with cold water.
- Bring to a boil and then reduce to a simmer and cook for 11/2 to 2 hours.
- Drain the oranges and let them cool enough so that you can handle them.
- Quarter the oranges and remove any seeds (mine didn't have seeds).
- Put the pieces or orange(yes, peel and all)into a food processor (a blender would probably also work) and pulse until you get a consistency similar to applesauce.
- Weigh out 450 grams of the orange sauce (about a pound) for use in the cake and discard the rest (or use it in a smoothie).
- Return the 450 grams of orange sauce to the food processor and add eggs one at a time while pulsing the food processor.
- Mix all of the dry ingredients together in a large mixing bowl.
- Add the orange and egg mixture into the large bowl of dry ingredients and mix well.
- Pour batter into a well greased and/or parchment lined 8x12 cake pan.
- Bake in a pre-heated 160C (325F) oven for 60 to 80 minutes. Cover with foil after about 40 minutes if it is getting brown. It's done when it doesn't jiggle and the center is firm.
- Serve with a dollop of whipped whole cream or coconut milk.
Pumpkin Pie Spice Bread (Cake)

I had some left over pumpkin puree from making pumpkin pancakes and so I whipped up this quick bread/cake to make use of it. And, let’s face it, so I could eat cake. This recipe is super quick and easy to throw together and tastes fantastic.
Mr. Swiss Paleo loved this cake
You could halve the recipe and bake it in an 8×8 pan or make a whole recipe in an 8×12 pan. This is delicious served plain, but you can really turn it into something special by topping it with a dollop of coconut milk whipped cream flavored with a splash of maple syrup and a dash of cinnamon. Sprinkle on a few chopped pecans to make it look extra fancy.
Pumpkin Pie Spice Cake
Ingredients
- 1 cup pumpkin puree
- 1 cup almond butter
- 1/2 cup honey or maple syrup
- 4 eggs
- 4 teaspoons pumpkin pie spice
- 2 teaspoon vanilla extract
- 1/2 teaspoon salt
- 1 teaspoon baking soda
Instructions
- Put everything together in a medium sized mixing bowl and stir until well combined and creamy. I used an electric mixer.
- Pour into a well greased (I used coconut oil) 8×12 cake pan and bake in a preheated 350 F (170 C) oven for 25-30 minutes.
- It’s done when it pulls away from the edges slightly and when a toothpick inserted in the middle comes out clean.
- Serve as is, or top with some coconut whipped cream (flavor it with a splash of maple syrup and a dash of cinnamon!) and chopped pecans.

Super quick and easy to make
Ingredients
- 1 cup pumpkin puree
- 1 cup almond butter
- 1/2 cup honey or maple syrup
- 4 eggs
- 4 teaspoons pumpkin pie spice
- 2 teaspoon vanilla extract
- 1/2 teaspoon salt
- 1 teaspoon baking soda
Instructions
- Put everything together in a medium sized mixing bowl and stir until well combined and creamy. I used an electric mixer.
- Pour into a well greased (I used coconut oil) 8x12 cake pan and bake in a preheated 350 F (170 C) oven for 25-30 minutes.
- It's done when it pulls away from the edges slightly and when a toothpick inserted in the middle comes out clean.
- Serve as is, or top with some coconut whipped cream (flavor it with a splash of maple syrup and a dash of cinnamon!) and chopped pecans.
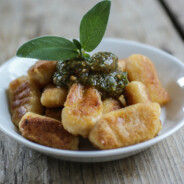
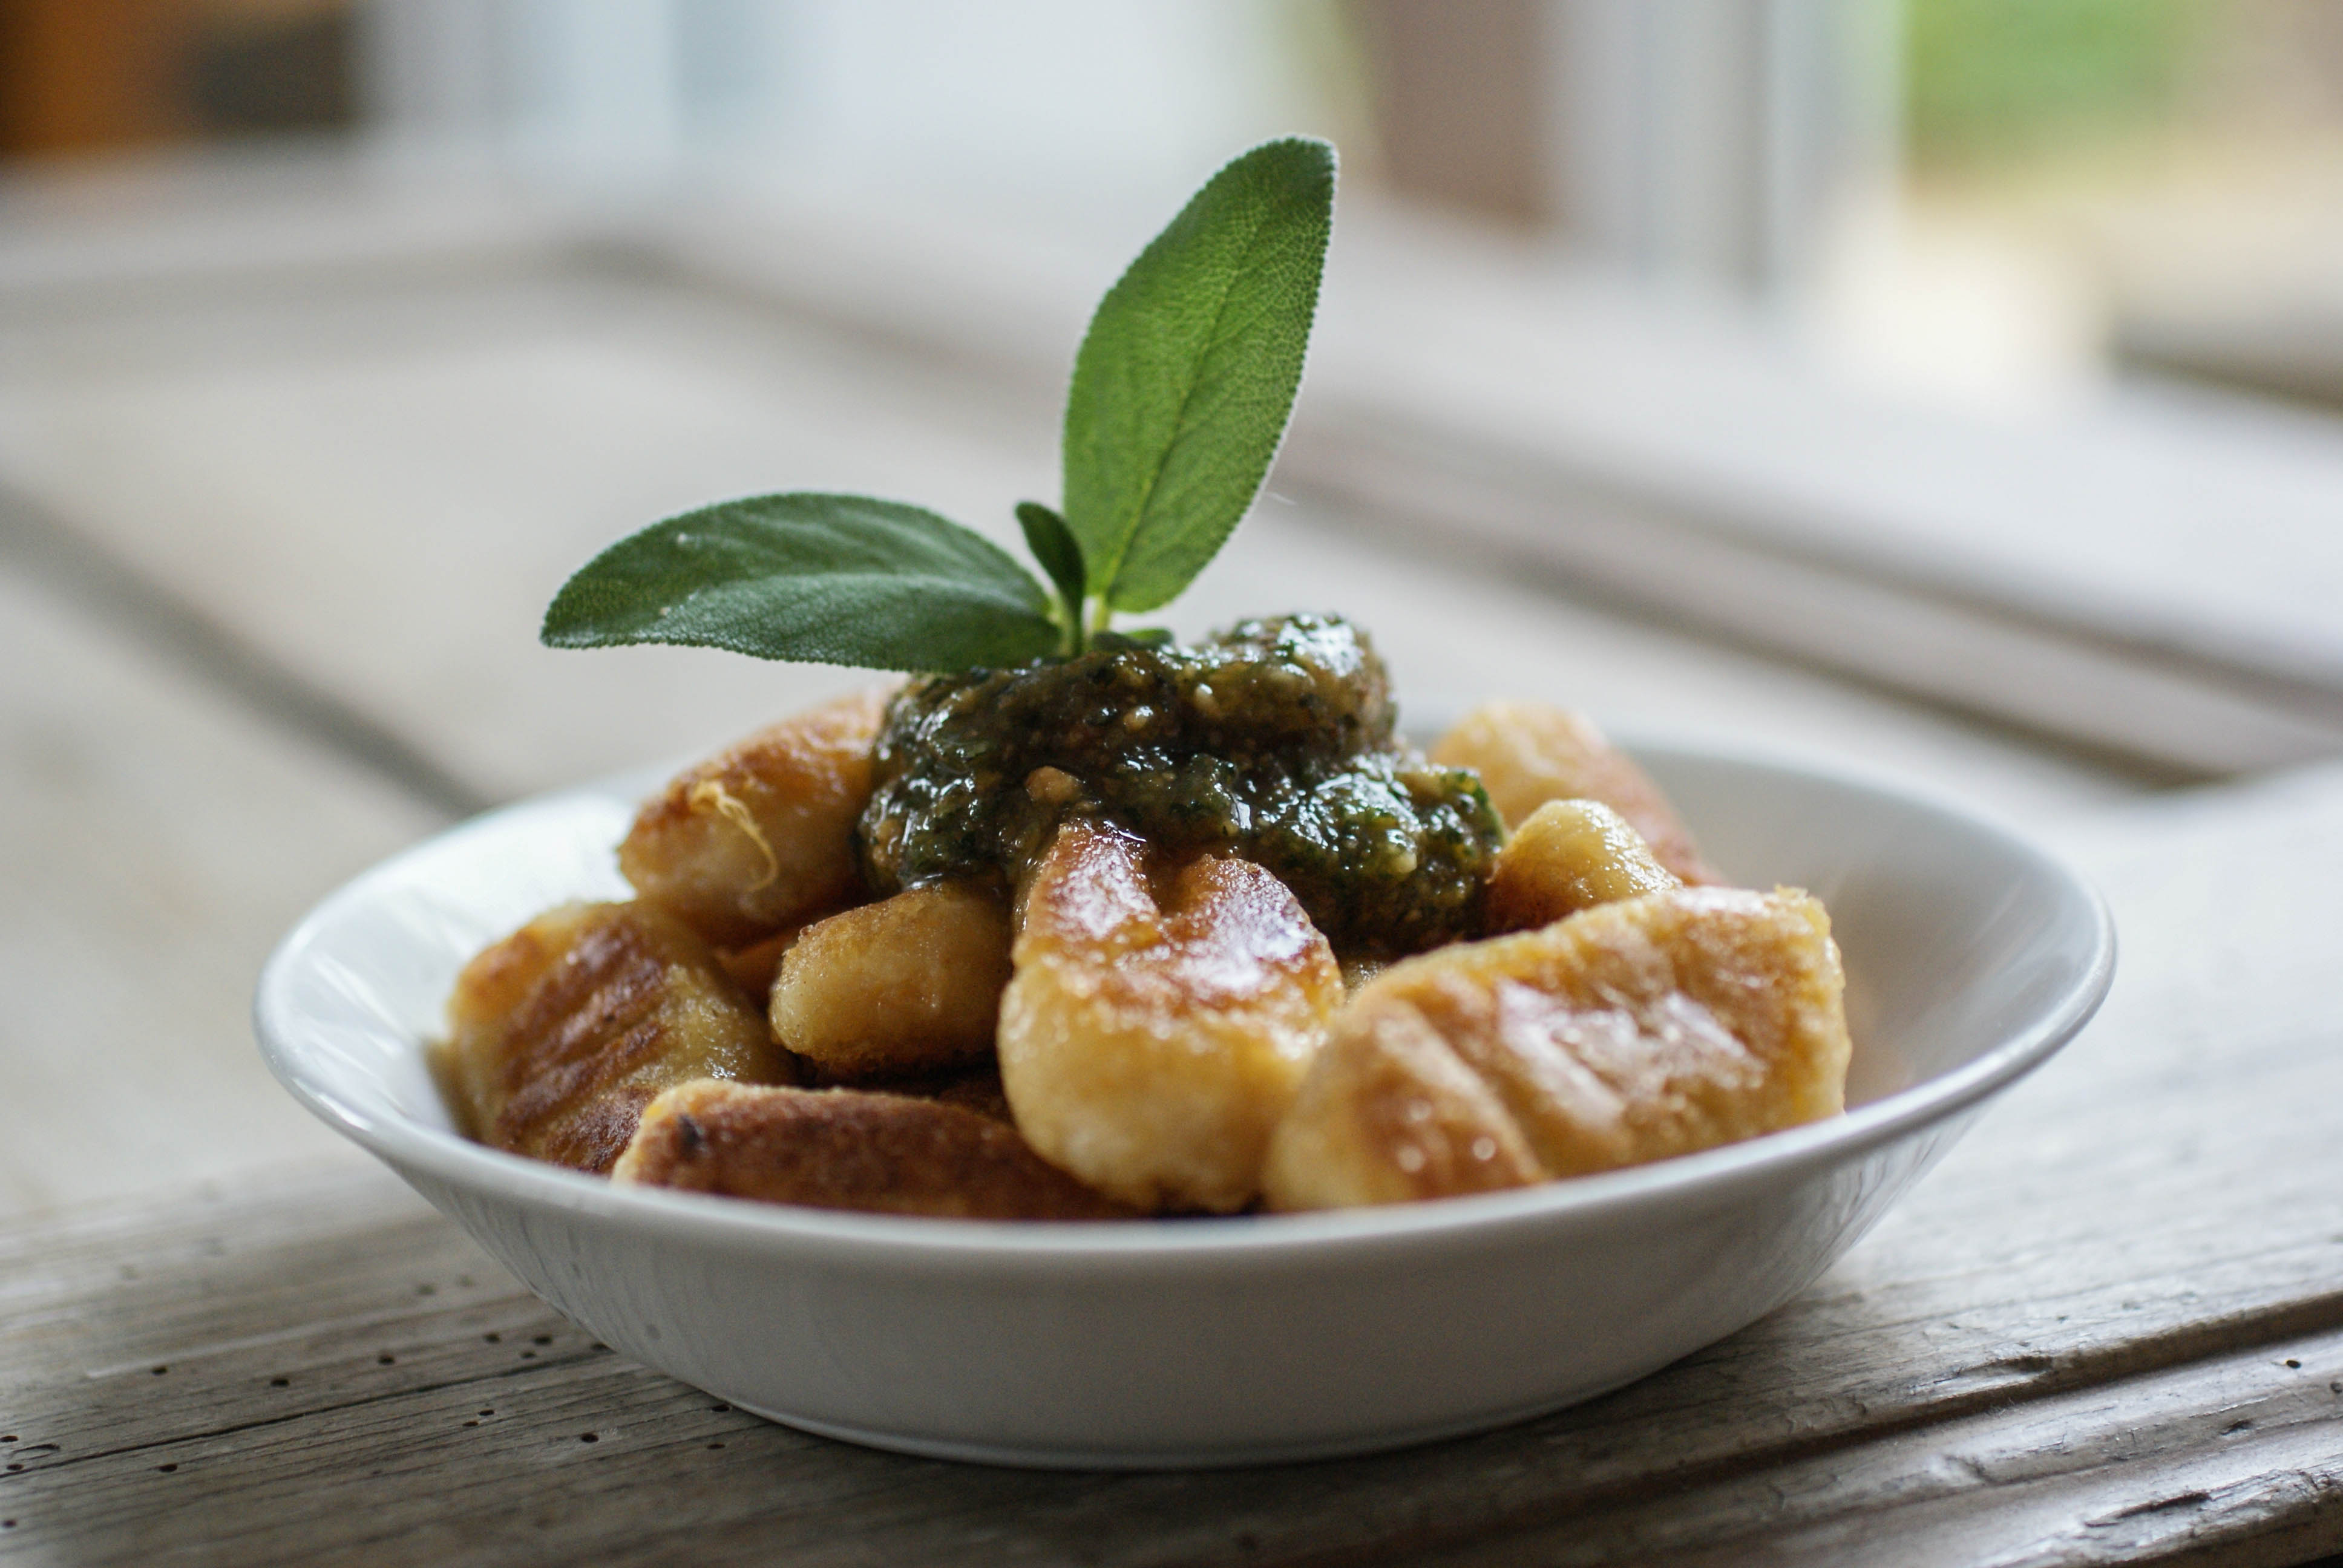
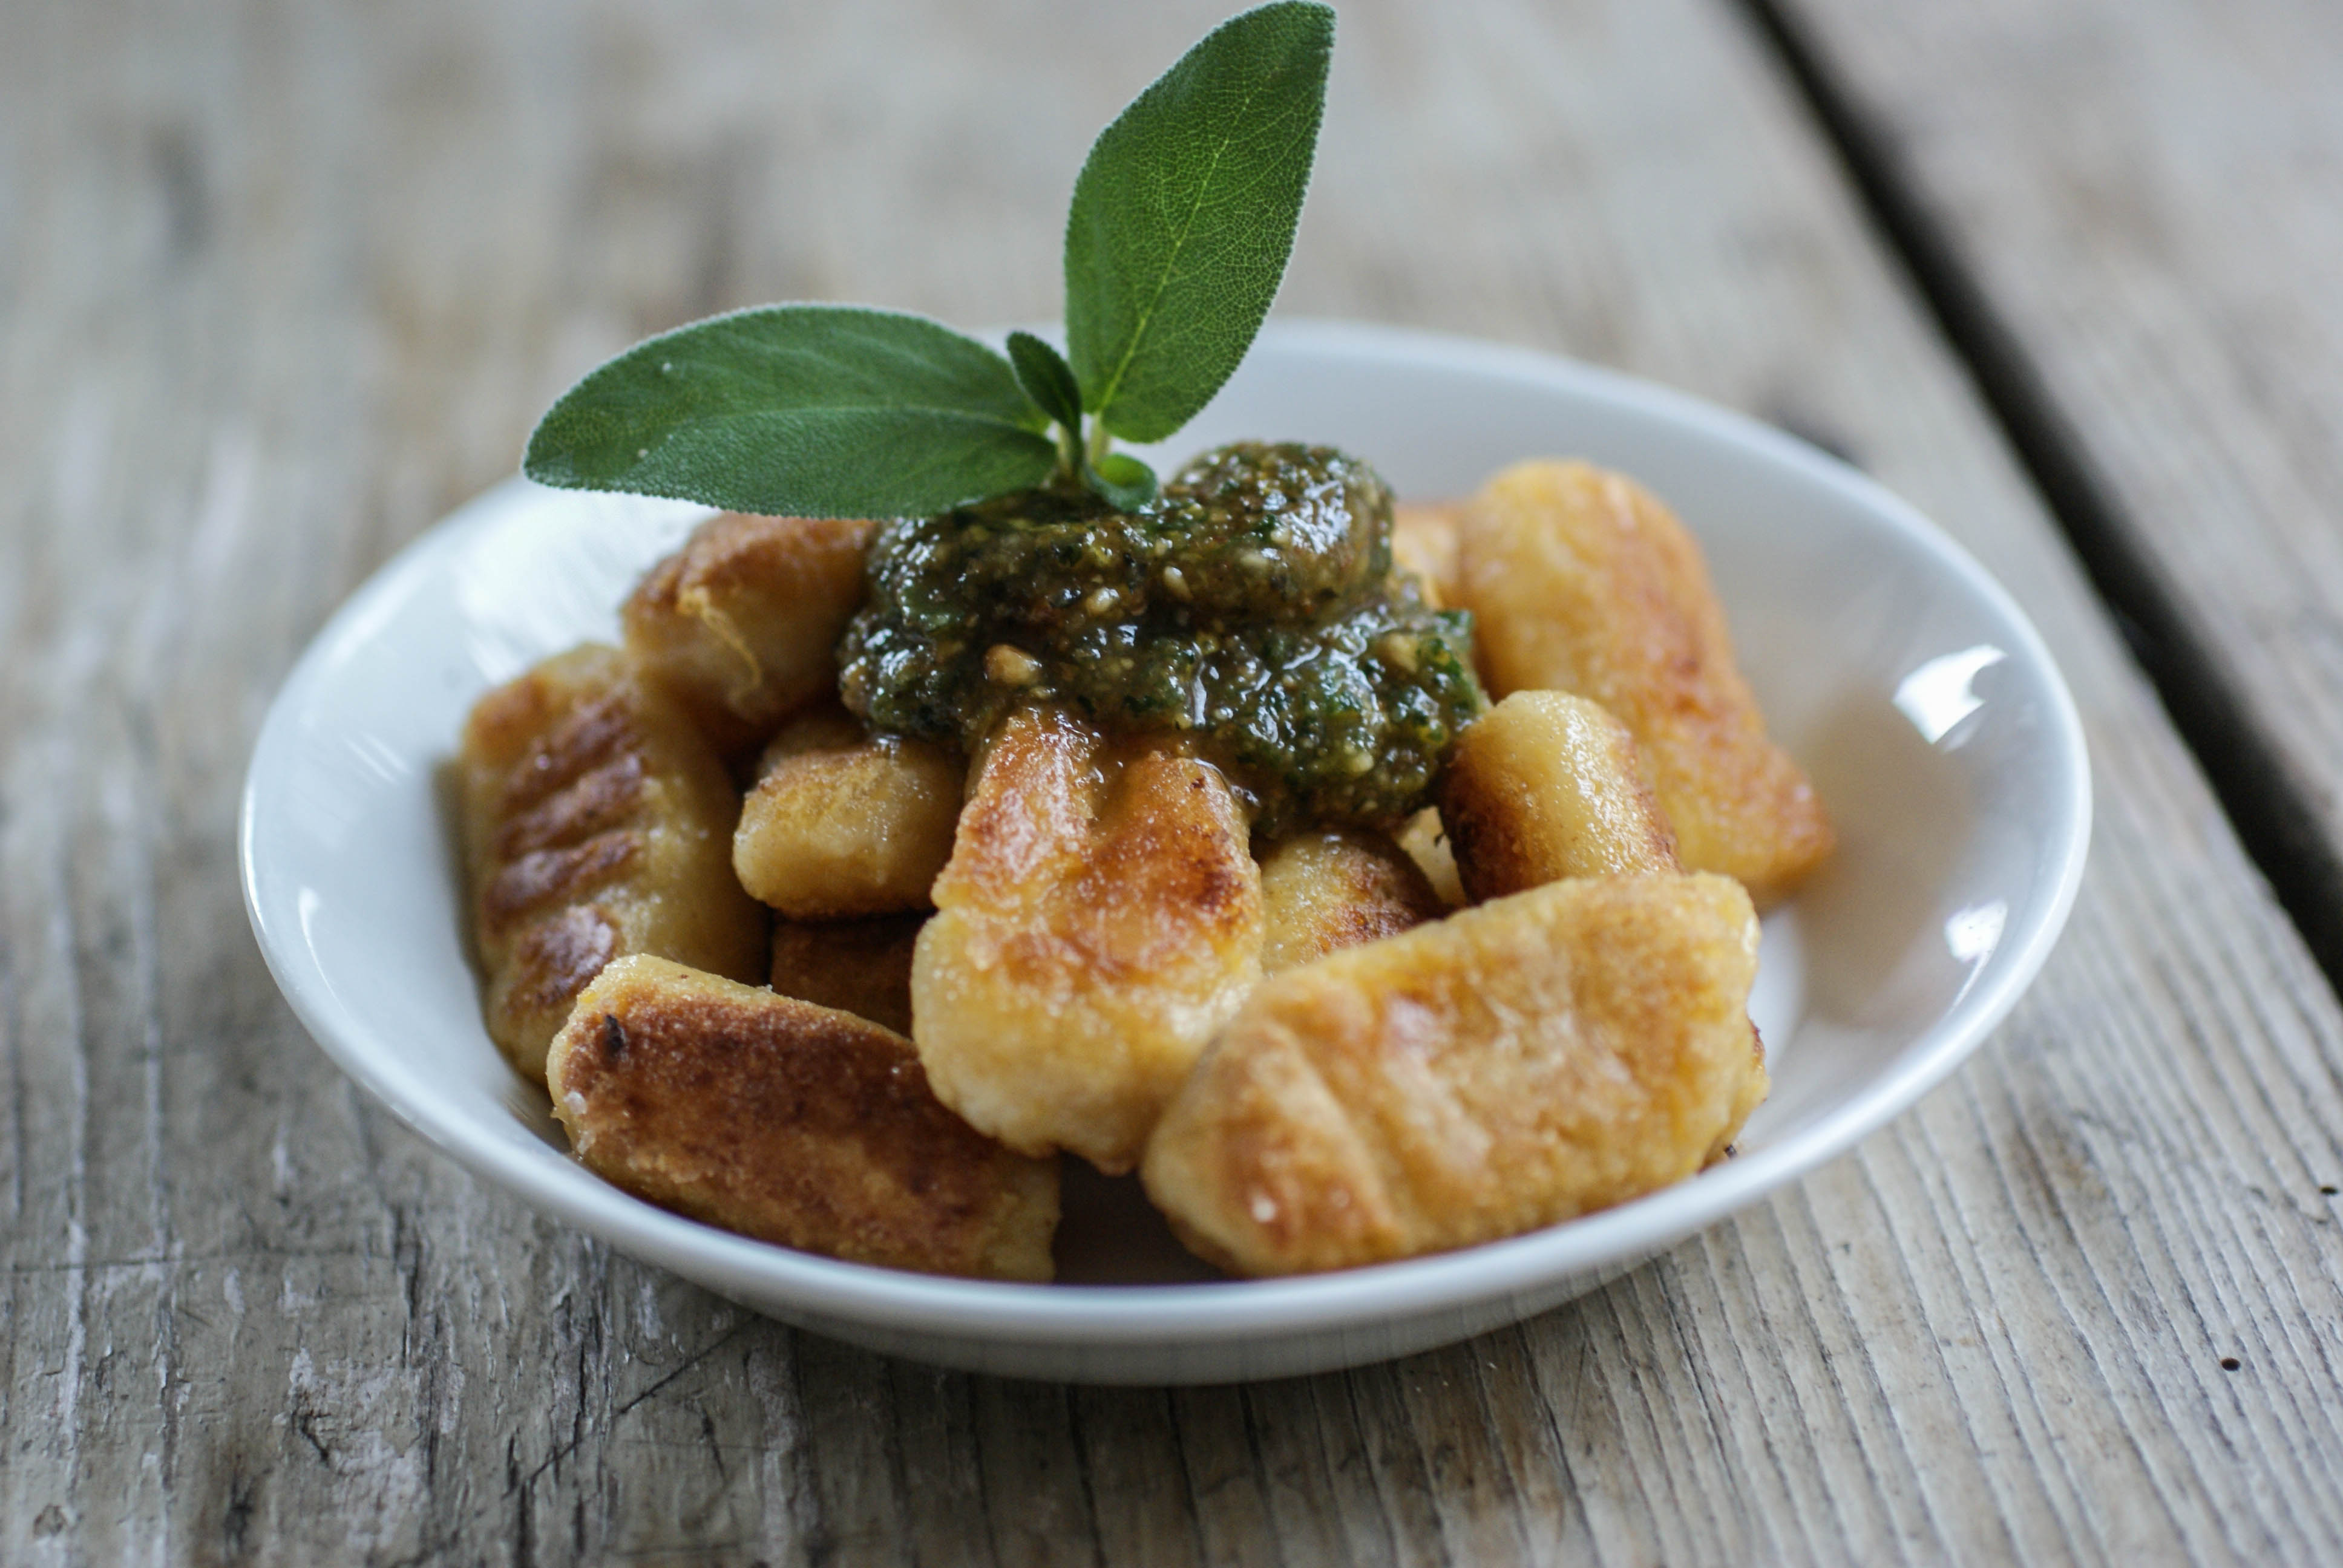
Sweet Potato Gnocchi
My daughter loves gnocchi. She recently tried some sweet potato gnocchi at a restaurant that she said was super tasty and she asked me to see if I could make her a paleo version. There are quite a few recipes out there, but I decided just to wing it. I was sure that they would fall apart and not work.
They absolutely worked and they turned out dangerously delicious. We topped off our gnocchi with some roasted walnut and sage pesto and I know my daughter will love them. I’ve put most of what I made in the freezer for her so that she can enjoy them during her visit.
Worth the effort (but actually pretty easy to make)
Don’t let the long instructions put you off. These really are quite easy and well worth the effort.
Ingredients
- 2 large sweet potatoes (mine totaled 550 grams), baked and peeled
- 2 1/2 cups arrowroot powder (plus a bit more for rolling)
- 2 1/2 cups almond flour
- 1 teaspoon salt
- 1 teaspoon baking soda
- 1 egg white
Instructions
- Poke a few holes in the sweet potatoes and bake them in a 400 F (200 C) oven for about an hour (or until soft and done).
- Remove from the oven and cool completely.
- Peel the sweet potatoes and then mash them in a large mixing bowl.
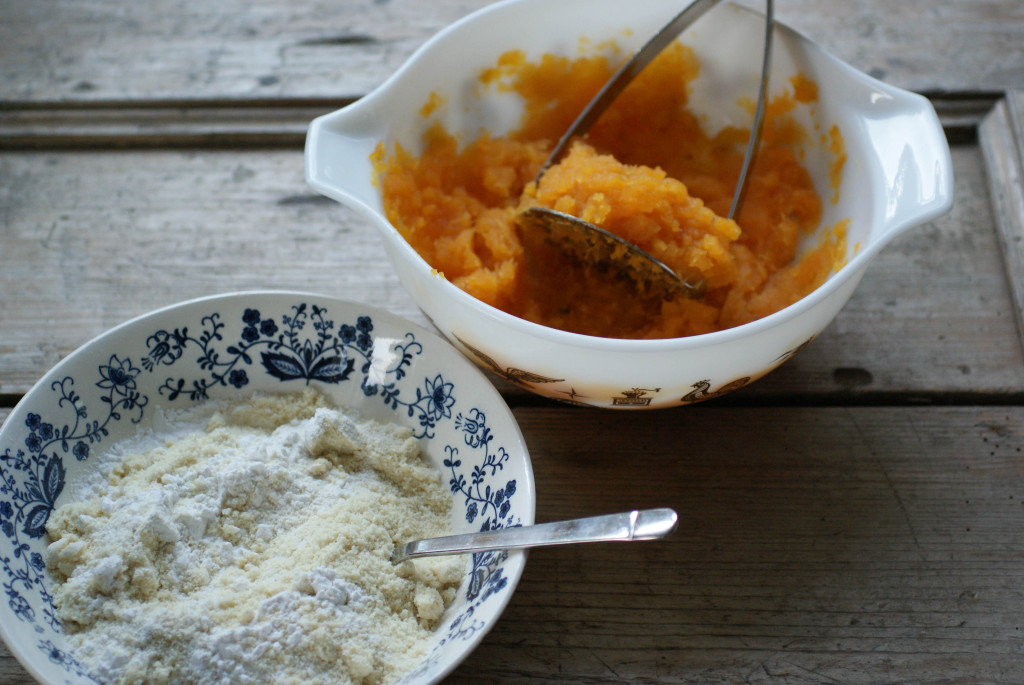
Mashed sweet potato and flours
- Add your flours in 1/2 cup at a time (1/2 cup almond flour, 1/2 cup arrowroot then stir before adding more).
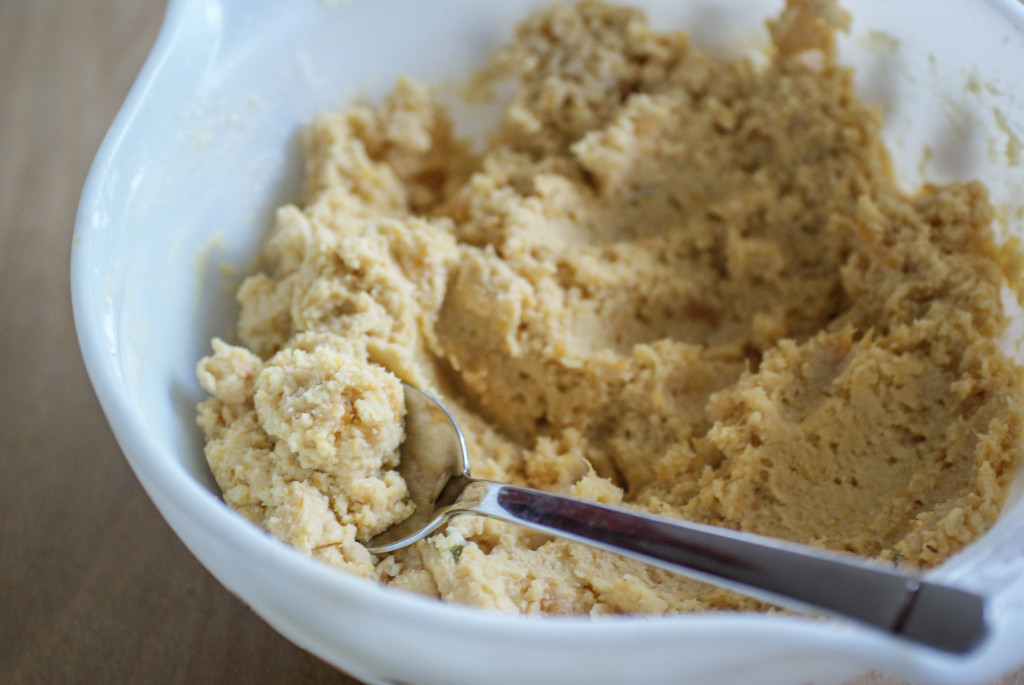
- After you have a whole cup of each flour added in, mix in the salt and baking soda and stir.
- Now beat your egg white until it is frothy and then stir it in.
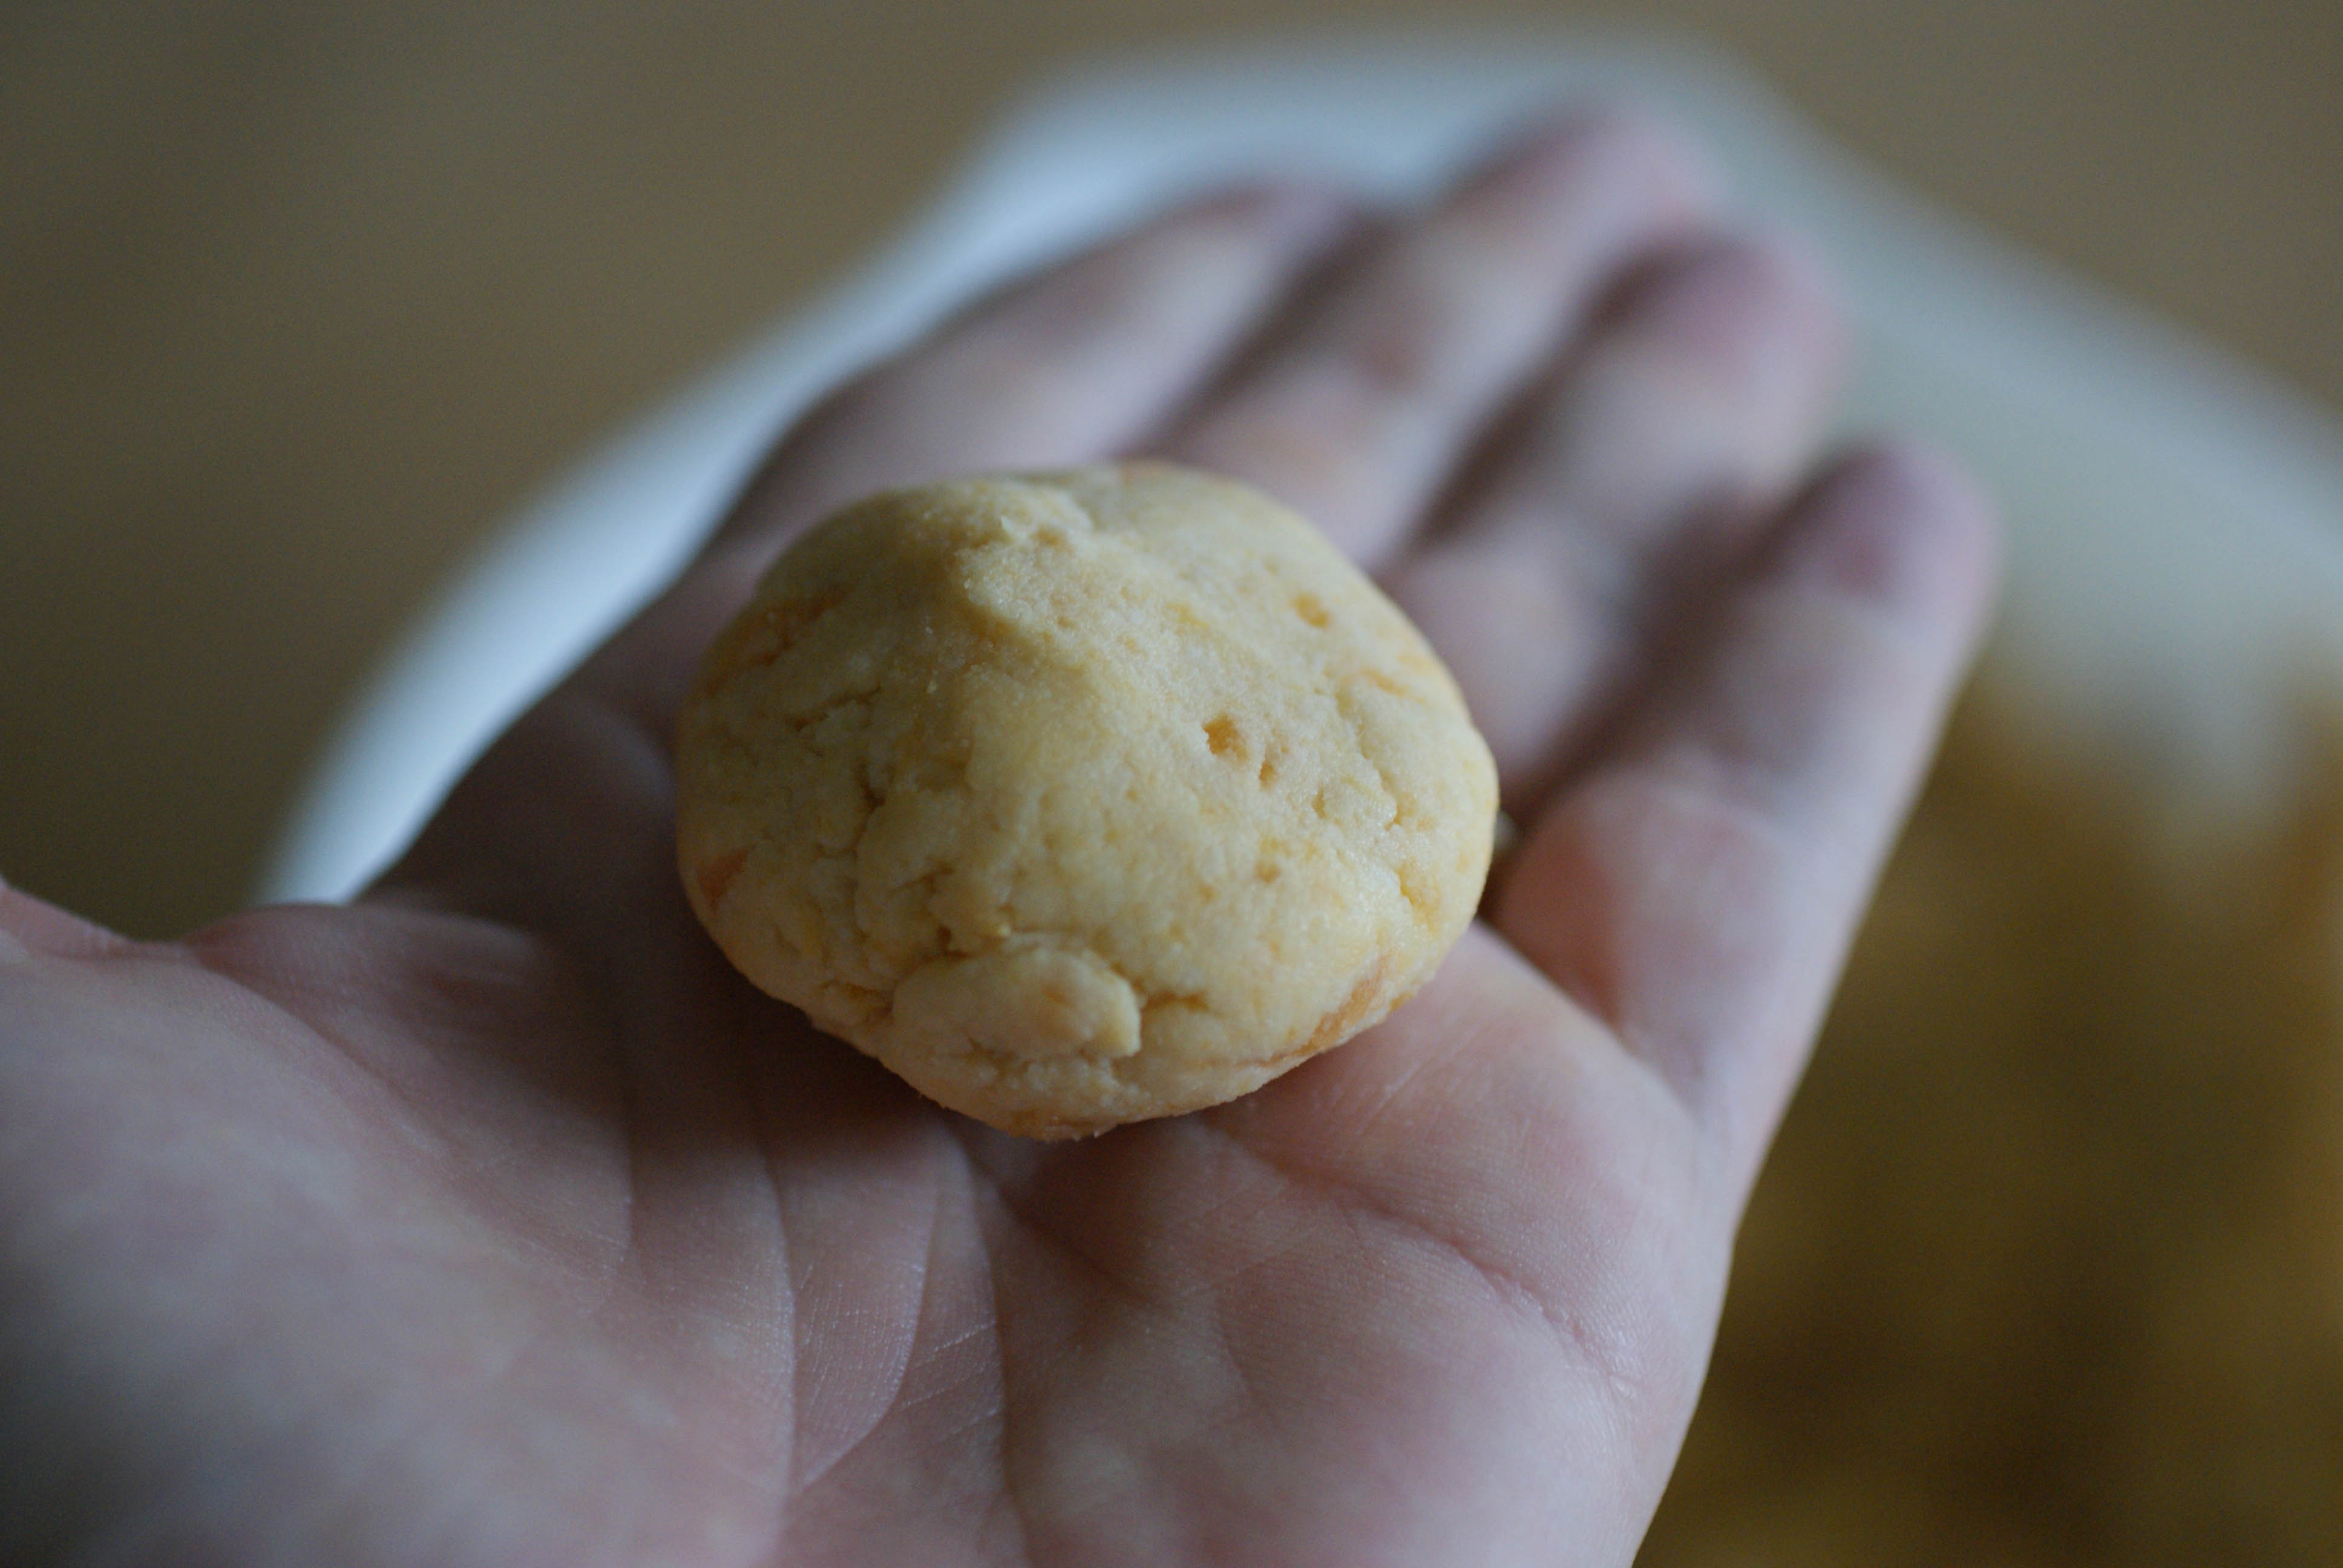
- Resume adding in the flours half a cup at a time until you reach a dough consistency that you are able to grab a handful of and roll into a ball. For me, this equaled 2 1/2 cups of each flour. You may need a little more or a little less depending on the humidity where you are.
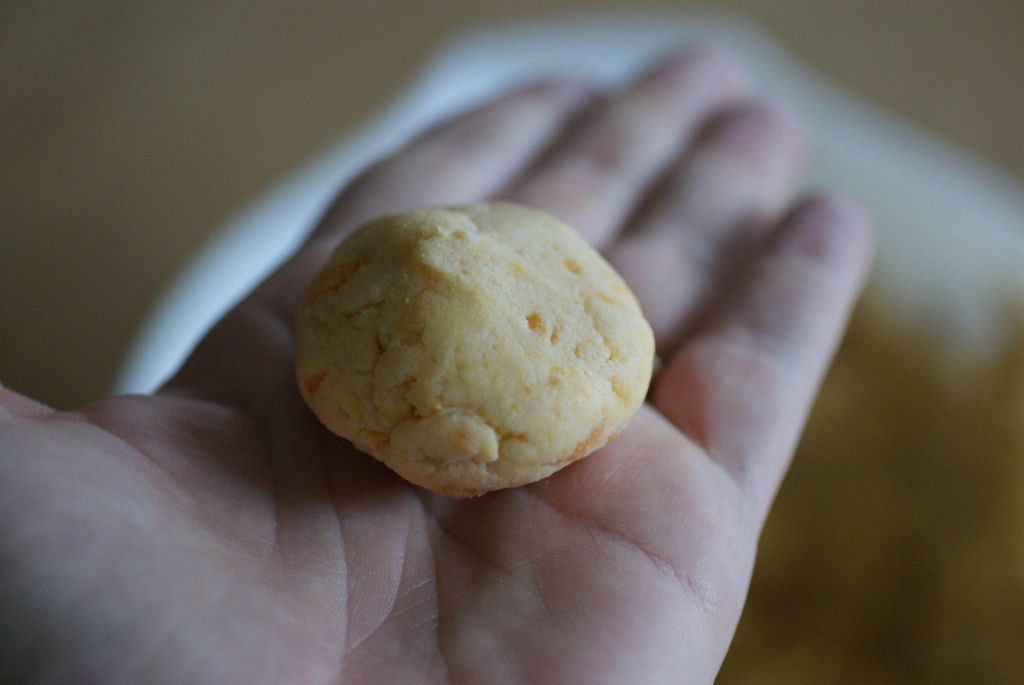
- Put your dough in the fridge for at least half an hour.
Ready for the fridge
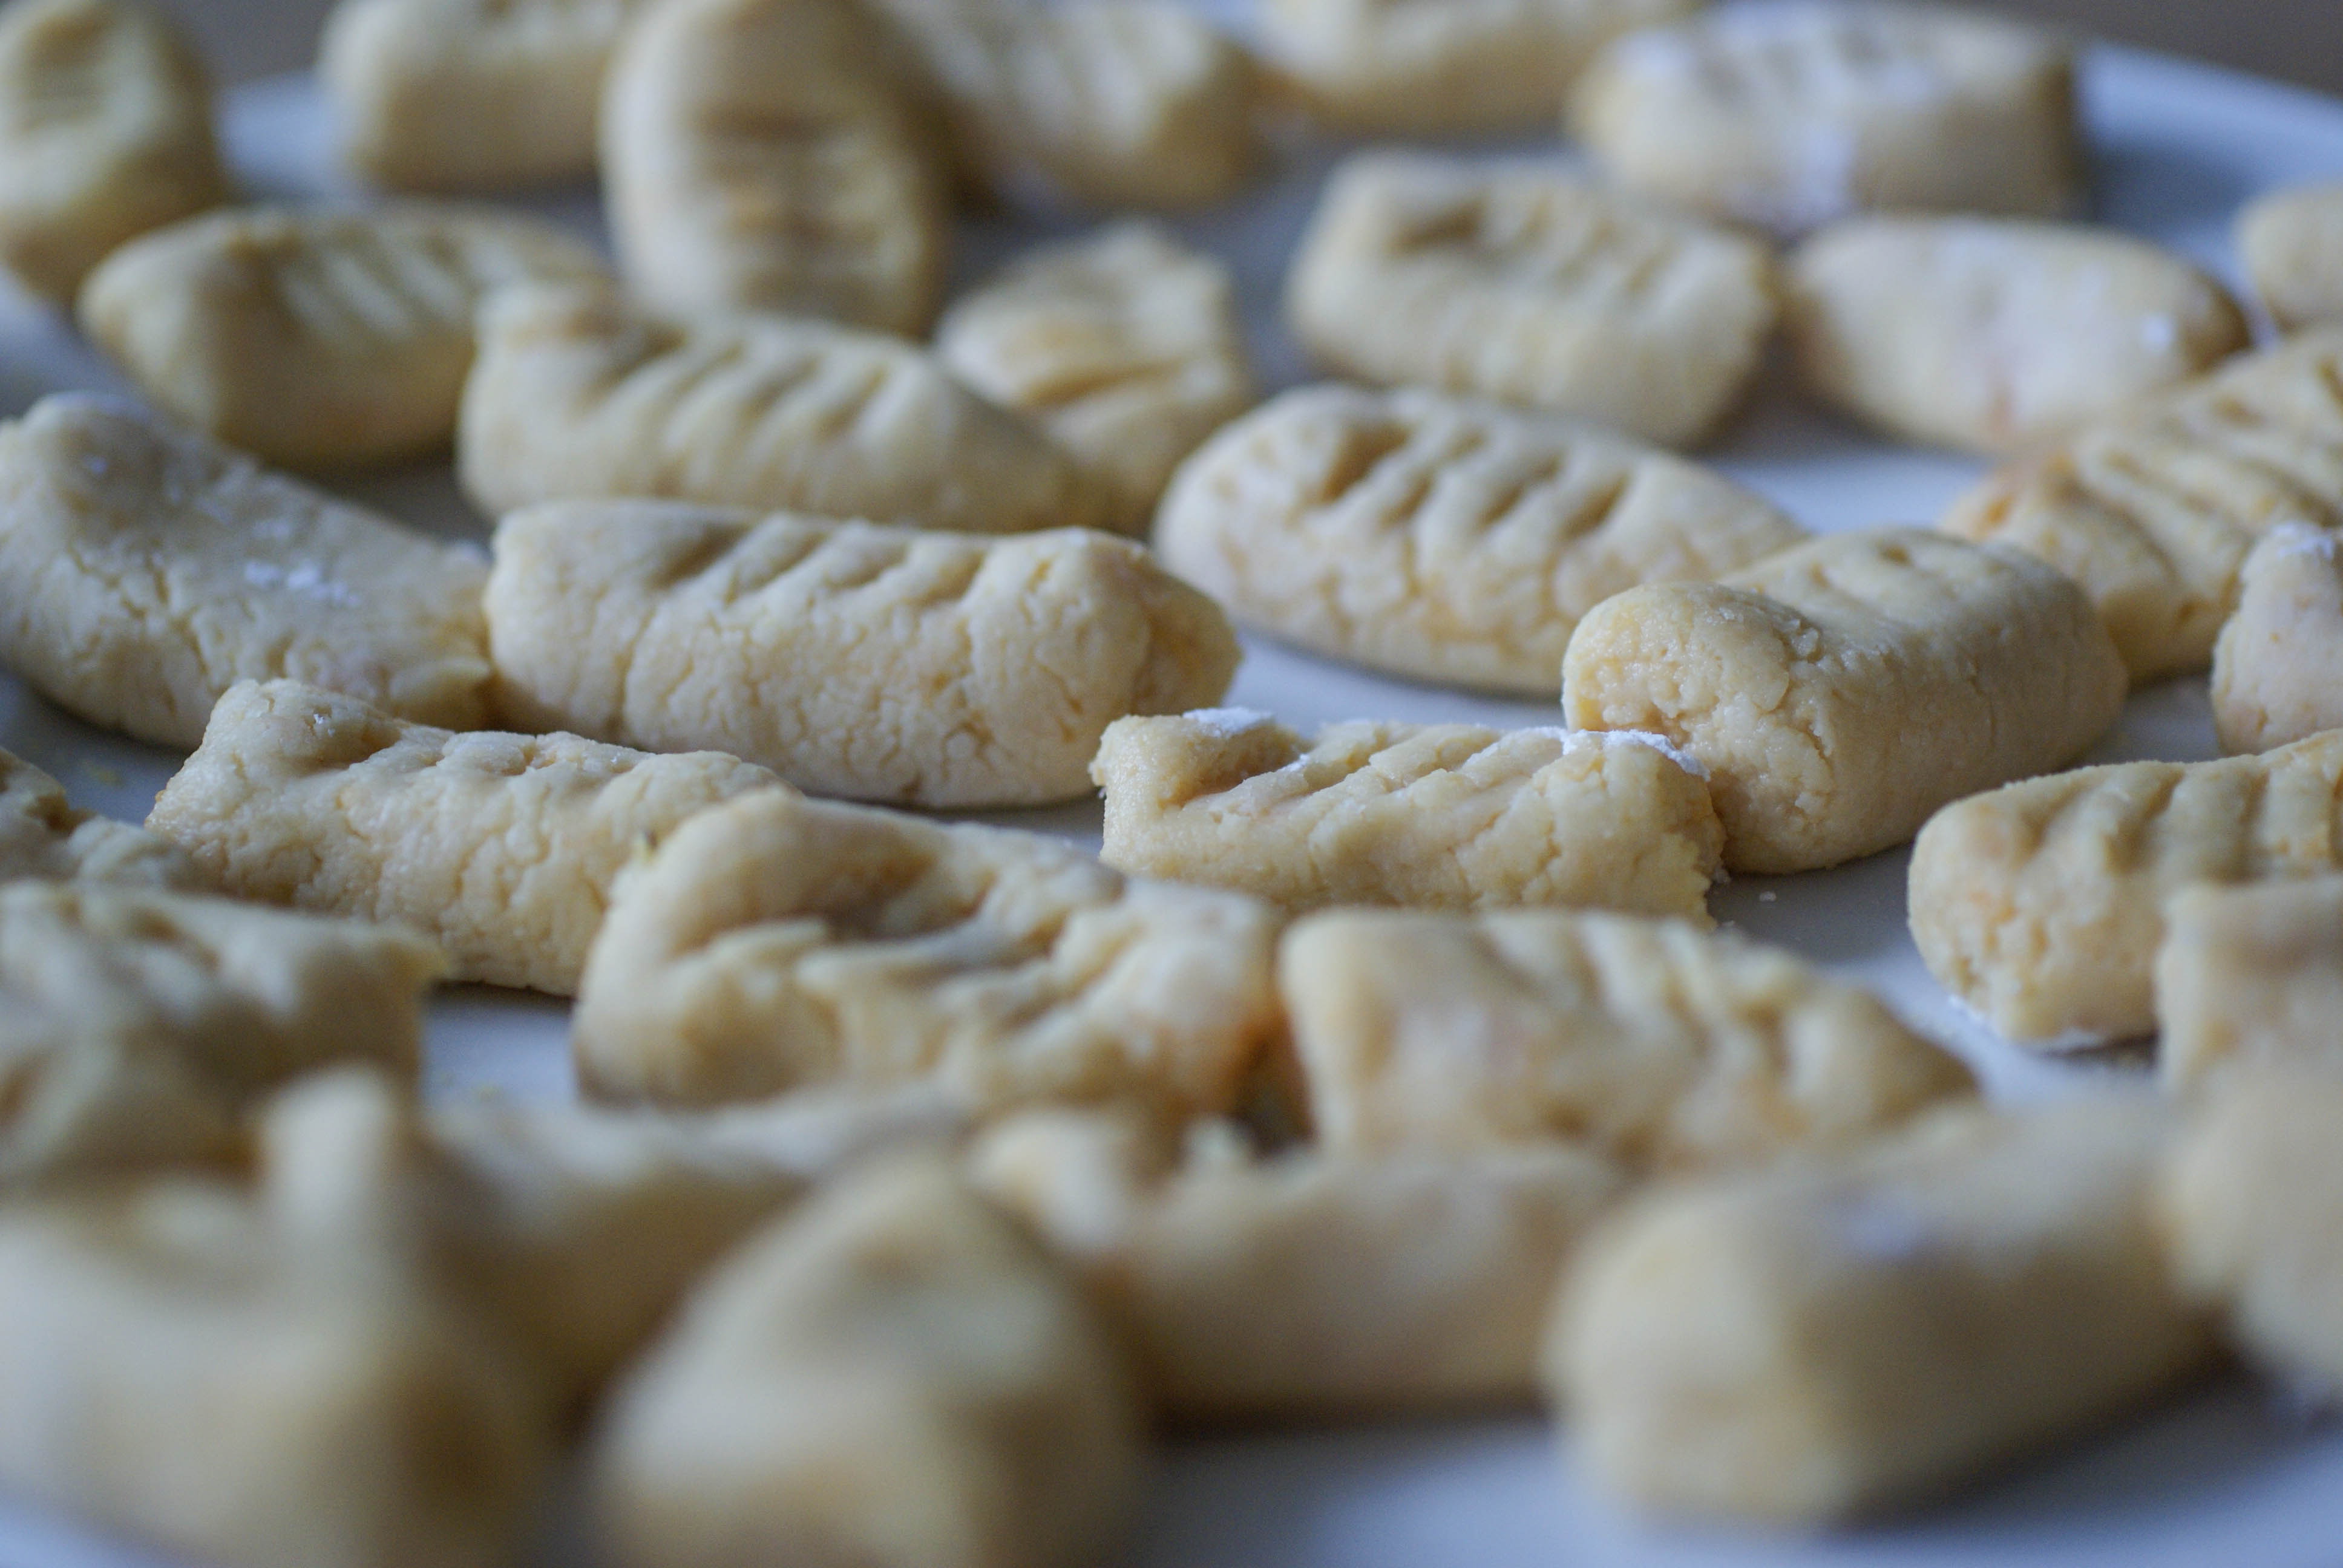
- Once it’s chilled, dust your counter top or a sheet of parchment paper with some arrowroot powder.
- Take a handful of dough and roll it out into a long snake shape with your hands. If it’s sticking to your hands, just dust your hands with some of the arrowroot powder.
Grab a small clump for rolling out
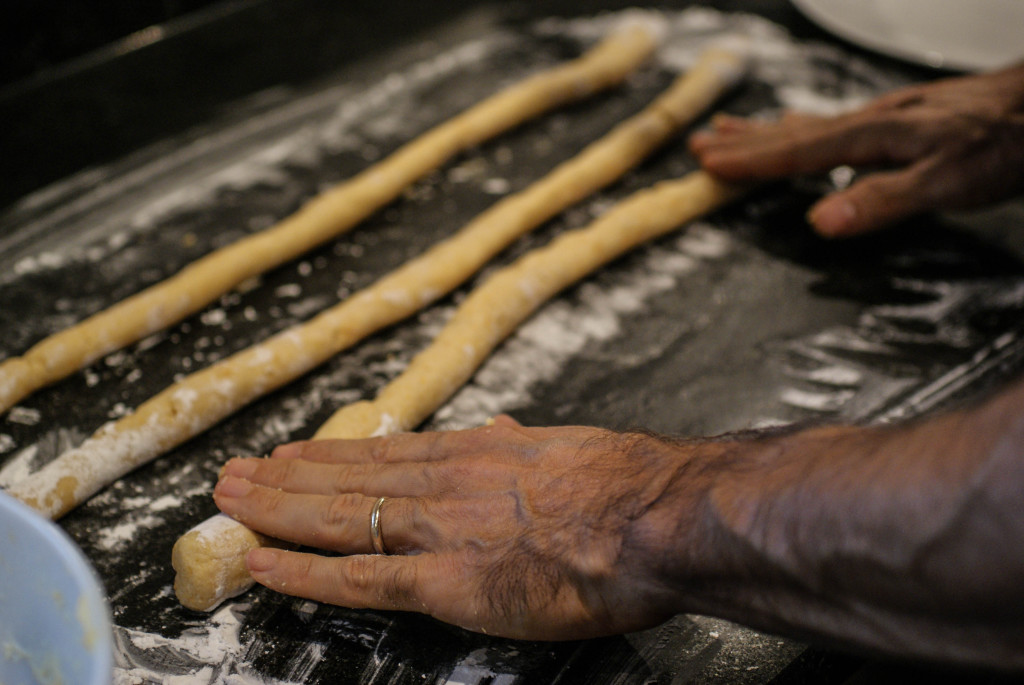
Roll out into snakes
- Cut your snakes into segments about an inch each. You can leave them in that shape or you can flatten them a bit with a fork dipped in arrowroot.

Cut into segments

We made fork prints on ours
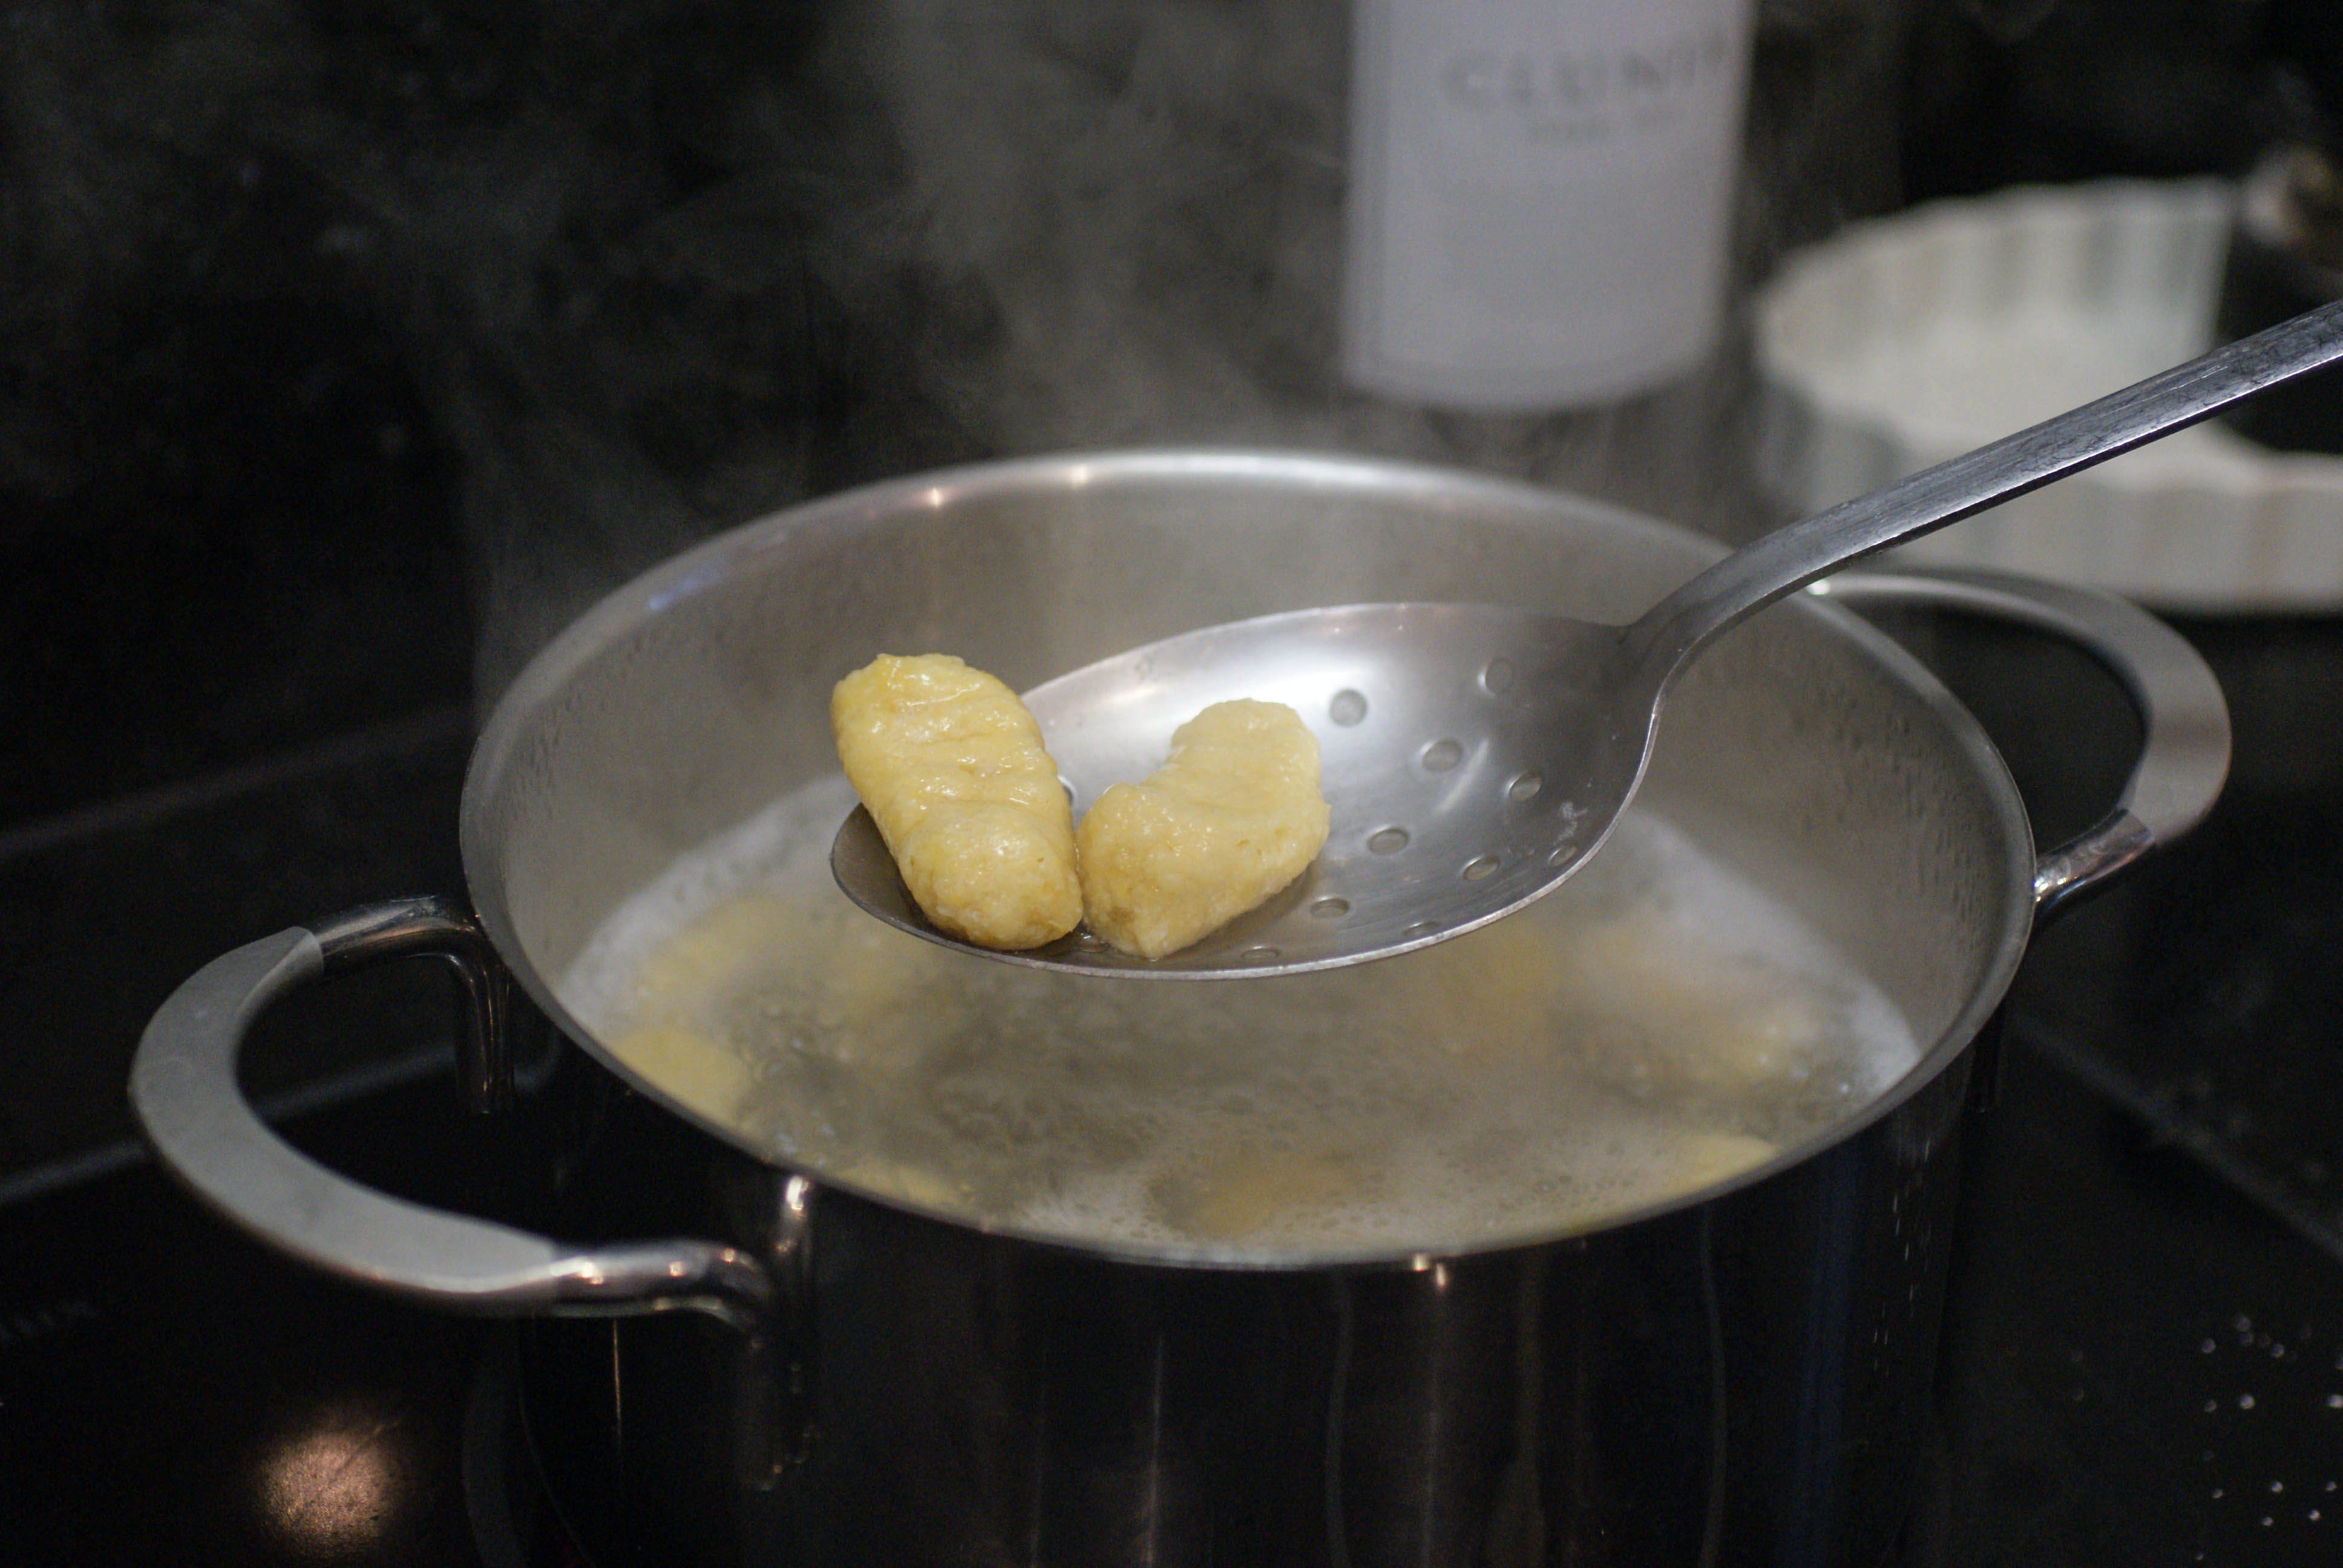
- Once all of your dough has been shaped and cut, drop each piece of gnocchi into a pot of boiling water.

Ready for the boiling water
- Within about a minute, they will float to the surface. Let them cook for about 30 seconds after they float to the top and them remove them to a colander with a slotted spoon.
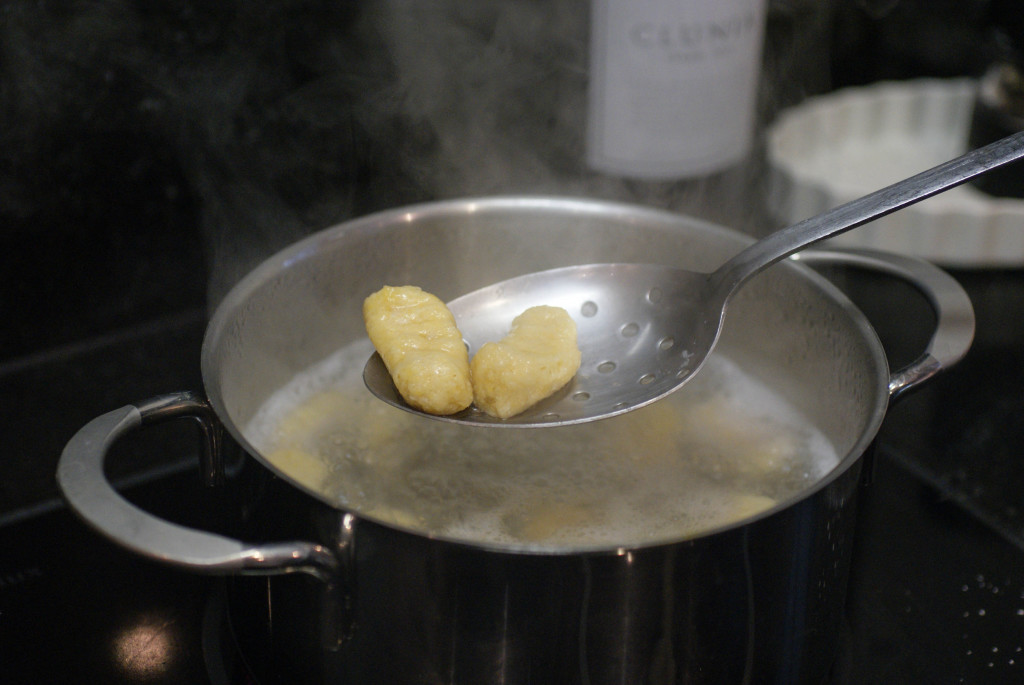
They hold together really well
- If you want, you can serve them at this point.
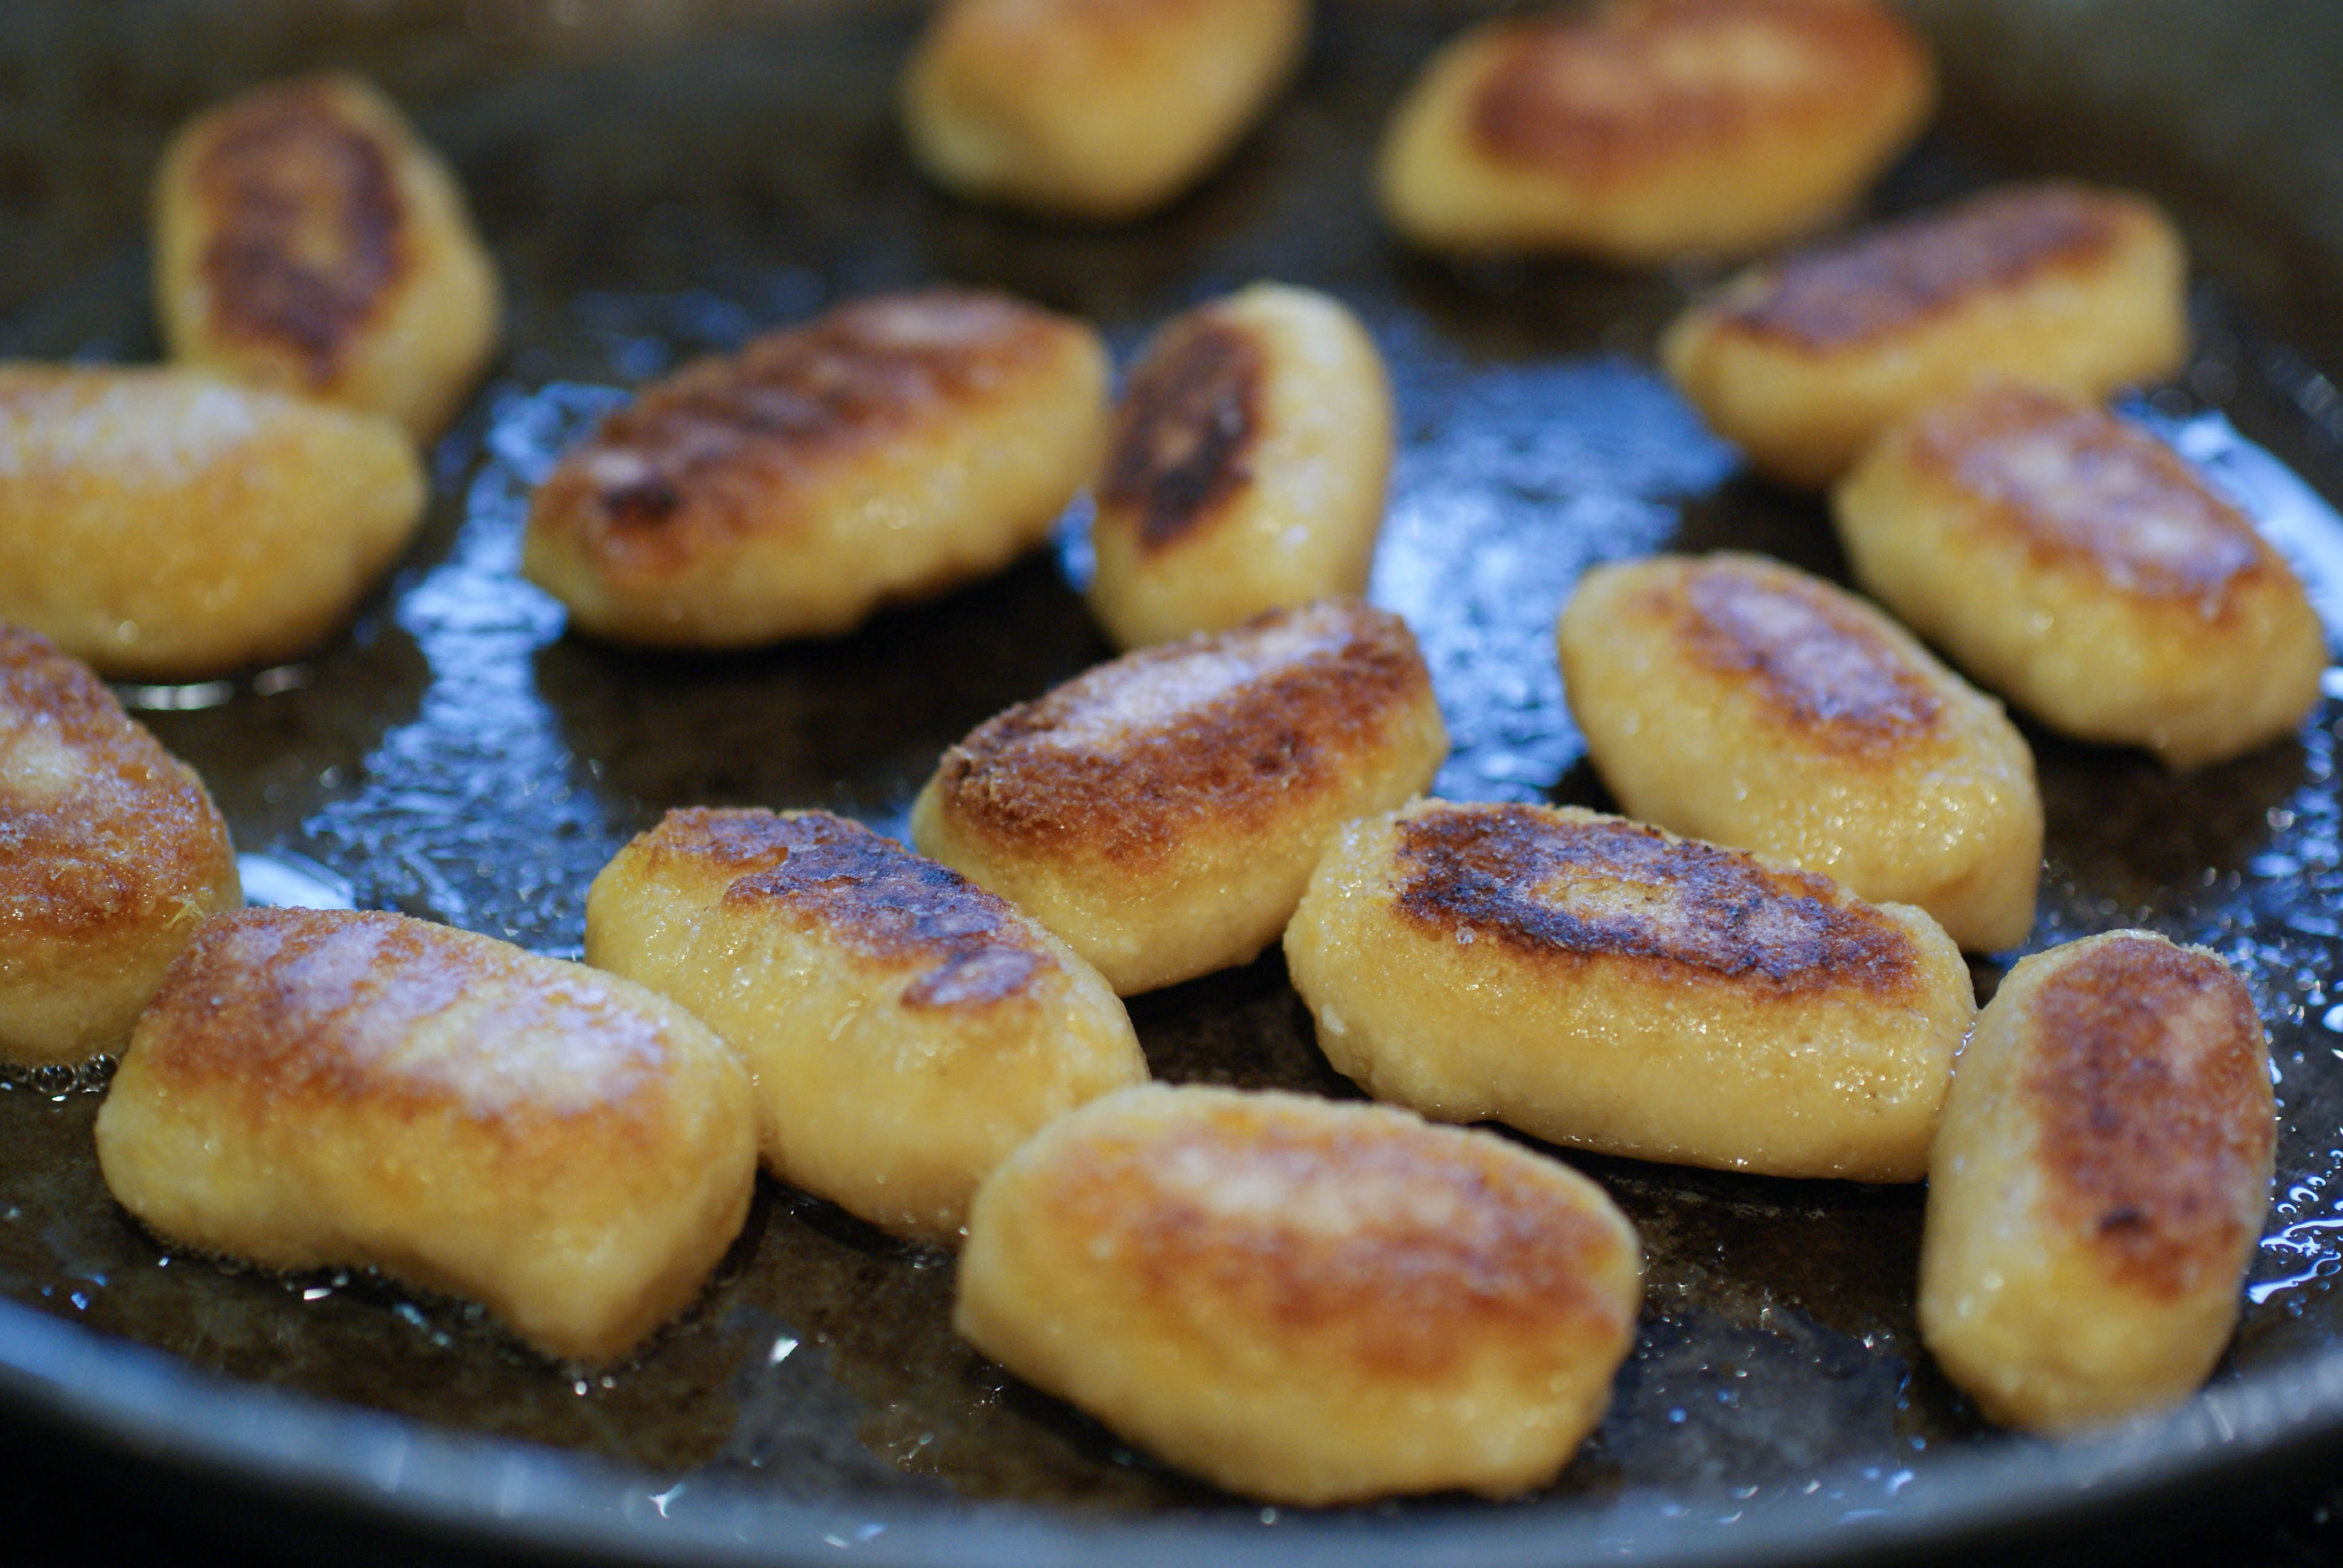
- We went a step further and melted some ghee in a frying pan with a pinch of salt over medium heat and pan fried the gnocchi. It’s important to let it brown before flipping it to brown the other side. If you flip too soon, they will stick and you will know you are trying to turn them too soon.

Fried in ghee
- Remove to a serving plate and top with the sauce of your choice.

Dangerously delicious


Ingredients
- 2 large sweet potatoes (mine totaled 550 grams), baked and peeled
- 2 1/2 cups arrowroot powder (plus a bit more for rolling)
- 2 1/2 cups almond flour
- 1 teaspoon salt
- 1 teaspoon baking soda
- 1 egg white
Instructions
- Poke a few holes in the sweet potatoes and bake them in a 400 F (200 C) oven for about an hour (or until soft and done).
- Remove from the oven and cool completely.
- Peel the sweet potatoes and then mash them in a large mixing bowl.
- Add your flours in 1/2 cup at a time (1/2 cup almond flour, 1/2 cup arrowroot then stir before adding more).
- After you have a whole cup of each flour added in, mix in the salt and baking soda and stir.
- Now beat your egg white until it is frothy and then stir it in.
- Resume adding in the flours half a cup at a time until you reach a dough consistency that you are able to grab a handful of and roll into a ball. For me, this equaled 2 1/2 cups of each flour. You may need a little more or a little less depending on the humidity where you are.
- Put your dough in the fridge for at least half an hour.
- Once it's chilled, dust your counter top or a sheet of parchment paper with some arrowroot powder.
- Take a handful of dough and roll it out into a long snake shape with your hands. If it's sticking to your hands, just dust your hands with some of the arrowroot powder.
- Cut your snakes into segments about an inch each. You can leave them in that shape or you can flatten them a bit with a fork dipped in arrowroot.
- Once all of your dough has been shaped and cut, drop each piece of gnocchi into a pot of boiling water.
- Within about a minute, they will float to the surface. Let them cook for about 30 seconds after they float to the top and them remove them to a colander with a slotted spoon.
- If you want, you can serve them at this point.
- We went a step further and melted some ghee in a frying pan with a pinch of salt over medium heat and pan fried the gnocchi. It's important to let it brown before flipping it to brown the other side. If you flip too soon, they will stick and you will know you are trying to turn them too soon.
- Remove to a serving plate and top with the sauce of your choice.
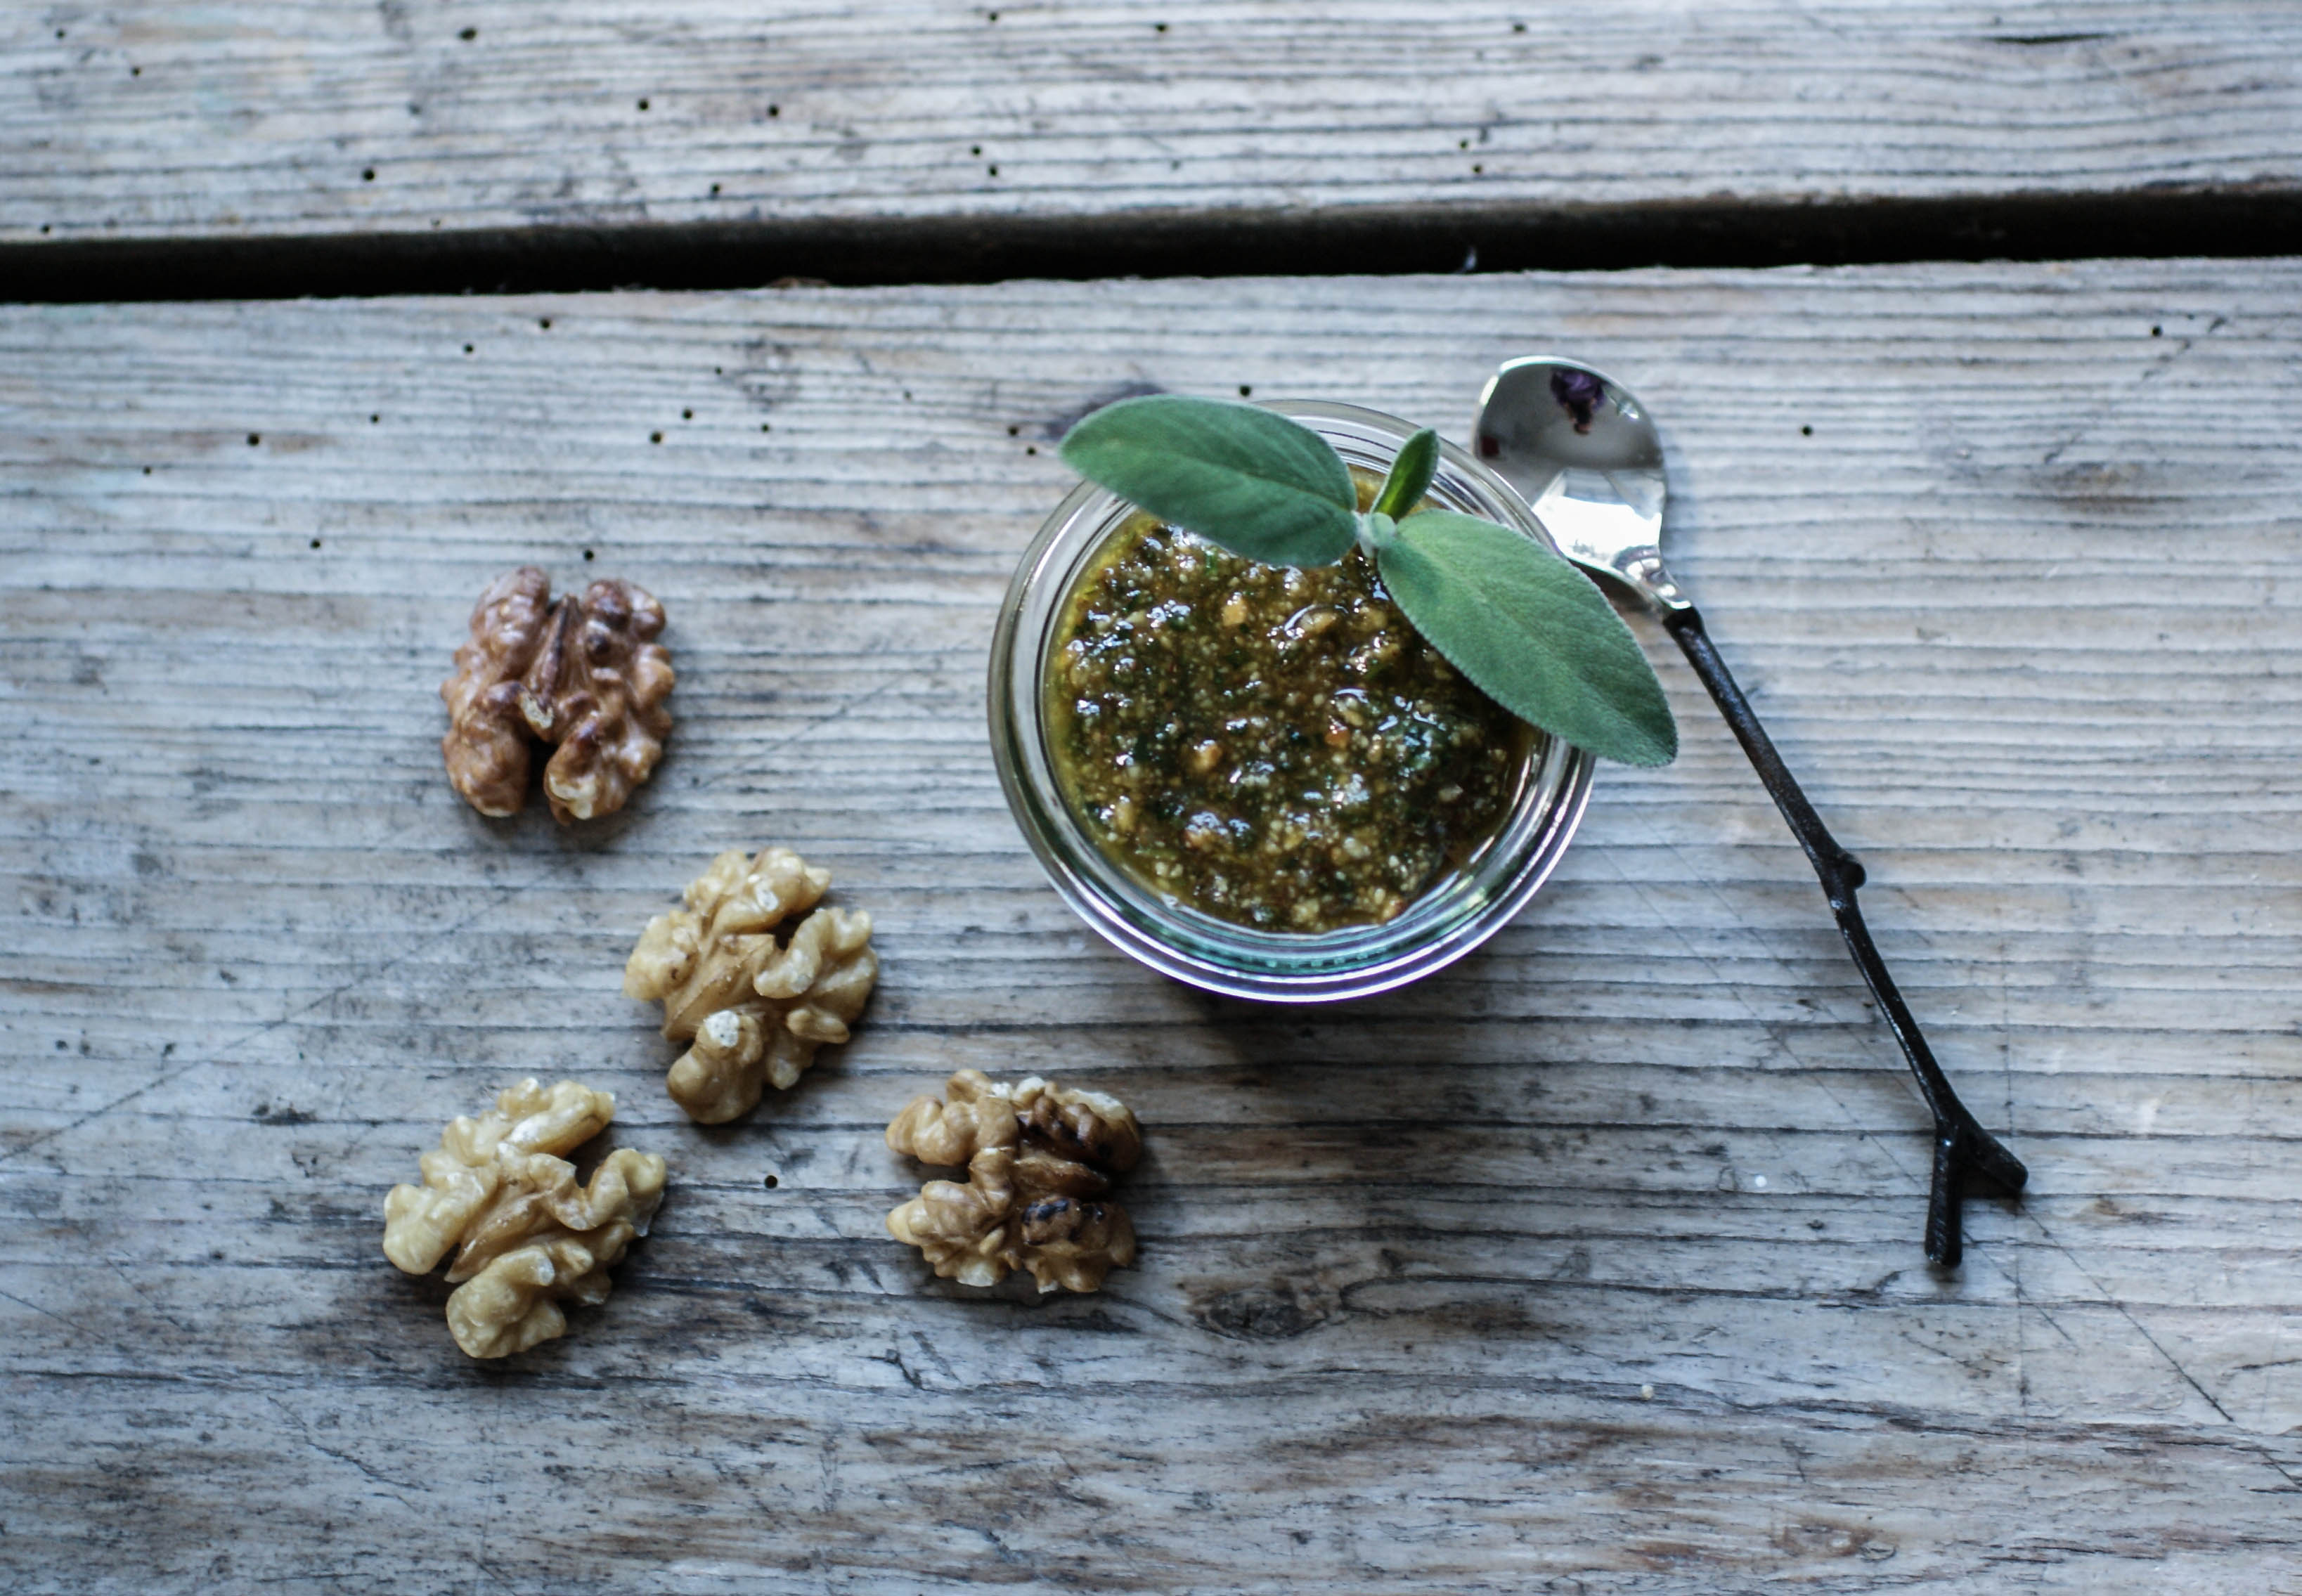
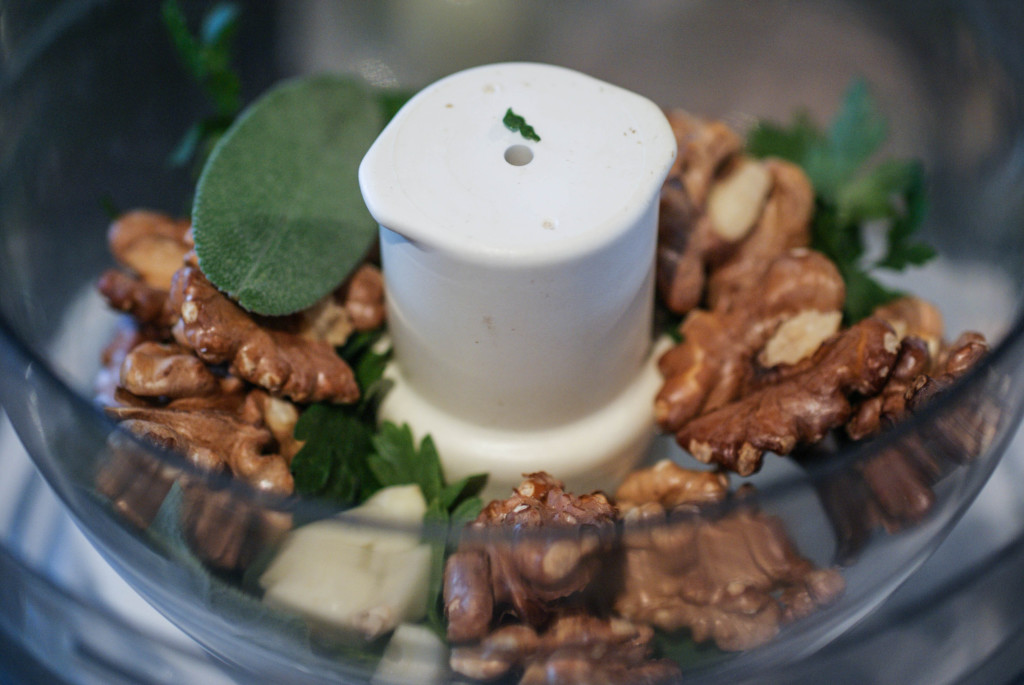
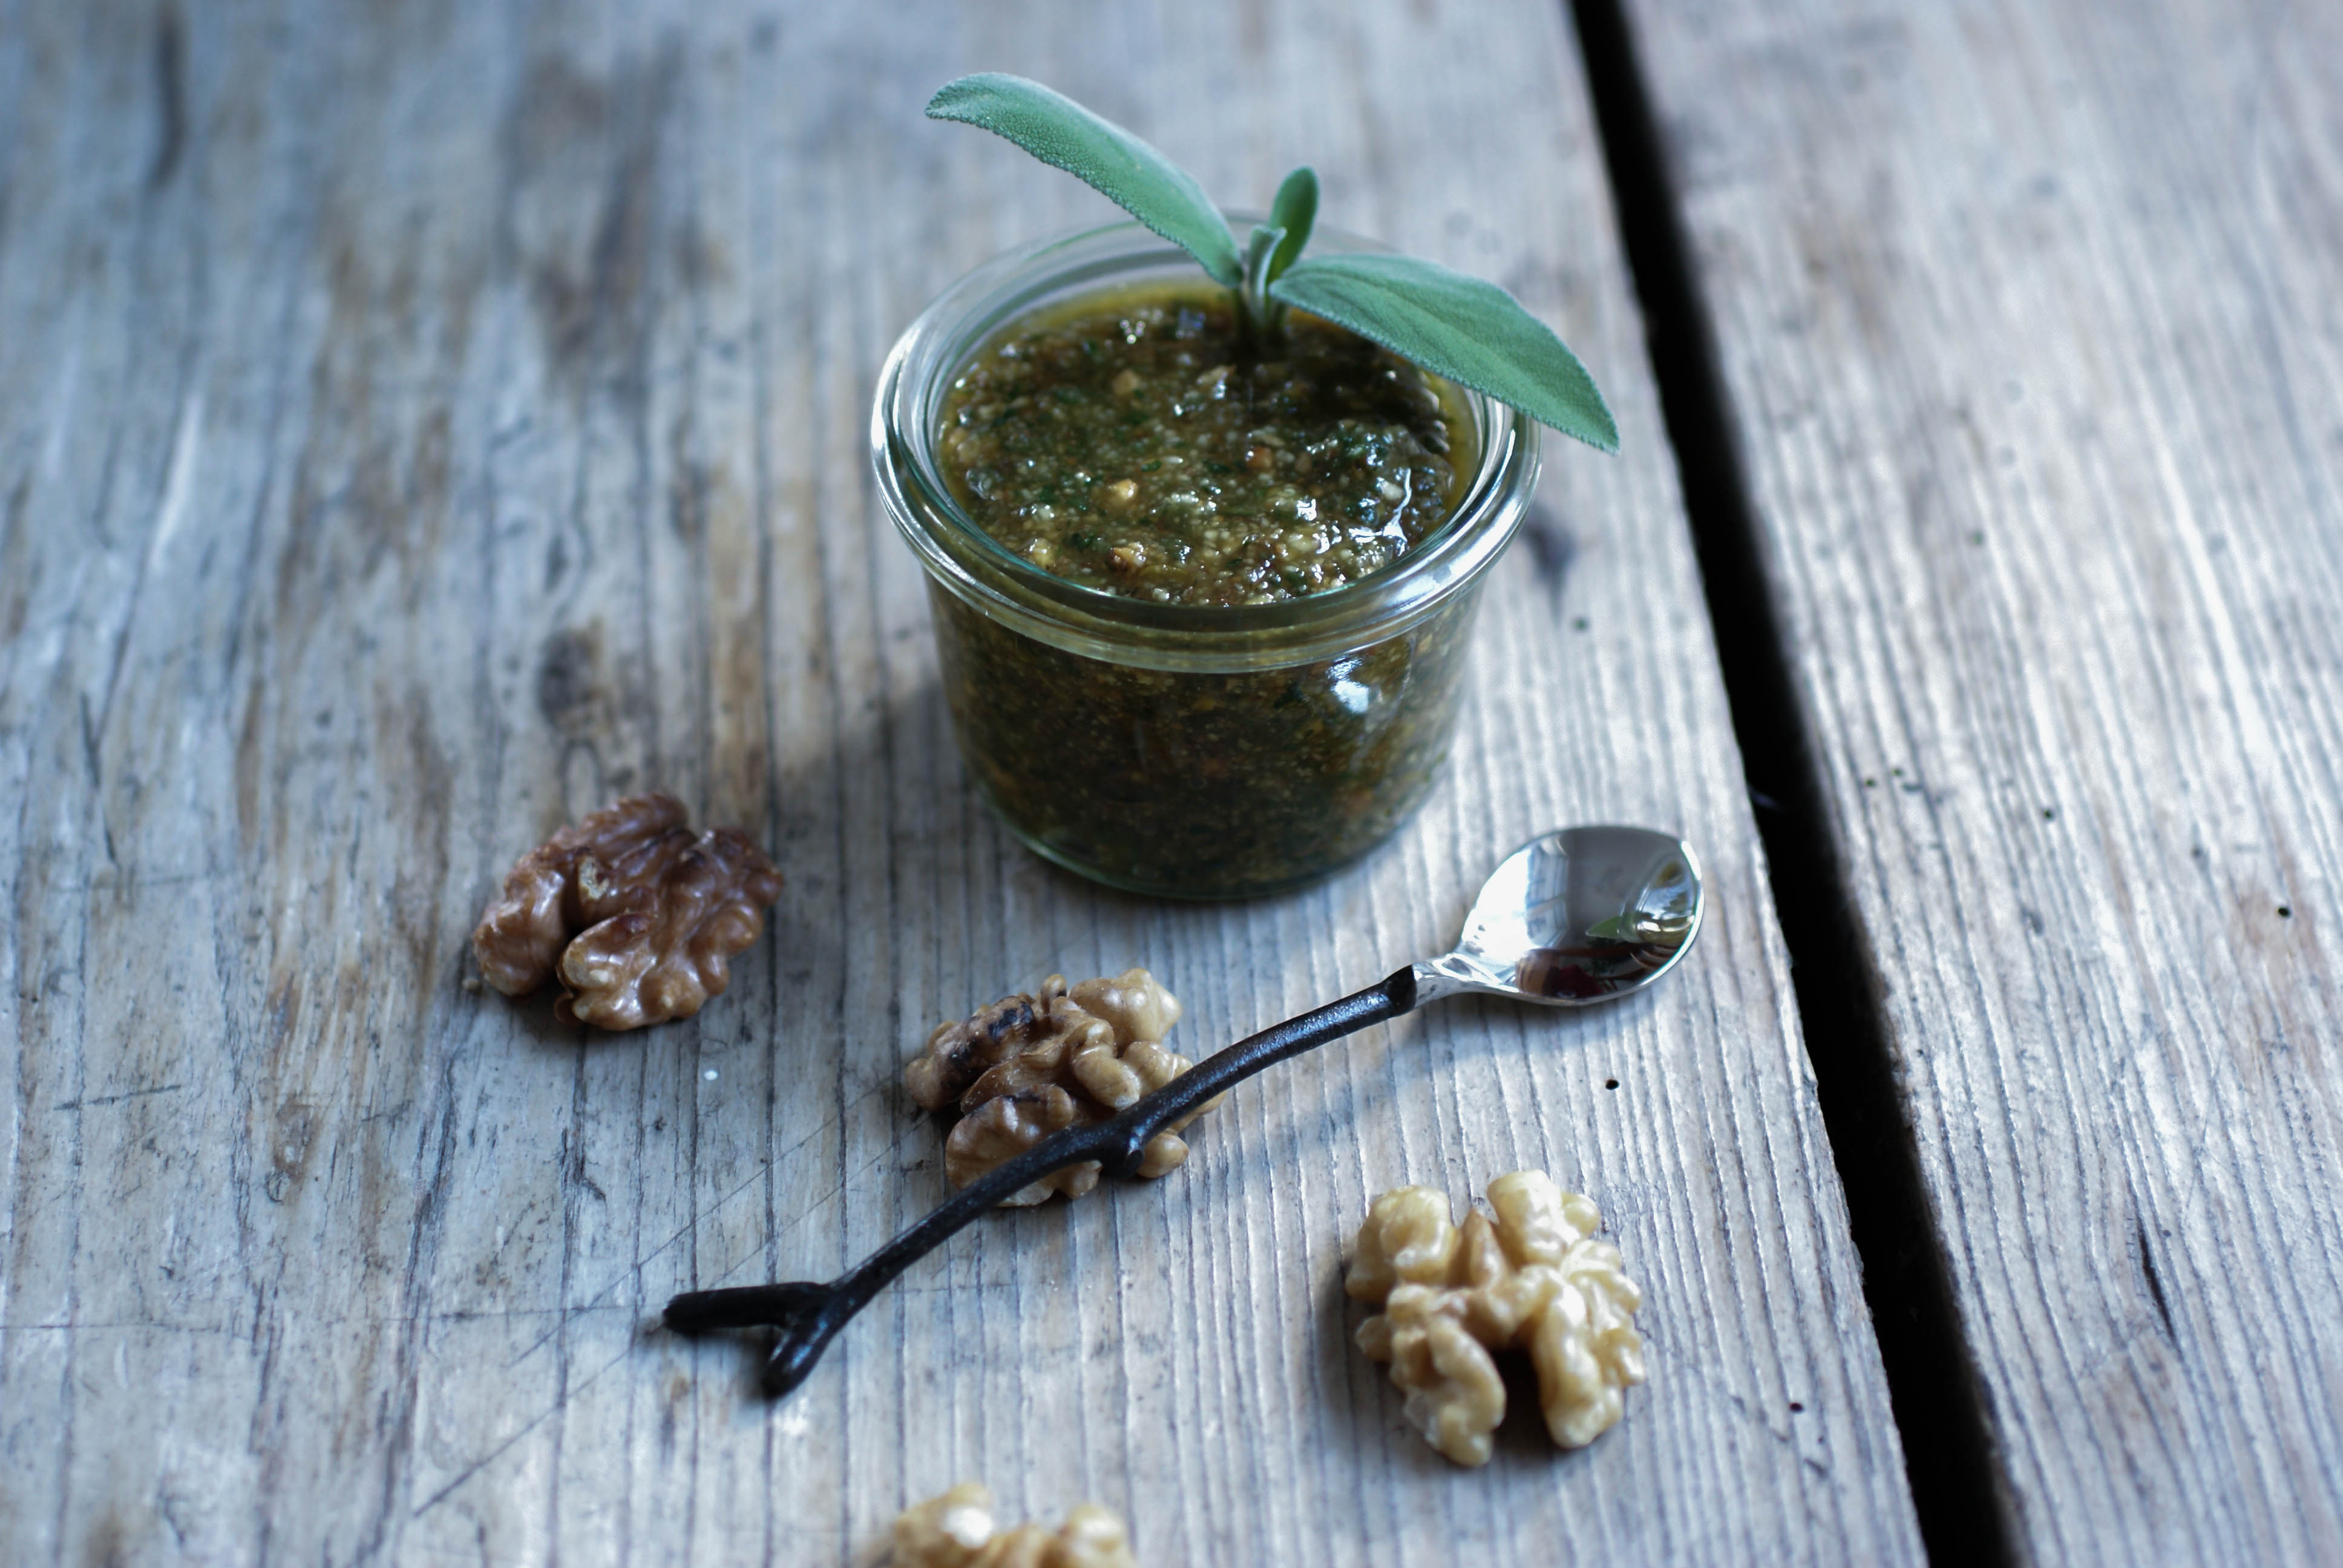
Roasted Walnut and Sage Pesto
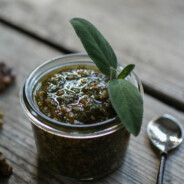
I love pesto. The funny thing is, I never ate it pre-paleo as something to slather over pasta. We usually use it as a spread for meat (chicken or steak). I tend to vary the nuts I use or the herb combinations to come up with different flavors. We had loads of sage growing in our garden this past summer/fall and I really need to make use of it, so this time around, the main herb is sage.
Roasted Walnut Sage Pesto
This turned out absolutely delicious. We served it over sweet potato gnocchi and also over grilled chicken. It also works well as a salad dressing over mixed greens.

Tastes great on anything
Ingredients
- 1/4 cup fresh sage leaves
- 2 Tablespoons of fresh flat leaf parsley
- 1 garlic clove
- 1/2 cup roasted walnuts (lightly dry roast in the oven for 10-15 minutes until lightly browned)
- 1 teaspoon fresh lemon zest
- 1/3 cup olive oil
- Salt and pepper to taste
Instructions
- Put everything but the oil in a food processor and whiz well to blend.
So easy to make
- As it starts to form a fine crumb like texture, slowly drizzle the oil in while the processor is still on and blending.
- Scrape down the sides once or twice during blending.
- Add salt and pepper to taste.

Enjoy!

Ingredients
- 1/4 cup fresh sage leaves
- 2 Tablespoons of fresh flat leaf parsley
- 1 garlic clove
- 1/2 cup roasted walnuts (lightly dry roast in the oven for 10-15 minutes until lightly browned)
- 1 teaspoon fresh lemon zest
- 1/3 cup olive oil
- Salt and pepper to taste
Instructions
- Put everything but the oil in a food processor and whiz well to blend.
- As it starts to form a fine crumb like texture, slowly drizzle the oil in while the processor is still on and blending.
- Scrape down the sides once or twice during blending.
- Add salt and pepper to taste.
The Paleo Bookshelf: Your Personal Paleo Code by Chris Kresser

I’ve been a fan of Chris’s website pretty much since the very beginning of my paleo journey. He is one of my “go-to” sources when I want to dig a little deeper into the science side of things or when I want to know more about how to tweak things a bit for a particular situation (like a low functioning thyroid). I’ve heard Chris present on various topics in person, and I trust that he’s a man who knows his stuff. I was thrilled when he sent me his new book for review! The book is called Your Personal Paleo Code and you can learn more about it from Chris’s site here.
One of my favorite things about Chris is his emphasis on personalizing a paleo lifestyle to fit you as an individual with unique needs. There is no one perfect way to be paleo. He talks a lot about following a paleo template (ie; finding what works best for you). His book is broken down into three parts, or rather three steps towards better health. Step One is all about resetting your diet. This section is essentially Paleo 101 and would be a great introduction for anybody who is new to paleo or needs to review the how and why.
The next section of the book is Step 2: Rebuild Your Life. This section has some great information on how to re-introduce “gray-area” foods after the thirty day reset in section 1. Gray-area foods are foods that were not a part of the original human dietary template but that are nevertheless nourishing and health promoting when they are well tolerated. Dairy anybody? This section will also teach you about the other important lifestyle factors and how to incorporate them into your life for optimal health. You’ll get the low down on things like exercise and movement, how to sleep more deeply, stress management, the importance of social connections and connecting with nature and why you should play.
Section three or Step 3: Revive Your Health shows you how to fine tune the paleo diet/lifestyle to fit your individual needs. This is the section for all you life-hackers out there. You’ll learn about:
- Macronutrient ratios: How much carbohydrate, fat, and protein should you eat?
- How often and how much should you eat?
- What dietary changes should athletes and highly active people make?
- Which superfoods should you be eating?
- Which supplements should you be taking and which ones should you avoid?
This last section also shows you how to personalize the paleo code for specific health conditions like weight loss, high cholesterol and heart disease, high blood pressure, digestive diseases, blood sugar disorders, mood disorders, thyroid disorders, autoimmune disease, adrenal fatigue syndrome and skin disorders.
Look what else you get if you purchase this book (!!!):
- Over 200 pages (!!!) of bonus chapters, including 10 chapters on how to customize Paleo for specific health conditions. There’s also a chapter on Supplementing Wisely, and another on Paleo Troubleshooting.
- 3 weeks of additional meal plans, recipes and shopping lists. Don’t miss these delicious recipes developed by a classically-trained French chef-turned-Paleo. Print out the shopping lists, head to the store, and you’ll eating Paleo in style in no time!
- Cheatsheets on Paleo superfoods, how to prevent cravings, Paleo snack ideas, brand recommendations for fats, and more!
- Action plans and worksheets to make sure you know exactly what to do next.
- A supplement guide based on the specific recommendations mentioned in the book.
- And much more…
I think this book makes an excellent addition to any paleo bookshelf and would be especially useful for any paleo newbies or somebody who is already experienced with paleo eating but might want to fine tune it for individual needs.
Happy Reading!
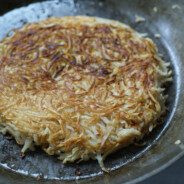
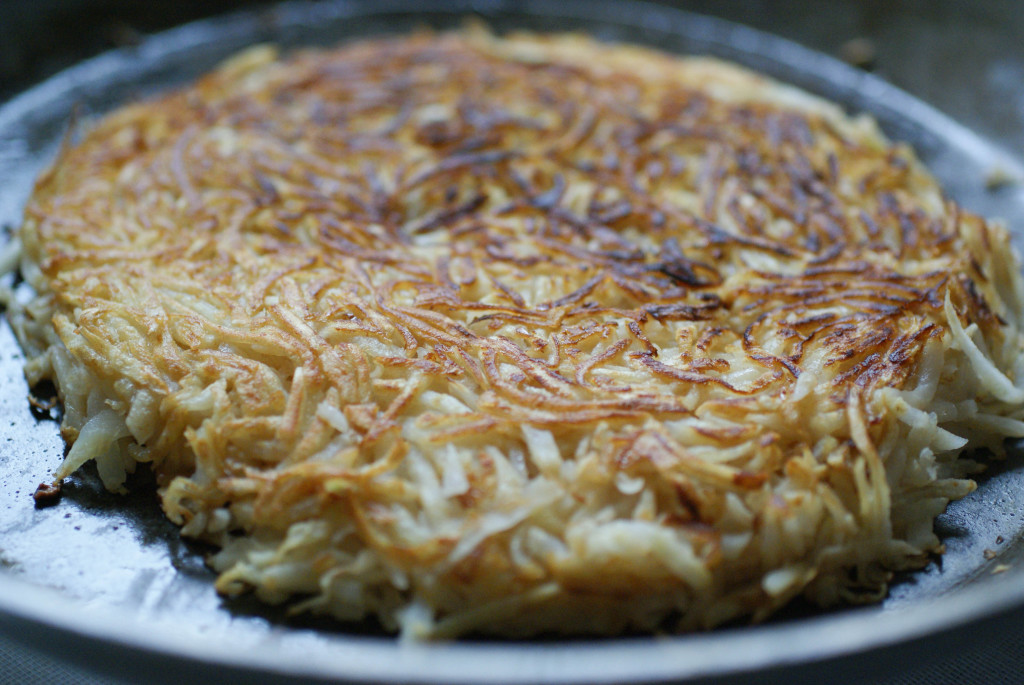
Celery Root Rösti (hash browns)
Celery roots are a staple in the Swiss grocery stores. I’ve never really done much with them before, other than chop them up and add them to soups and stews.

Celeriac Root
Celery root (celeriac) is a root vegetable, but unlike most other tubers, it has a very low starch content (very low carb). What I love about root vegetables and winter squash, is that you can buy them and let them sit around for weeks until you feel ready to do something with them. They aren’t going to go bad or spoil.
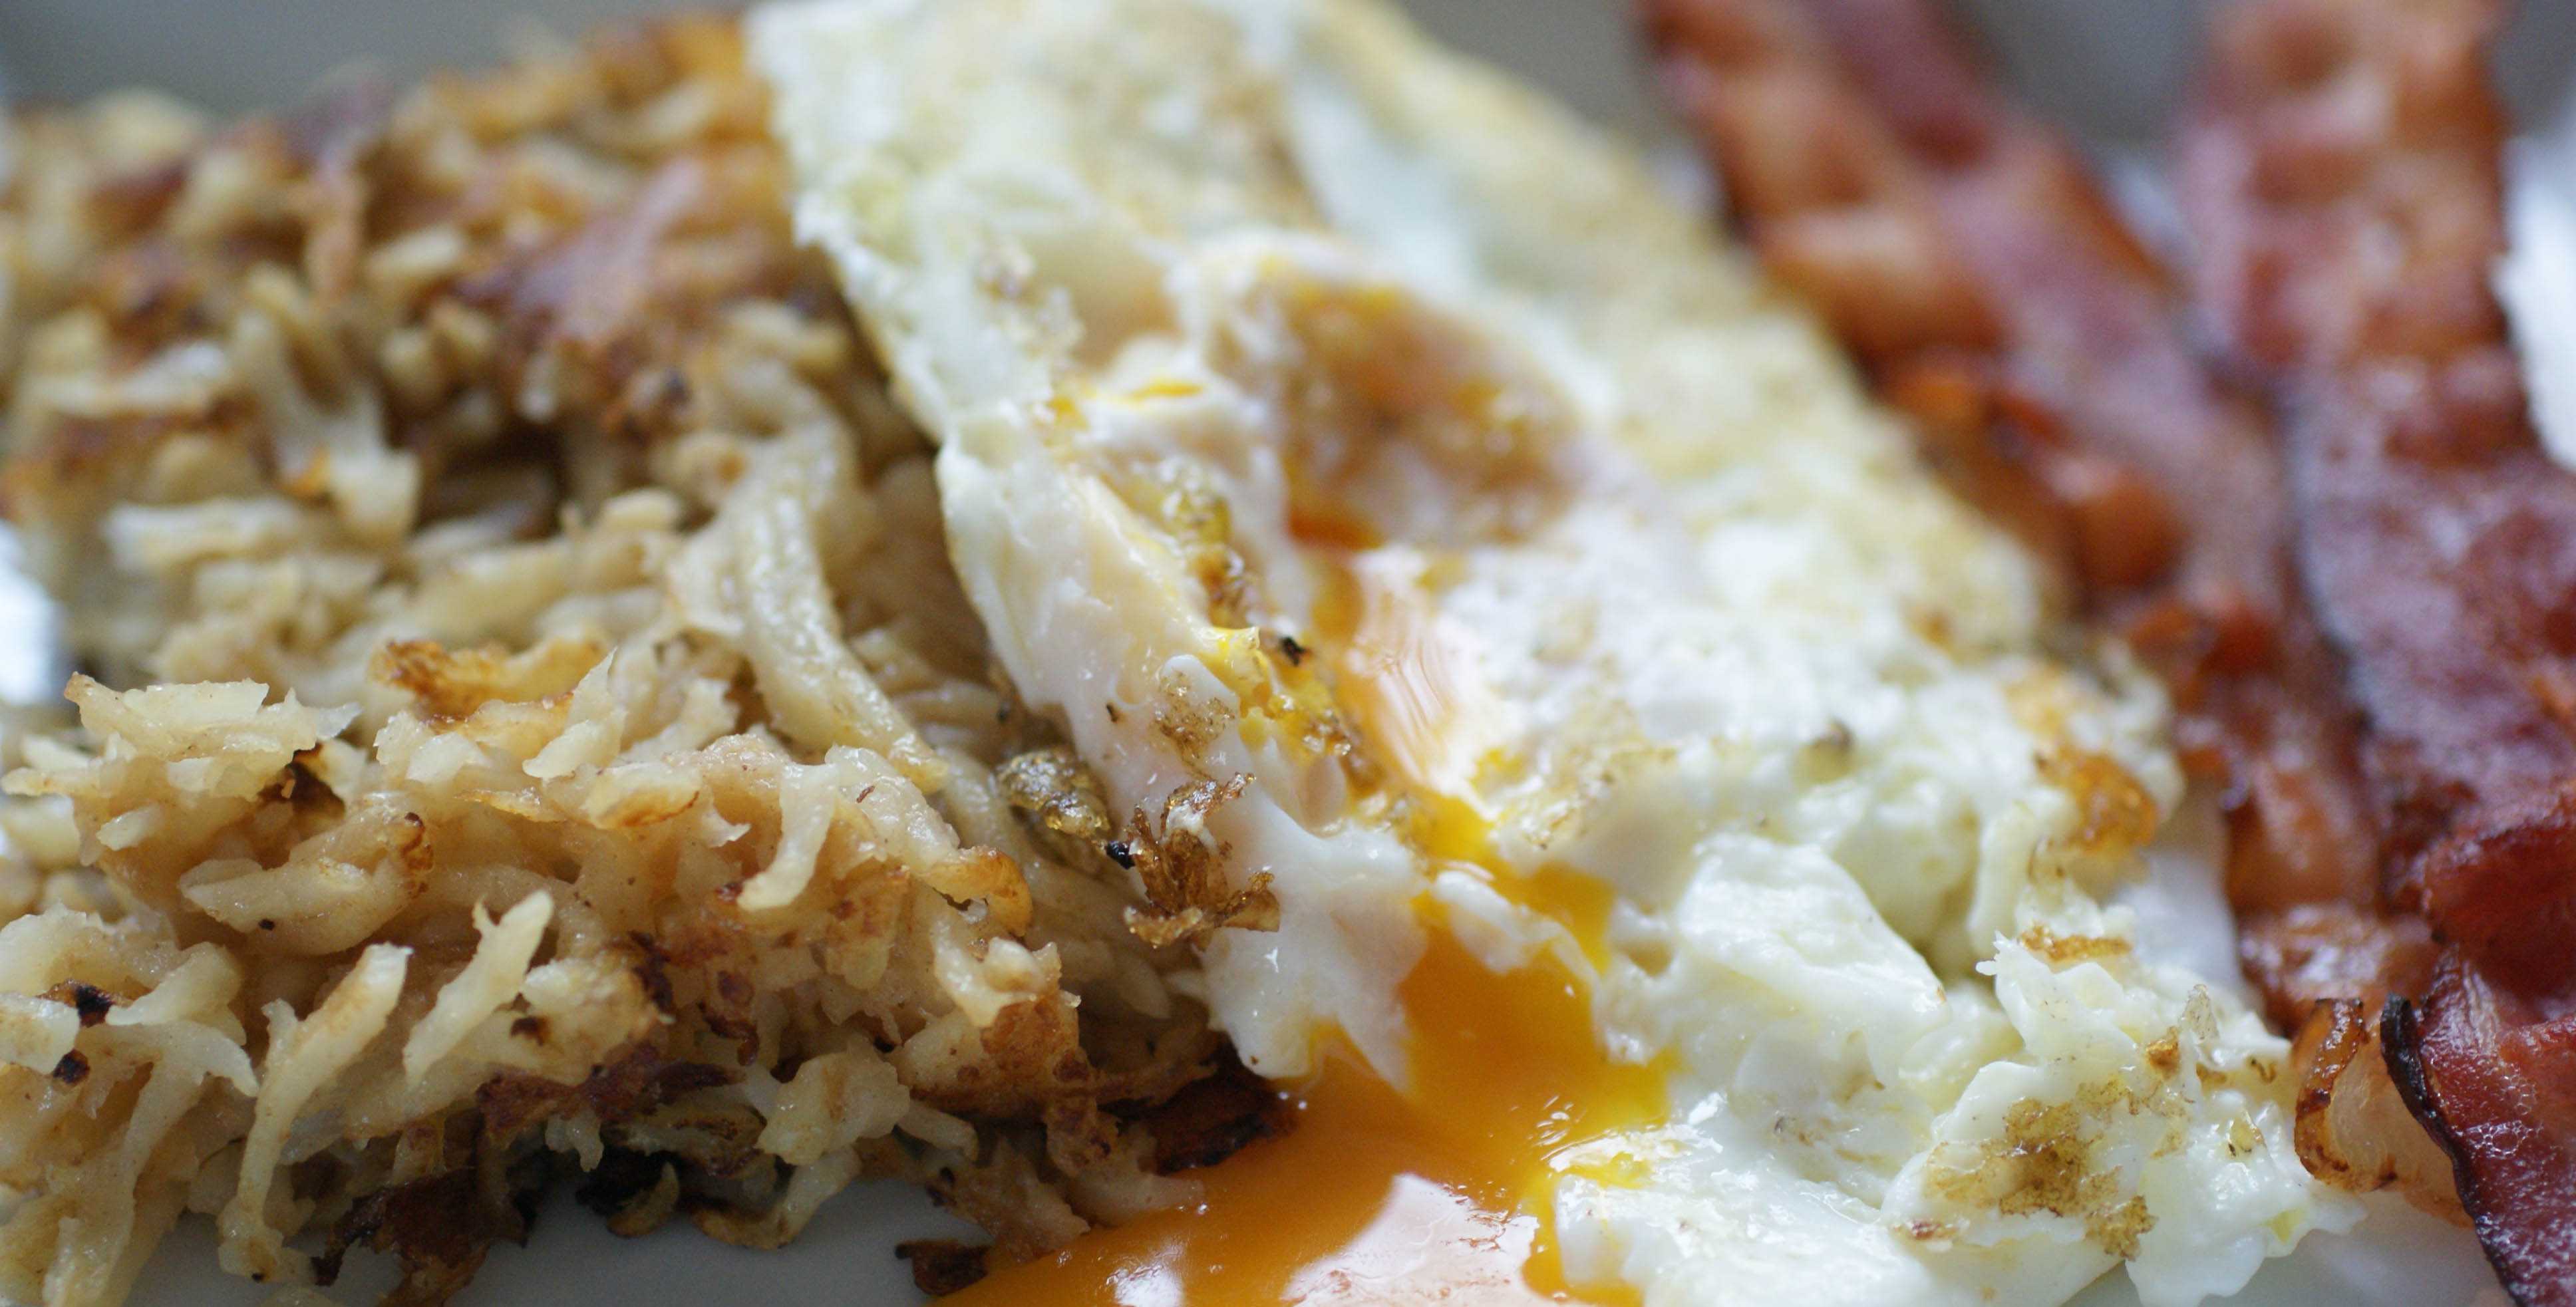
One of our favorite Swiss meals has always been Rösti. Rösti is like a giant hash brown made from potatoes. You can get it topped with all sorts of things, and it’s served as a main meal (not just for breakfast). One of our favorite places to eat Rösti is The Johanniter in old town Zürich. I’ve always loved mine topped with a fried egg, bacon and melted cheese. Yum….

Perfect low carb Rösti
I really wasn’t very optimistic about this dish and Mr. Swiss Paleo was downright skeptical. We were both proven wrong and we thought celery hash browns were delicious. They have a creamy sweet taste and not an over powering celery taste. If I didn’t know it was celery root, I would never be able to guess.
Breakfast
Ingredients
- 1 or 2 celery roots, depending on how much you want to make
- coconut oil, ghee or lard for pan frying (we used lard)
- salt and pepper to taste
- topping of choice
Instructions
- Peel the celery root with a paring knife or vegetable peeler.
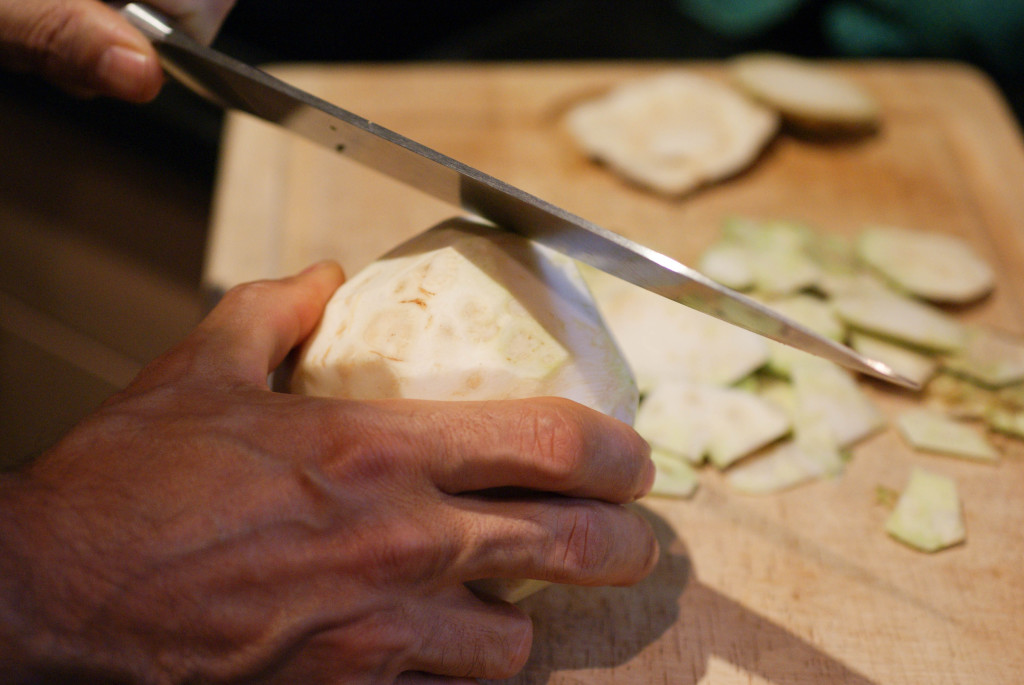
Peel your roots
- Chop it into chunks and grate it with a hand grater or in a food processor (I used my food processor).
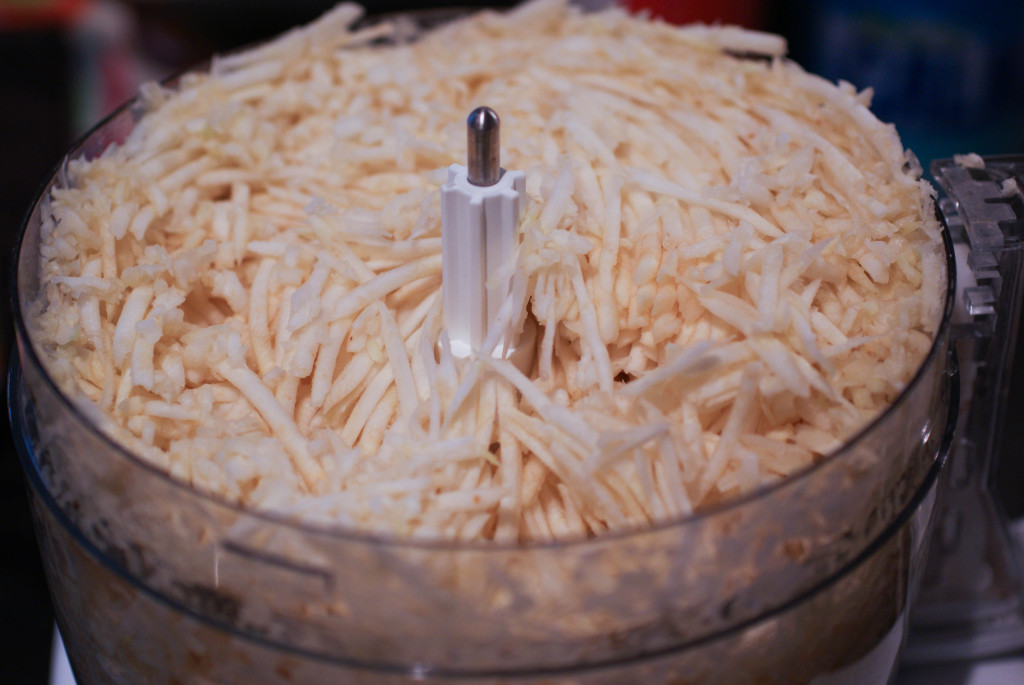
Grated
- Add salt and pepper to taste to the grated celery root.
- Heat the oil in a frying pan over medium high heat.
- You can either make individual smaller hash brown patties or you can fill your pan and make one large Rösti (which you then can cut into wedges for serving).
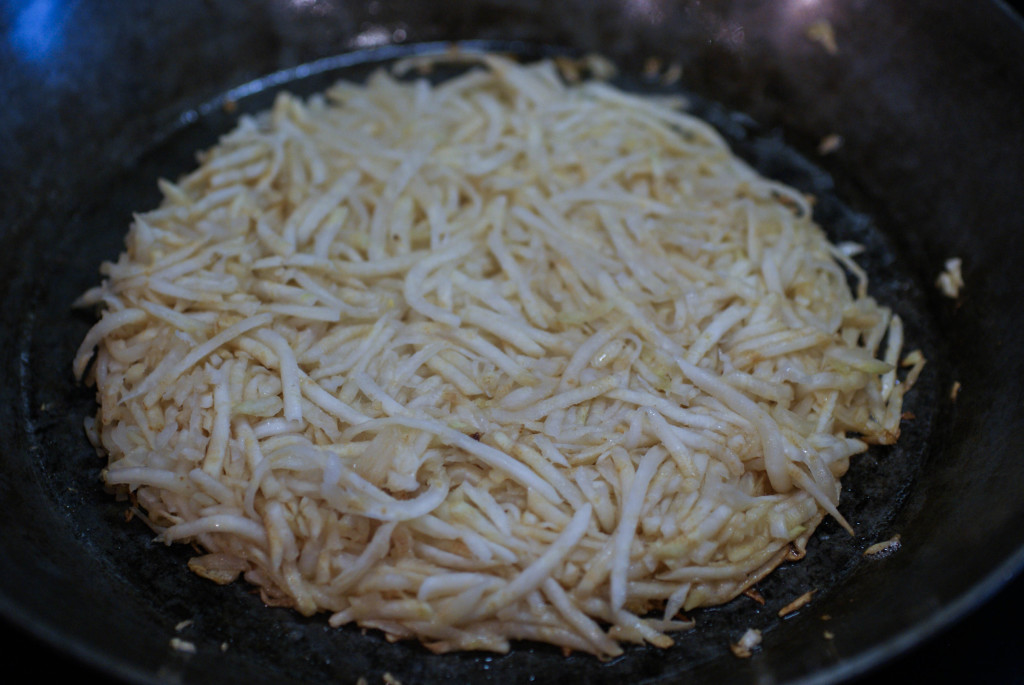
Before flipping
- Cook anywhere from 10-20 minutes before flipping. You don’t want to attempt flipping until it’s well browned on the bottom. If you have filled your pan for a large Rösti, it’s easiest to to flip it by inverting it onto a plate and then sliding it back into the pan.
- Cook a further 10- 15 minutes until browned again.
- Serve with scrambled or fried eggs, bacon, tomato salsa, roasted vegetables….whatever you like!
Perfectly browned


Ingredients
- 1 or 2 celery roots, depending on how much you want to make
- coconut oil, ghee or lard for pan frying (we used lard)
- salt and pepper to taste
- topping of choice
Instructions
- Peel the celery root with a paring knife or vegetable peeler.
- Chop it into chunks and grate it with a hand grater or in a food processor (I used my food processor).
- Add salt and pepper to taste to the grated celery root.
- Heat the oil in a frying pan over medium high heat.
- You can either make individual smaller hash brown patties or you can fill your pan and make one large Rösti (which you then can cut into wedges for serving).
- Cook anywhere from 10-20 minutes before flipping. You don't want to attempt flipping until it's well browned on the bottom. If you have filled your pan for a large Rösti, it's easiest to to flip it by inverting it onto a plate and then sliding it back into the pan.
- Cook a further 10- 15 minutes until browned again.
- Serve with scrambled or fried eggs, bacon, tomato salsa, roasted vegetables....whatever you like!